Applies to: SharePoint Online
Description
NITRO Copilot can be used by end users to get comprehensive answers to their questions. And Help Desk staff users can easily generate responses for their Tickets.
NITRO Copilot leverages the latest AI technologies along with an organization’s existing information and data to provide relevant and accurate answers to user inquiries.
Organizations can now use their data to provide users with a self-serve Copilot that integrates with the NITRO Help Desk.
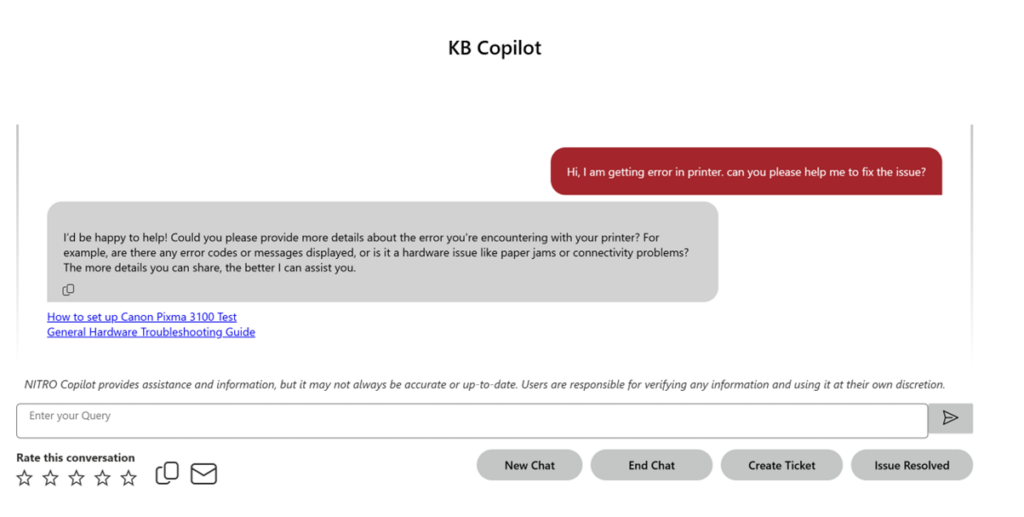
If users still need help after making an inquiry to NITRO Copilot, they can escalate the request to the Help Desk with just a click. The request is auto-populated based on the conversation with Copilot, saving time for the user and staff.
This article describes the steps to configure copilot in NITRO Studio.
Prerequisites
Copilot can work with different data sources; prerequisites vary based on the type of data source for the knowledge base that is used to generate the answers.
Please refer this article for more details on Azure Services: Instructions to create Azure Services – Crow Canyon Software Support
Summary of steps
- AI services connections in NITRO Studio
- Configure NITRO Copilot settings
- Add NITRO Copilot component in a SharePoint site page
- KB Copilot in NITRO Helpdesk
Detailed description
AI Connections in NITRO Studio
Connections are a way to authenticate and consume both Microsoft and other resources within your Azure AI Studio projects.
Below are the supported connection types in NITRO Copilot.
| Connection Type | Description |
| Azure Open AI | Azure OpenAI Service provides REST API access to OpenAI’s powerful language models including GPT-4o, GPT-4 Turbo with Vision, GPT-4, GPT-3.5-Turbo, and Embeddings model series. |
| Open AI | OpenAI is a cloud-based platform that allows developers to access a variety of models hosted by OpenAI, configure and submit prompts to said models and use their generative outputs in automations. |
| Document Intelligence AI | Document Intelligence is an AI service that applies advanced machine learning to extract text, key-value pairs, tables, and structures from documents automatically and accurately. |
| Azure AI Search | Azure AI Search is an Azure resource that supports information retrieval over your vector and textual data stored in search indexes. |
To configure the connections in NITRO Studio, go to the site -> Site Settings -> Crow Canyon NITRO Site Settings -> Expand “AI Connection Settings” and configure the connections as shown below:
Azure Open AI Connection Settings:
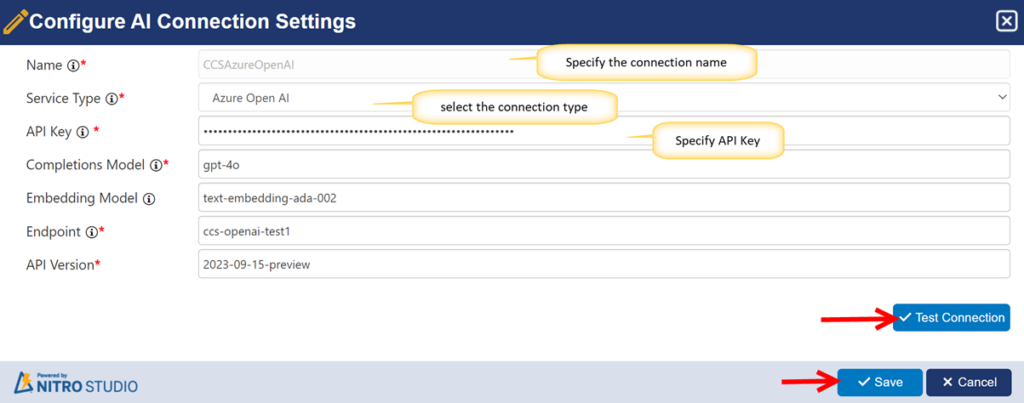
Name: Specify the connection name.
Service Type: Select the type of service you are using from the dropdown.
API Key: Enter the API key provided by the service provider. API key is a unique authentication token that grants access to the AI service capabilities, including text generation and natural language processing. API key value can be accessed from the settings of the Azure Open AI resource in the Azure portal.
Completions Model: Enter the name of the Completion Model provided by the service provider. Models can be added to the Azure Open AI resource from the Azure portal. The completion model generates text based on the input provided, utilizing advanced natural language processing capabilities. Example: gpt -35-turbo.
Embedding Model: Enter the name of the Embedding Model provided by the service provider. Models can be added to the Azure Open AI resource from the Azure portal. The Embedding Model transforms text into numerical representations (embeddings) that capture semantic meaning and context.
Endpoint: Enter the endpoint URL provided by the service provider. This endpoint serves as the gateway for making API requests to utilize advanced AI capabilities such as text generation and natural language processing. Endpoint URL value can be accessed from the settings of the Azure Open AI resource in the Azure portal
API Version: Enter the API Version provided by the service provider.
Open AI Connection Settings
These details can be accessed from your Open AI subscription settings.

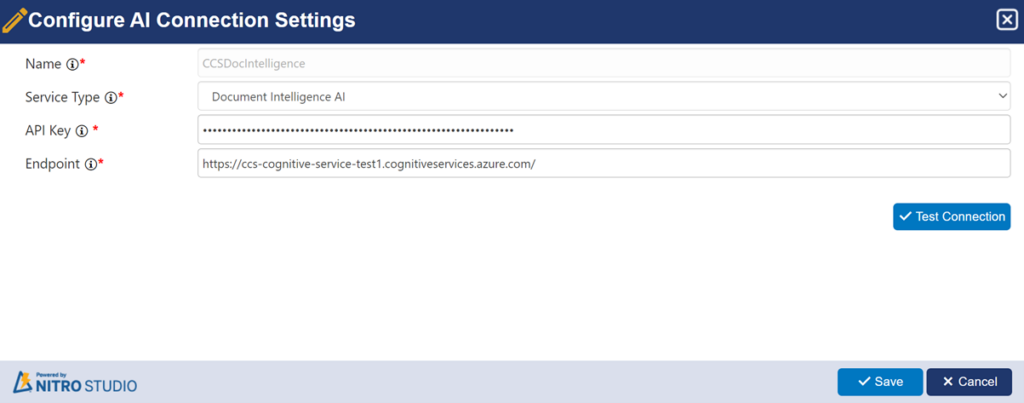
Document Intelligence AI Connection Settings
For document intelligence AI connection, users need Azure AI services multi-service account. API key and Endpoint value can be accessed from the corresponding resource in Azure portal.
Azure AI Search Connection Settings
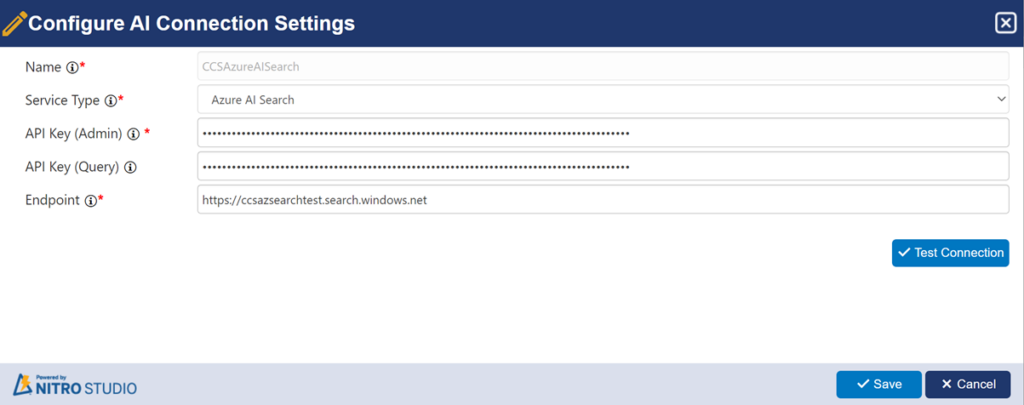
API Key (Admin): Enter your Admin API key to authenticate and authorize administrative tasks and configurations for Azure API search. This key grant access to manage indexes, query settings, and other administrative functions within your Azure API Search service. API key can be accessed from the settings of the Azure AI Search resource in the Azure portal.
API Key (Query): Enter your Query API key to authenticate and authorize queries made to Azure API search. This key allows access to perform search operations and retrieve search results from your Azure API Search service. API key can be accessed from the settings of the Azure AI Search resource in the Azure portal.
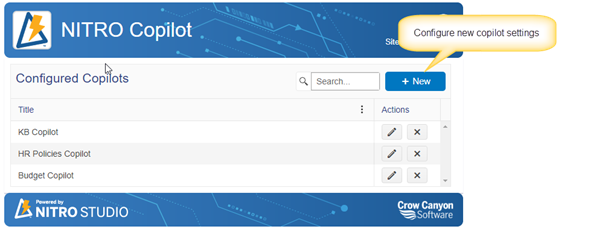
General details of NITRO Copilot
To configure NITRO copilots, navigate to the URL below manually.
##SiteURL##/CrowCanyonAppsLib/nitroai/copilot/default.aspx
##SiteURL##: Replace the placeholder with the site URL
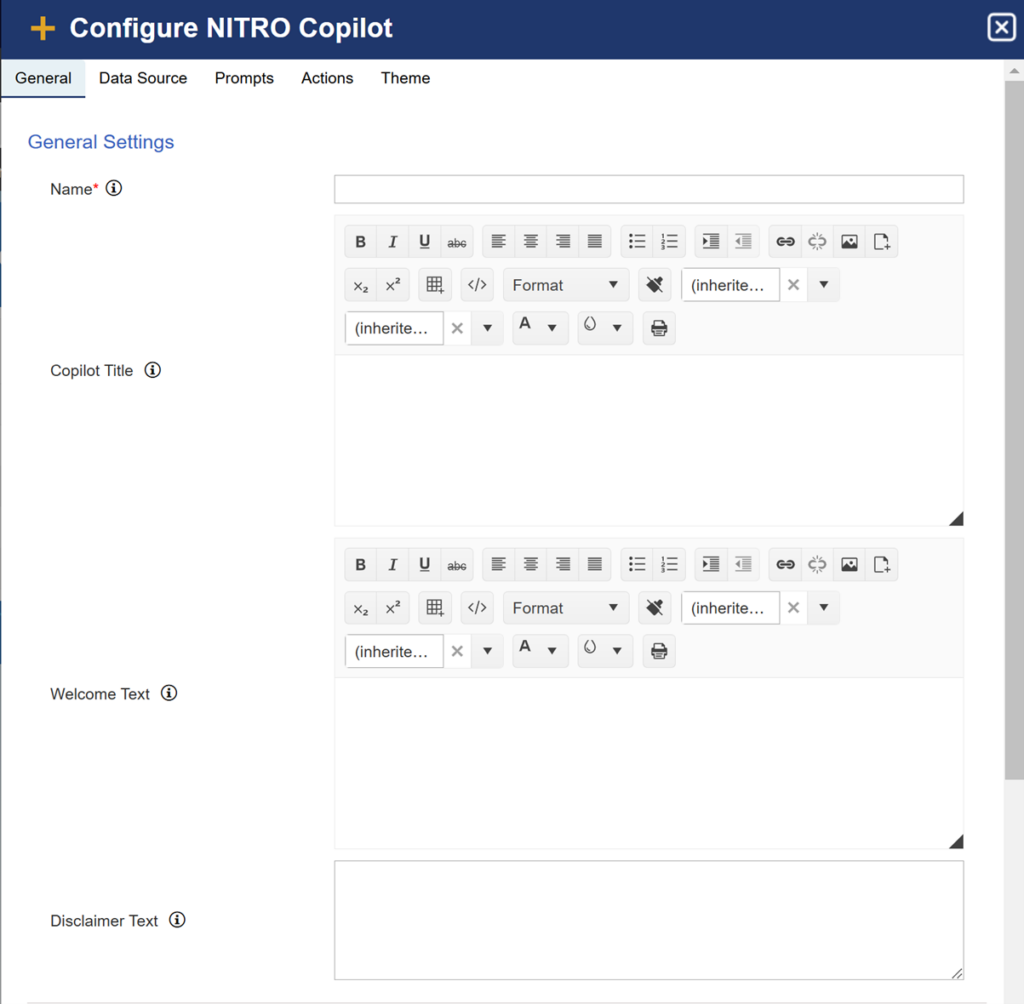
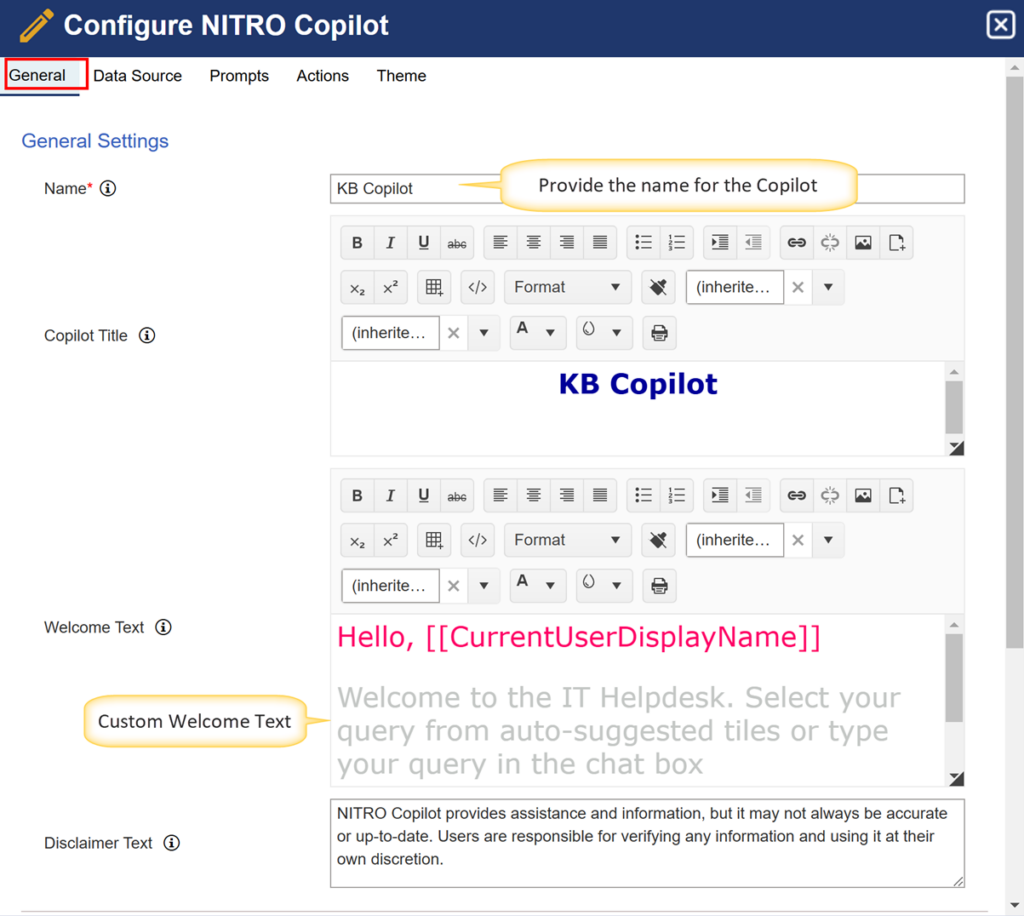
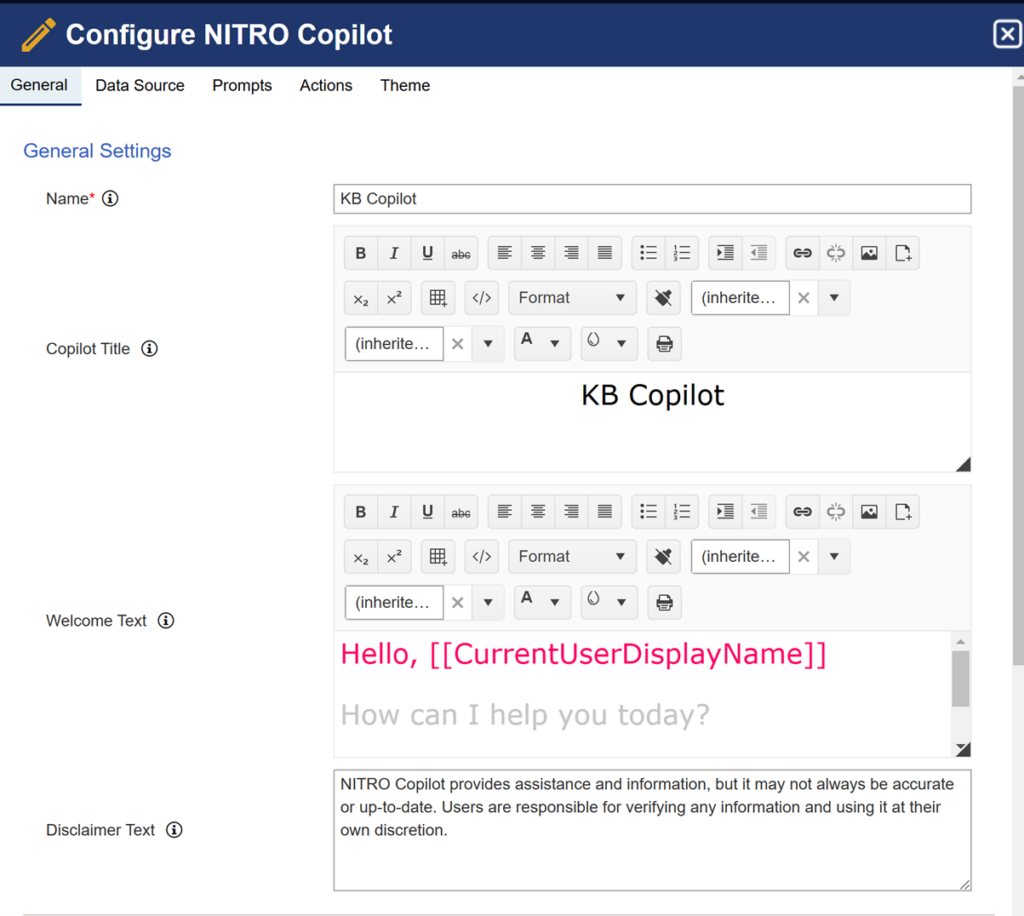
General Settings
Name: Specify the name for the copilot. The name will be shown on the copilot page.
Copilot Title: Specify the copilot title. Copilot title will be shown at the top of the copilot.
Welcome Text: Specify the welcome text for your Copilot search application. This text will greet users and provide initial guidance or instructions on how to use the application effectively.
Example: Welcome to Copilot search! Start typing your query or question to begin exploring insights and information.
Leave this blank to use the default welcome text in the Copilot web part.
Supported placeholder: [CurrentUserDisplayName]]
The above placeholder will be replaced with the current logged-in user’s name.
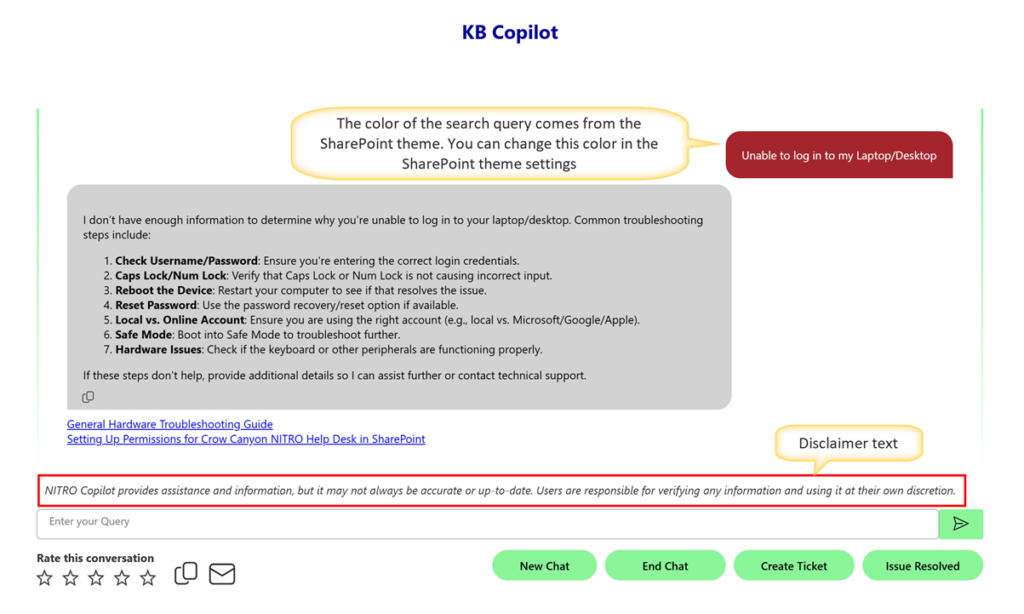
Disclaimer Text: Disclaimer for NITRO Copilot response, shown at the end of the answer below the list of document sources. To remove the disclaimer from the copilot response, remove the disclaimer text.
General
General Settings configuration Example:
Sample Output of General Settings:
Enter search query:
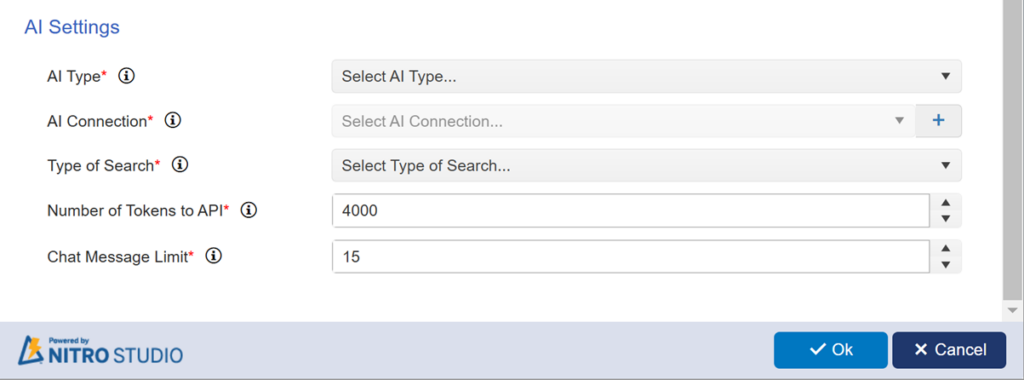
AI Settings
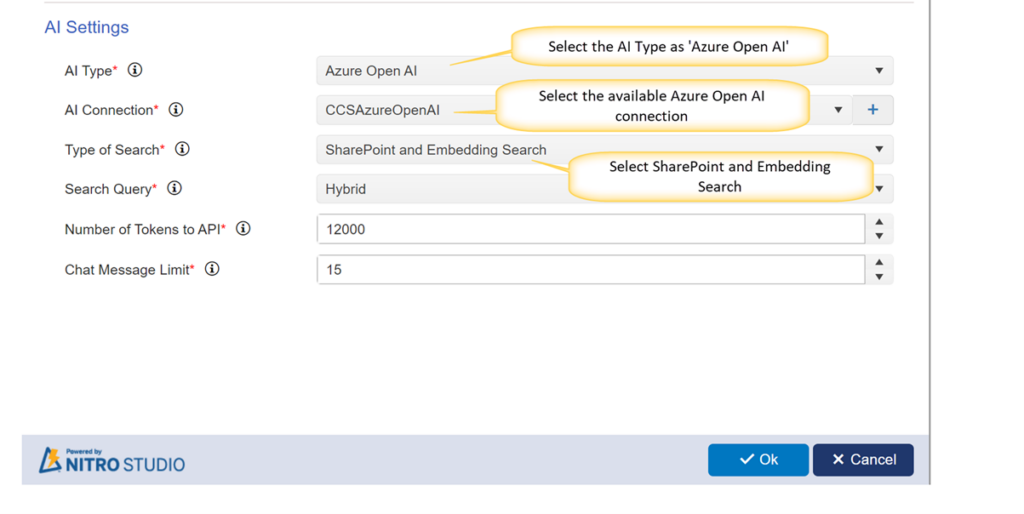
AI Type: Select the AI type as per the requirement for text generation and language processing. Below are the supported AI Types.
- Open AI
- Azure Open AI
AI Connection: Select an AI connection Configured in NITRO Site Settings. If no connection is configured yet, please click the ‘+’ button beside the dropdown to create it now.
Type of Search: Below are the supported search types. Select the type of search you wish to perform.
SharePoint and Embedding Search: Search the content using SharePoint search and the results are ranked using embeddings to capture semantic meaning and context.
SharePoint Search: Access and retrieve information stored within SharePoint repositories. Benefit from SharePoint’s robust document management and collaboration features.
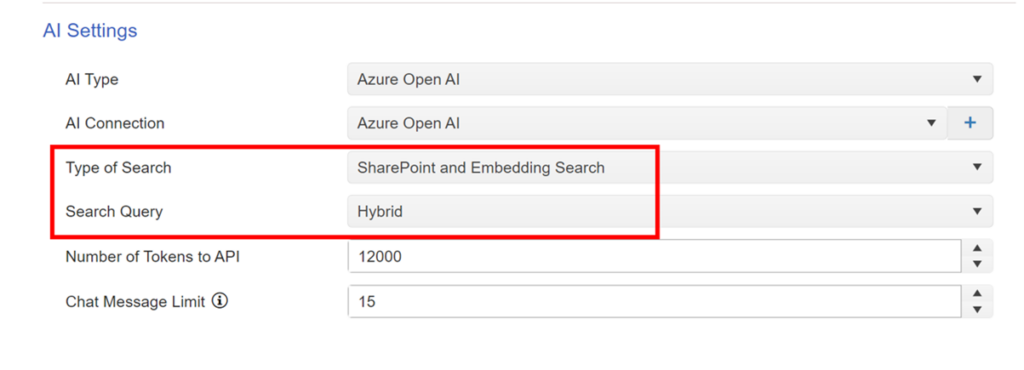
Search Query:
Search query will be shown only if the “Type of Search” is “SharePoint Search” or “SharePoint and Embedding Search”
It provides three options for search query input.
- User Input
- Key Phrases & Synonyms
- Hybrid
User Input: Keywords and phrases entered by the user in Copilot will directly be used to search for relevant information.
Key phrases & Synonyms: Instead of using the user-entered text directly, Copilot will send it to the AI service to extract keywords and synonyms. These keywords and synonyms will be used for the actual search.
Hybrid: Copilot will first search with user entered text. If no results are found, then it will use key phrases and synonyms
- Azure AI Search: It utilizes powerful AI-driven search capabilities provided by Azure with features like semantic search.
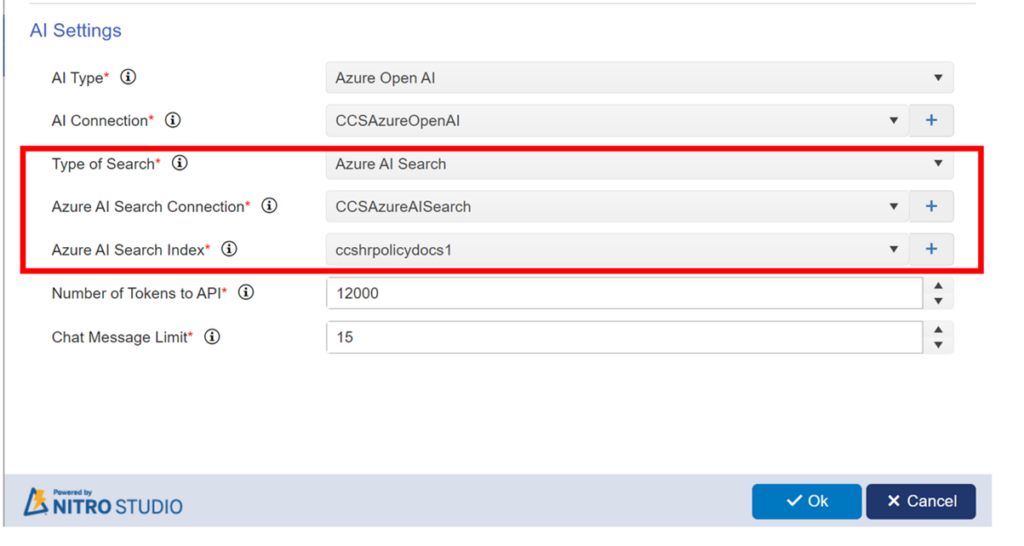
Azure AI Search Connection:
This connection will show only when we select “Type of Search” as “Azure AI Search”. Select the Azure AI Search connection to establish a connection with Azure AI Search. This connection allows the Copilot search application to interact with Azure AI Search Services, enabling powerful search capabilities. This dropdown will show the existing Azure AI search connections configured in the NITRO Site Settings.
Also, we can create a new connection using the plus (+) icon.
Azure AI Search Index:
Select the Azure AI Search index you wish to query within your Copilot search application. In Azure AI Search, indexes are used to store the extracted data from the documents and make them available in the search.
The index represents the structured data repository where Azure AI Search stores and retrieves searchable content.
This dropdown will show the existing search indexes in the Azure AI Search. We can also create a new index using the plus (+) icon.
Number of Tokens to API:
Tokens can be thought of as words or pieces of words. 75 words are roughly equivalent to 100 tokens. Passing more tokens to AI APIs will give better results but will incur higher cost.
Specify the number of tokens to the API as per the selected AI connection and the completion model. Different models have different limits for allowed number of tokens.
Chat Message Limit:
Specify the number of messages the user is allowed to send in one conversation with the copilot. Users can start a new chat once this limit is reached.
Data Source
A data source in NITRO Copilot refers to the location where documents are stored and from which Copilot retrieves information.
Some possible options include:
- SharePoint Document Libraries
- SharePoint lists
Data source for Azure AI Search
Data source lists are not required for the Azure AI search as it will search content from the search index selected in the general settings.
Data Source for SharePoint Search, and SharePoint and Embedding Search in AI Settings (General Section):
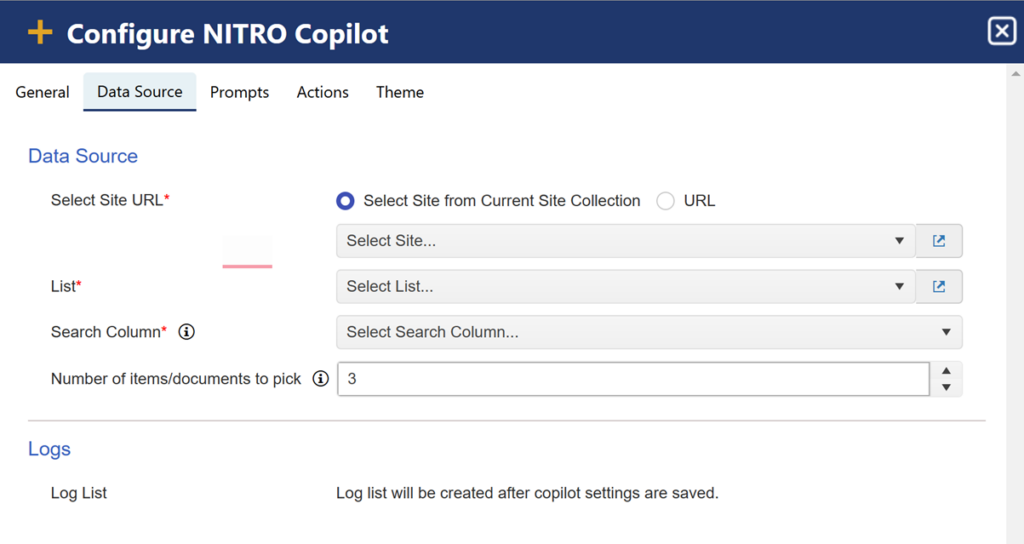
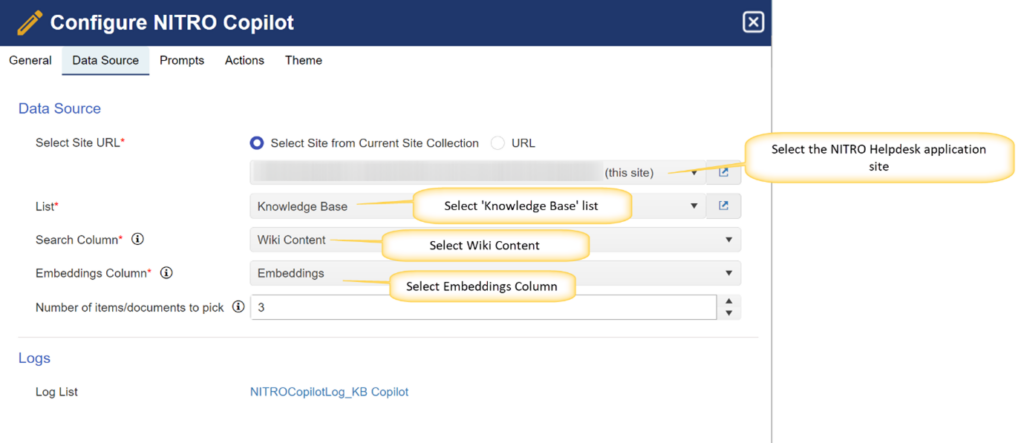
Select Site URL: Select the site URL for the data source list.
List: This dropdown will show all the available lists from the selected site. Search column can be selected from a
- Custom list or
- Document library list.
Search Column:
For a custom list, select the search column from the dropdown where Copilot will look for relevant information. For a document library, the DocContent column is automatically created. This column stores the extracted text from documents, making them searchable. Copilot searches within this column When it needs to find specific details, such as policy information. Example: If an employee asks, “What is the leave policy?”, Copilot will scan the DocContent column to retrieve the most relevant information.
Number of items/documents to pick: Enter the maximum number of documents or items you wish to retrieve as search results in the SharePoint Search. This number determines how many search results will be displayed or processed based on your query.
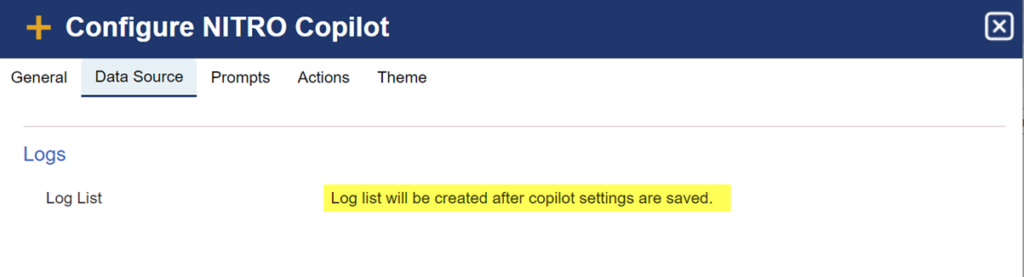
Logs: Copilot stores its logs in the SharePoint list, and these can be analyzed by administrator or Crow Canyon support whenever required. It keeps track of system activities, user actions, and errors. It helps in monitoring performance, fixing issues, and improving Copilot responses.
Detailed explanation of lists selected in Data Source
Custom List: To search within a specific list, select the desired list from the available options. If you choose a custom list, the ‘Embeddings Column’ will become visible.
Example settings for KB Copilot:

Embeddings Column: This column will store the embedding value of the search column content. This is used to better match the content with the user query based on the semantic meaning of the user query.
Connection Between Copilot and Embedding Action in Workflow:
NITRO Copilot utilizes embeddings to understand and process user queries effectively.
The ‘Calculate Embedding‘ action in NITRO Workflows generates these embeddings for your list items. When a new item is added or an existing item is updated, this action computes the embedding for the specified content and stores it in the ‘Embeddings Column’. Copilot then references these embeddings to deliver contextually relevant responses to user queries.
Document Library:
If a customer wants to use Copilot to find information within their documents, they first need to store the documents in a SharePoint Document Library. However, for Copilot to understand and retrieve content effectively, the text from these documents must be extracted and indexed. This is where the Document Intelligence action in Nitro Workflows comes in.
After running the Document Intelligence action, the extracted content becomes available in SharePoint, making it accessible to Copilot.
If the content is stored in a SharePoint List, customers should select that list as the data source in Copilot.
If the content is stored in the Document Library, Copilot will automatically use the “DocContent”(automatically created) column, where the extracted text is indexed for search.
Example Settings:
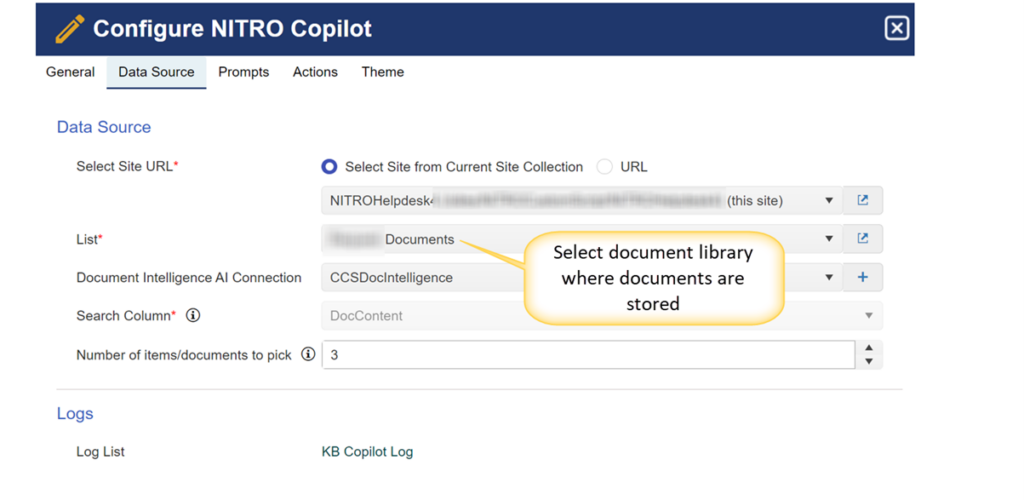
Document Intelligence AI Connection:
The Document Intelligence AI Connection (set as Azure Doc Intelligence in the example) enables Copilot to analyze and extract information from documents. If this is set up:
- Copilot can automatically read, understand, and extract key details from documents.
- Without the connection, Copilot can only retrieve metadata like file names, not document content. For example, if asked about the HR leave policy, Copilot can return the file name but not the text. To enable content-based searches, the Document Intelligence AI connection is needed; otherwise, Copilot can only list documents.
This dropdown will show the existing Document Intelligence connections configured in the NITRO Site Settings. Also, we can create a new connection using the plus (+) icon.
Note: Users can create a workflow in Nitro Workflows that includes the Document Intelligence action to process and manage documents efficiently. This action automatically stores the documents in a designated target location, making them easily accessible for future use. Once the documents are stored, users can select this target location as a data source in Copilot. This setup ensures that all processed documents are indexed and available for search, improving Copilot’s ability to retrieve relevant information when needed.
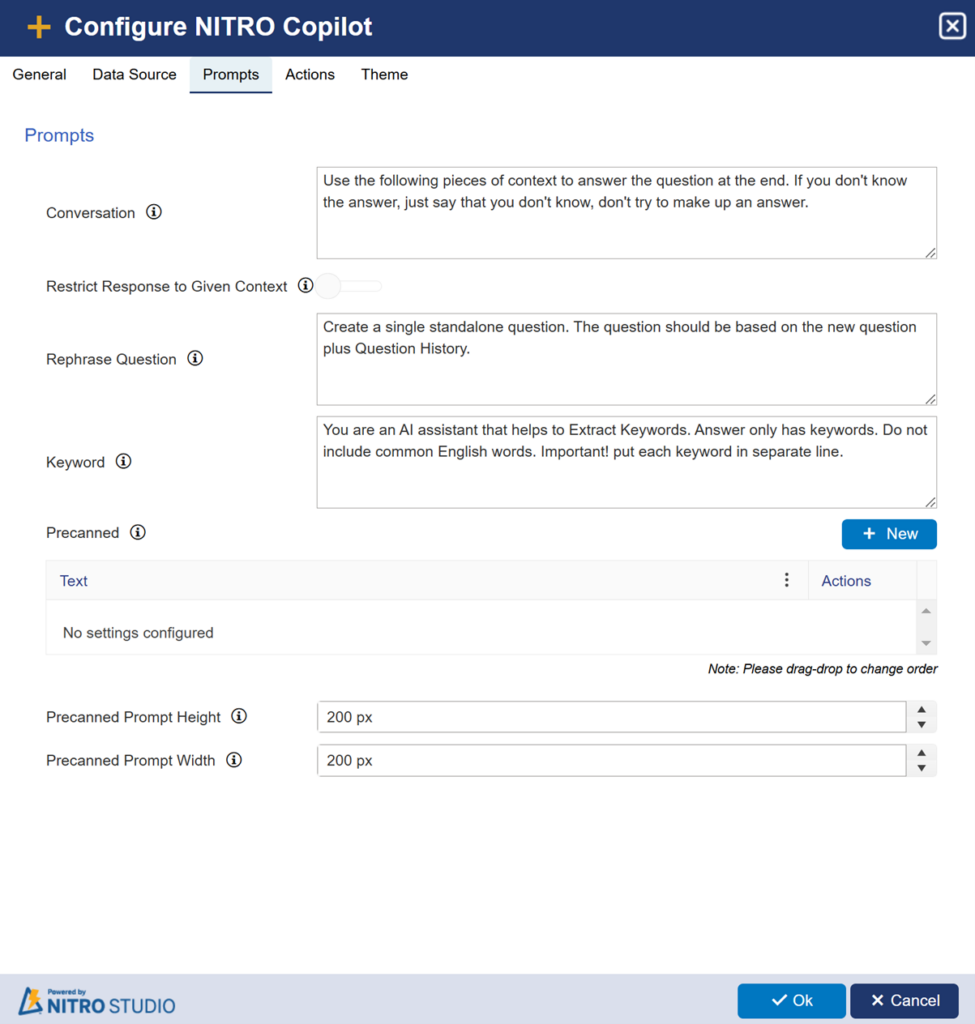
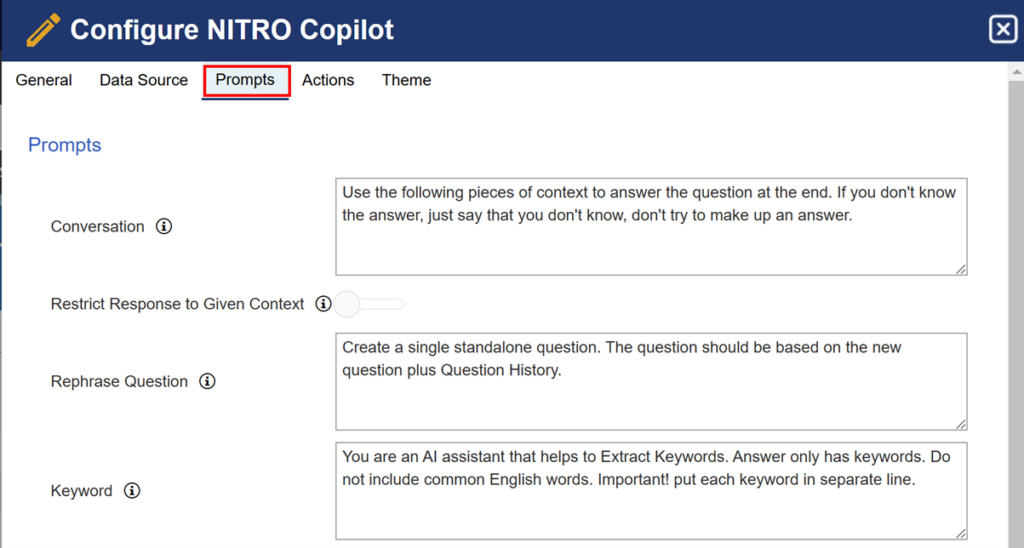
Prompts
Prompts are the instructions to AI to get the desired response. These can be tweaked as per the requirement.
Sample Prompt Configuration:
Conversation: Input to LLM (Large Language Model) AI to generate the answer based on user query and search content.
- In this setting, Input to LLM (Large Language Model) AI means that the user’s query and any relevant search content are provided as input to the AI model.
- The AI then generates a response based on this input, leveraging its language processing abilities to provide a coherent and relevant answer.
Restrict Response to Given Context: This is an optional setting that can be enabled to control how the AI generates its responses.
- When Checked:
- The AI is instructed to only use the provided context to formulate its response.
- It is not allowed to provide general answers or make any assumptions outside of the given context.
- This ensures the response remains accurate, relevant, and consistent with the information provided, avoiding general answers that may not be relevant to your organization.
If Restrict Response to Given Context option is enabled, the following text is added to the conversation prompt:
“Only use the provided context to answer the question. If the context is not there or not relevant to the question, then do not fabricate or make up the answer. Strictly ensure that the response is relevant to the context given and maintains coherence with the topic.”
If Restrict Response to Given Context option is disabled:
When the “Restrict Content” option is disabled in NITRO Copilot’s conversation prompt settings, you have the flexibility to include additional information directly within the conversation prompt. This allows the AI to generate responses based on both the user’s query and the provided context.
Sample Output without enabling Restrict Response to Given Context:
Sample Output with enabling Restrict Response to Given Context:
Rephrase Question: Input to LLM (Large Language Model) AI to rephrase the question based on the latest user query text and the conversation history.
Keyword: Input to LLM (Large Language Model) AI to extract the keywords from user query text.
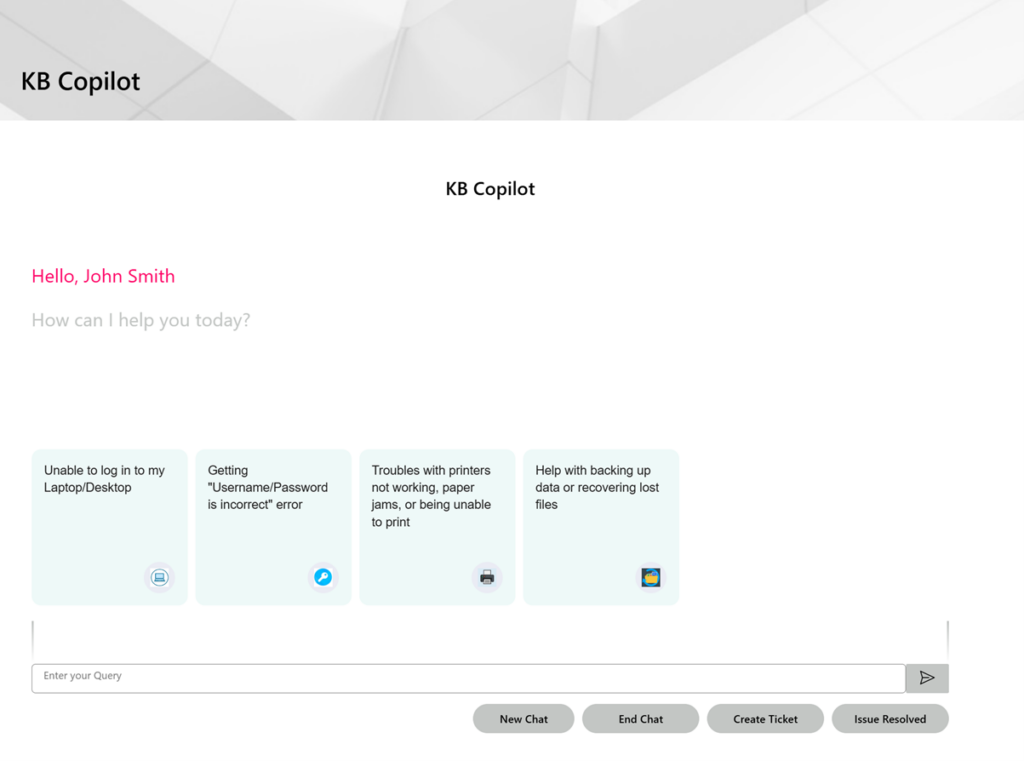
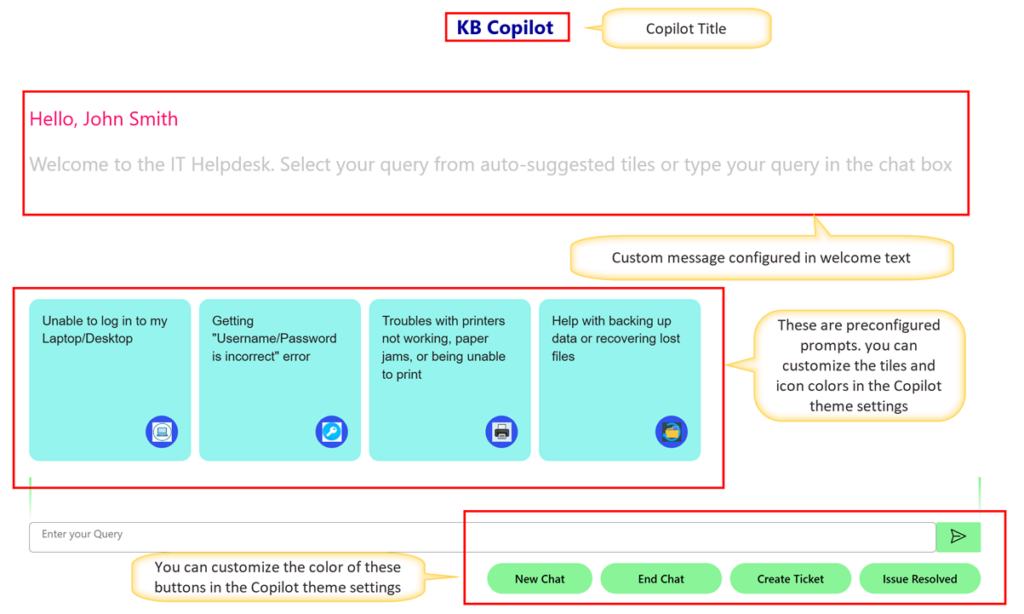
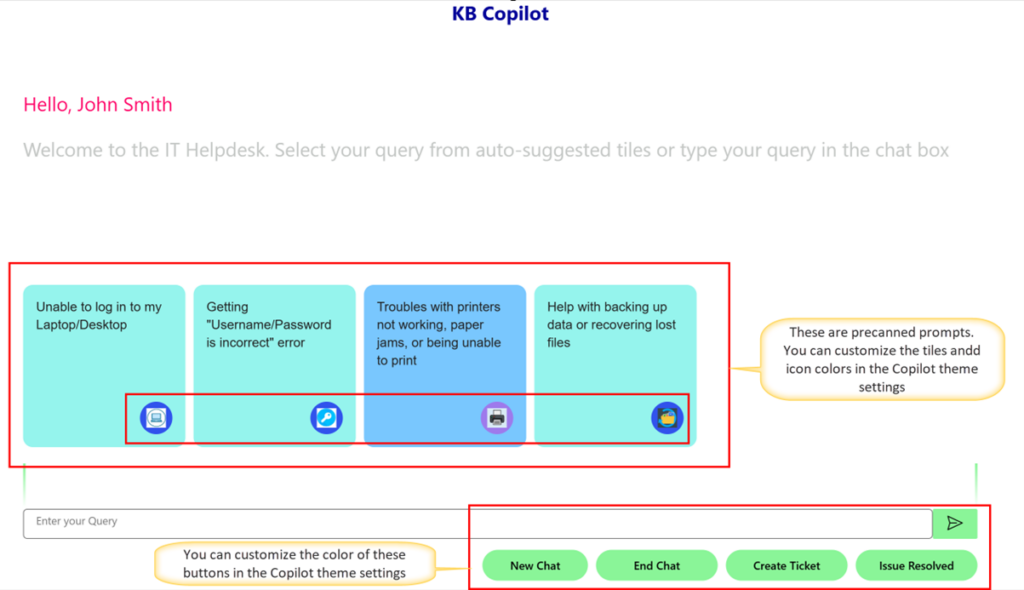
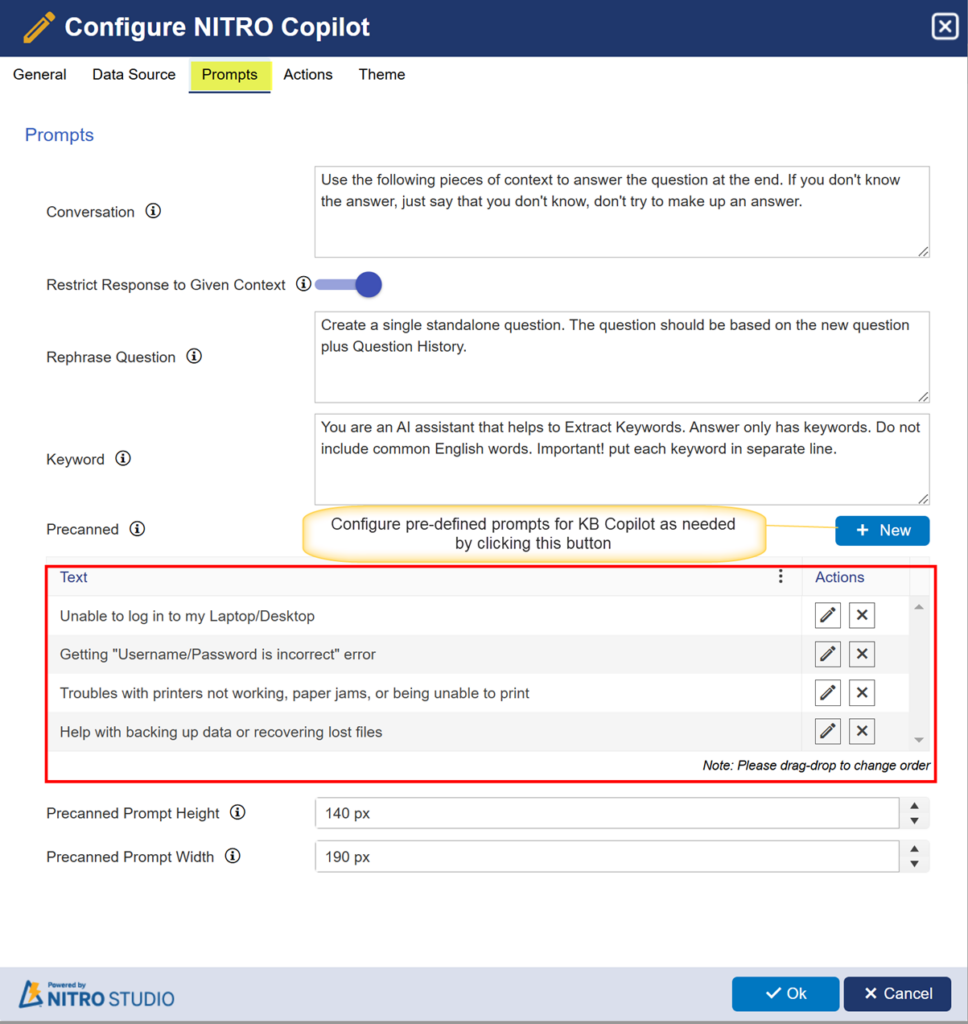
Precanned: Tiles for frequently used queries from the users. These are designed to quickly address common queries or actions within the Copilot application.
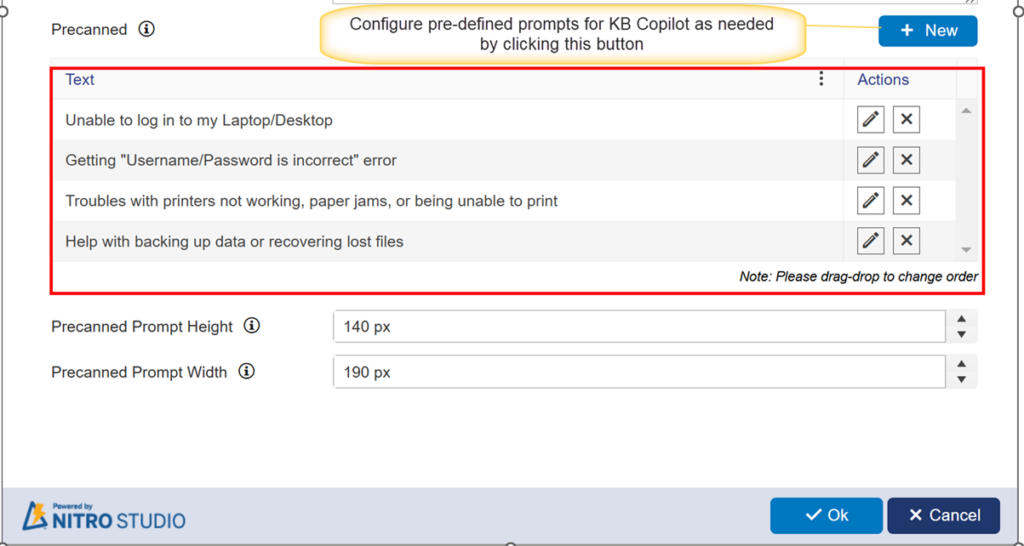
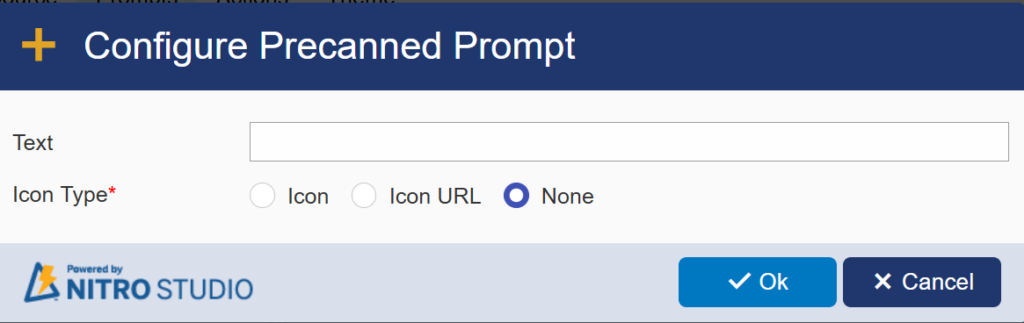
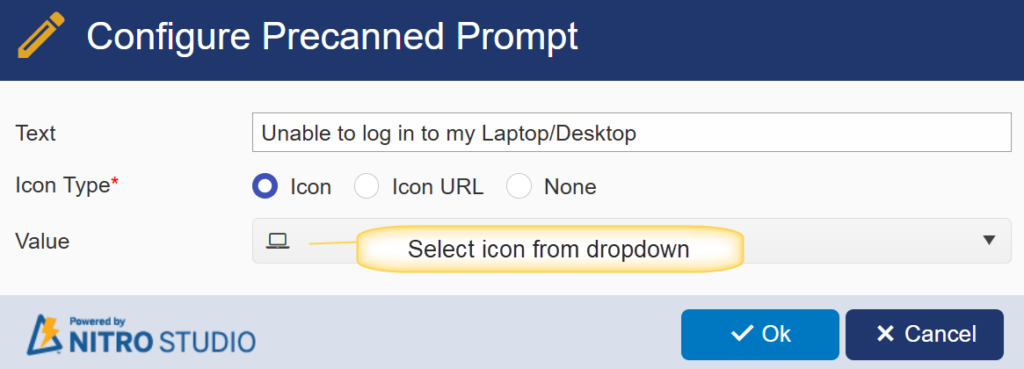
You can create a new Precanned prompt by clicking the ‘New’ button.
Sample configuration:
Or provide Icon URL as shown below
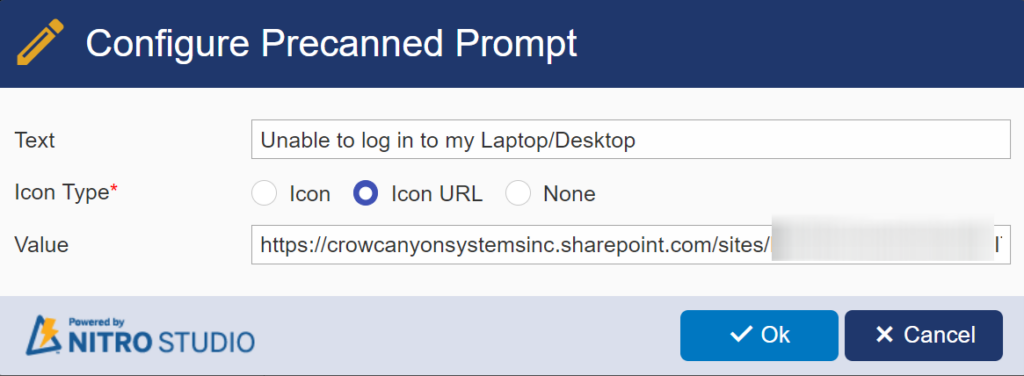
Upload the icon in any folder in Site Assets, then copy the link.
Sample URL used above: [[Site URL]] /SiteAssets/Icons/Laptop.png
Precanned Prompt Height: Specify the height (in pixels)of the tiles to display precanned requests in your copilot application.
Precanned Prompt Width: Specify the width (in pixels)of the tiles to display precanned requests in your copilot application.
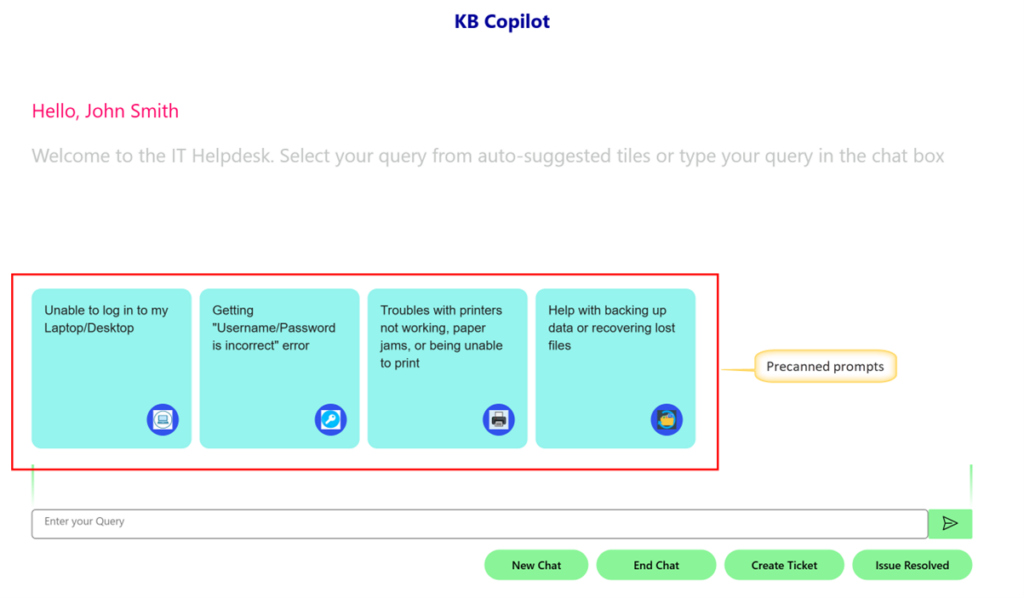
Sample Output:
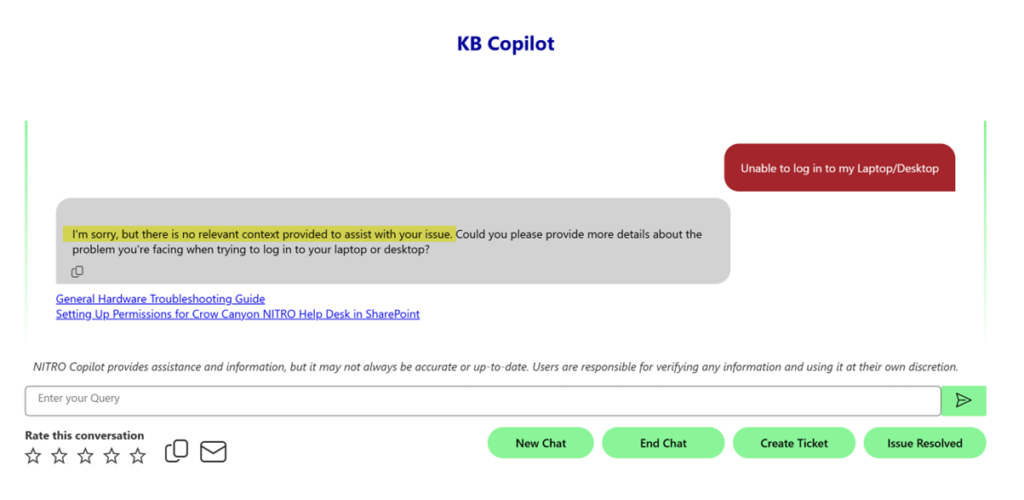
Configured Precanned prompts will be shown in the NITRO Copilot webpart as shown below:
Actions:
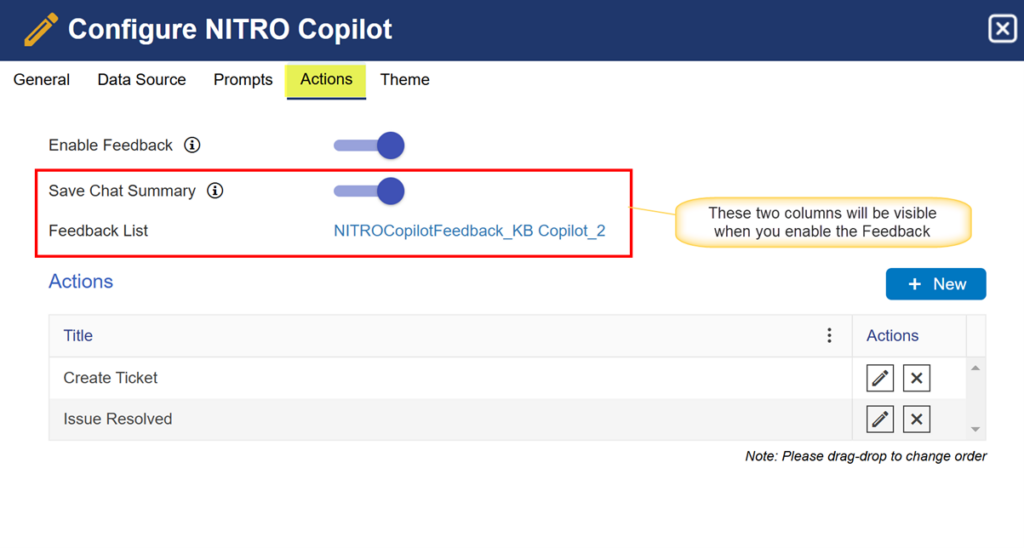
Enable Feedback: Enables users to give feedback rating for the conversation. This feedback is stored in a list and can be used by admins to analyze the effectiveness of the copilot. Knowledge-based content can be added and improved based on the types of queries asked by the users.
Save Chat Summary: Enable this setting to copy the conversation along with the feedback.
Feedback List: The feedback list will be created automatically when we save the copilot settings. All the feedback will be saved in this list.
Actions:
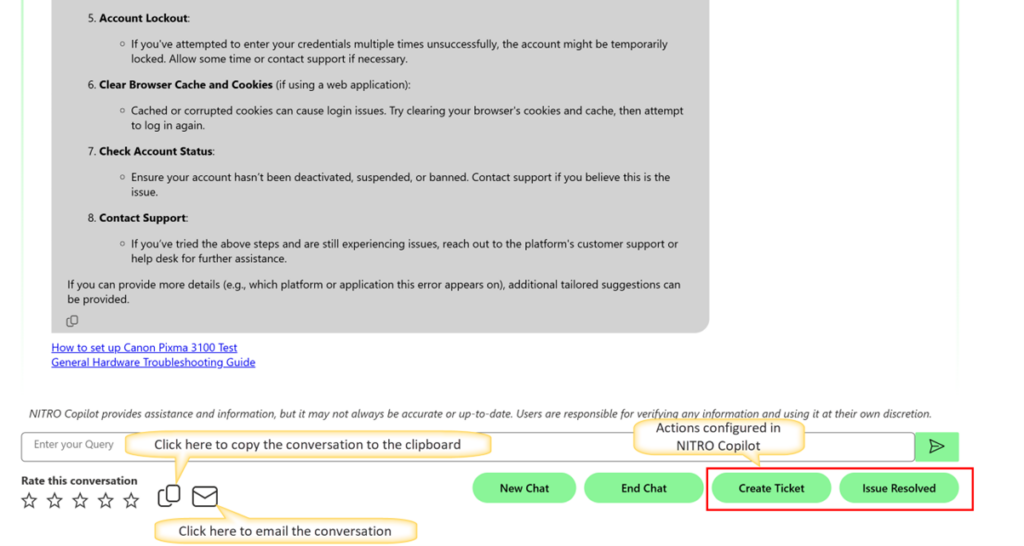
Configure actions to escalate the request to the helpdesk if user query is not resolved by the copilot.
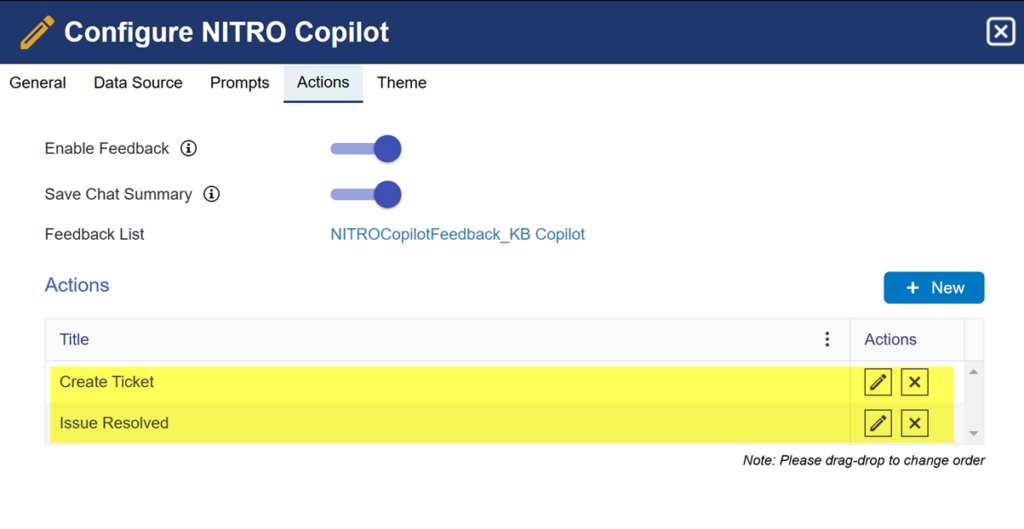
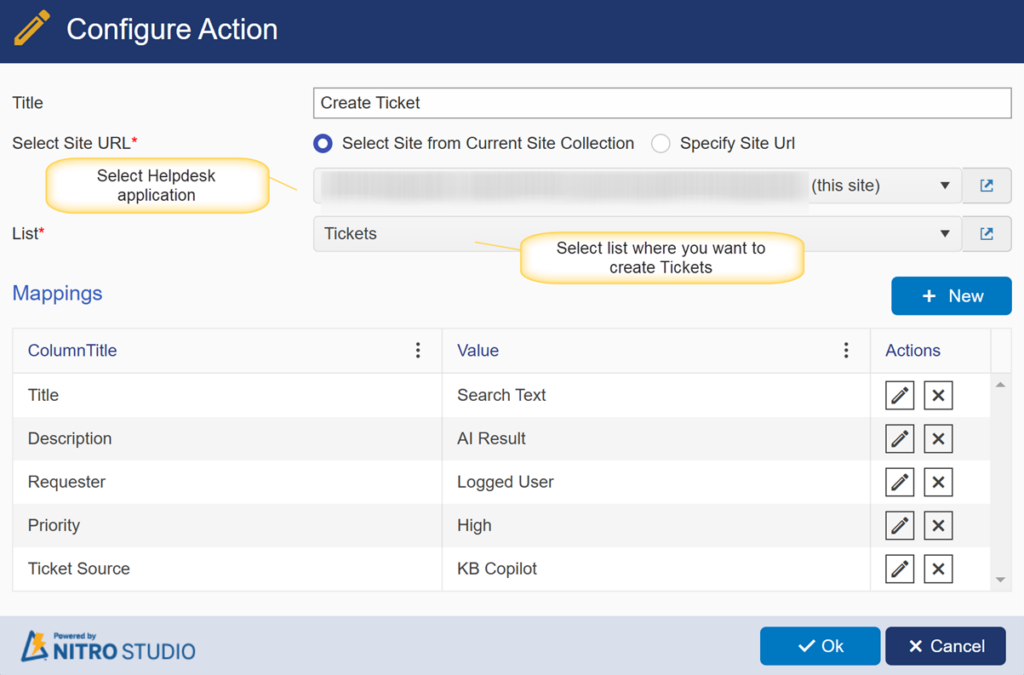
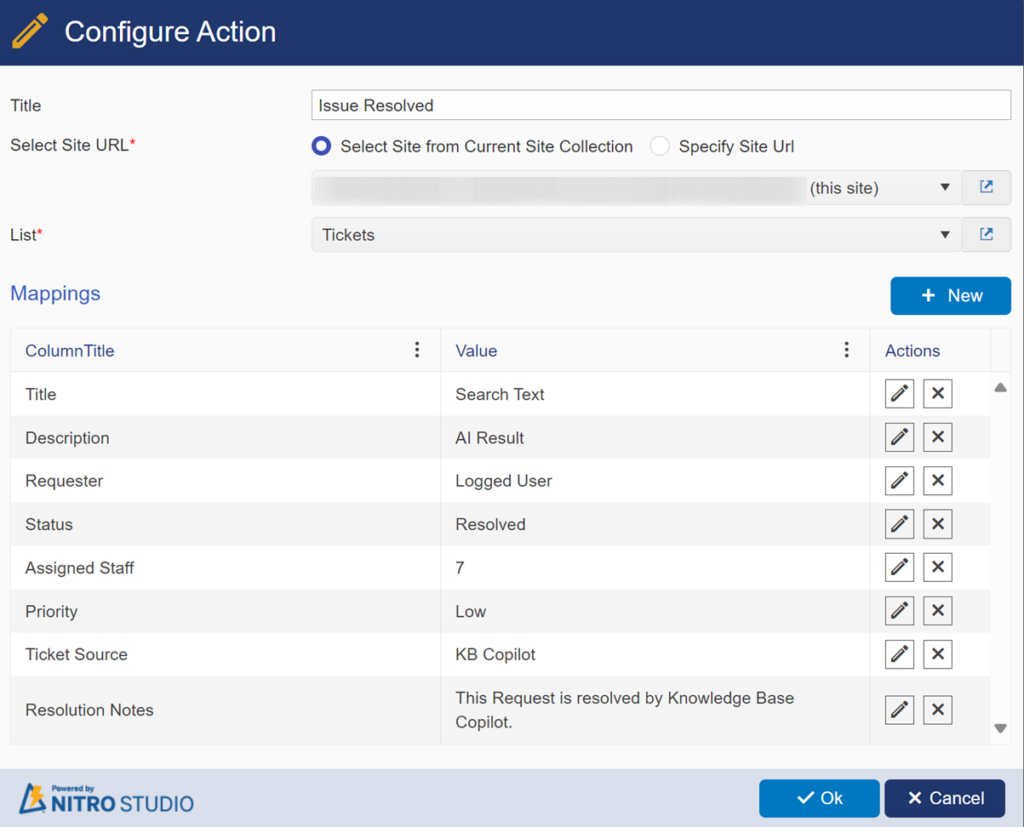
Create Ticket Action:
Issue Resolved
Sample Output:

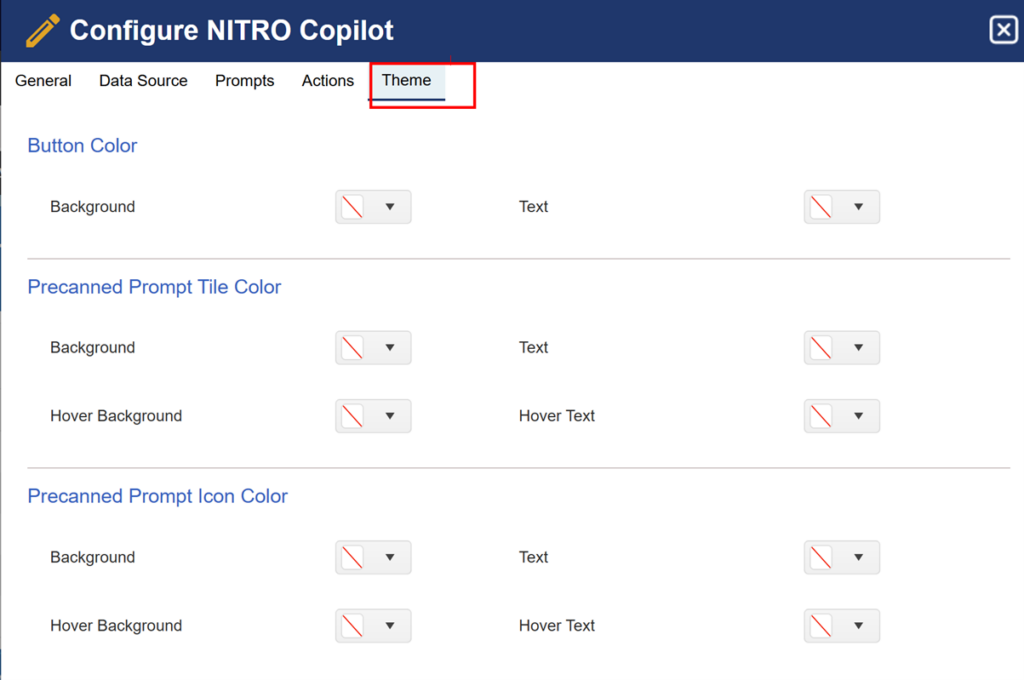
Theme
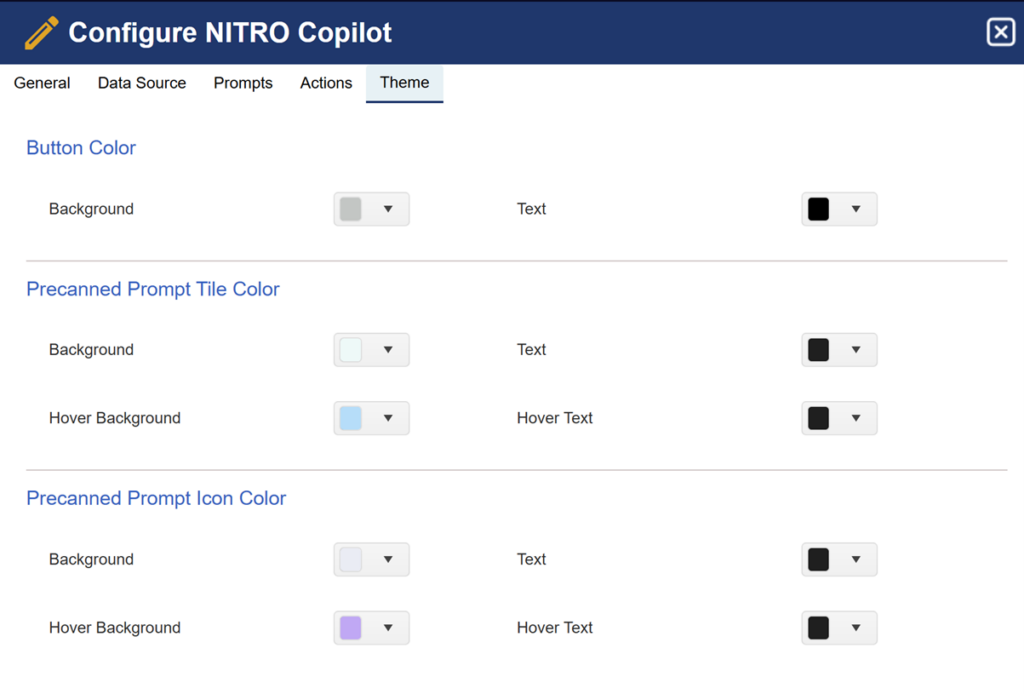
It allows users to customize the appearance of various UI elements, including button colors and pre-canned prompt tiles. Users can configure the theme as required.
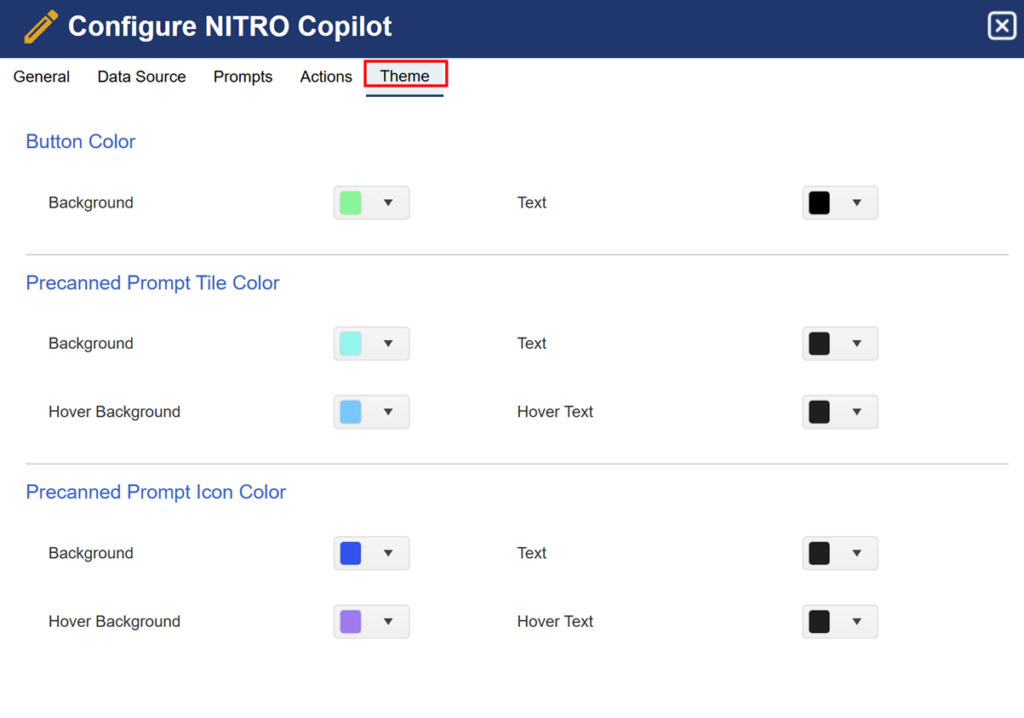
1. Button Color
- Background and Text: Allows customization of the background and text color for buttons.
- The dropdowns let you select different colors or keep the default theme.
2. Pre-canned Prompt Tile Color
- Background and Text: Sets the background and text color for pre-canned prompt tiles.
- Hover Background and Hover Text: Configures colors when hovering over the prompt tiles.
3. Pre-canned Prompt Icon Color
- Background and Text: Customizes the colors of icons within pre-canned prompts.
- Hover Background and Hover Text: Changes the icon colors when hovered over.
Sample Configuration:
Sample output with custom theme:
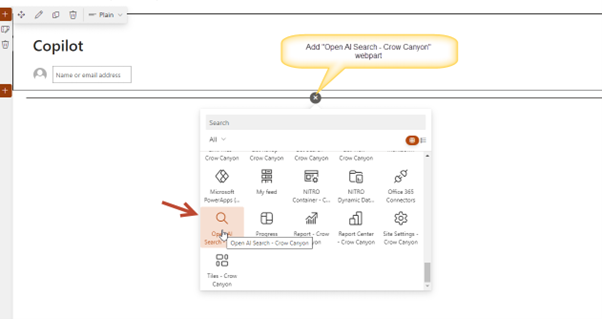
Configure the Copilot web part on the page
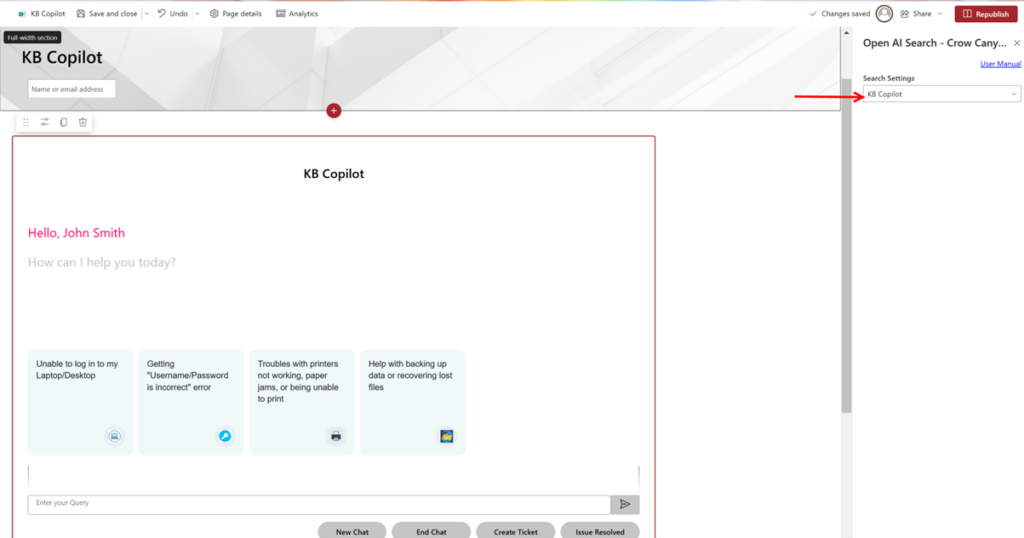
To configure the copilot web part, create a new site page, add the “Open AI Search – Crow Canyon” web part, and select the configured NITRO Copilot.
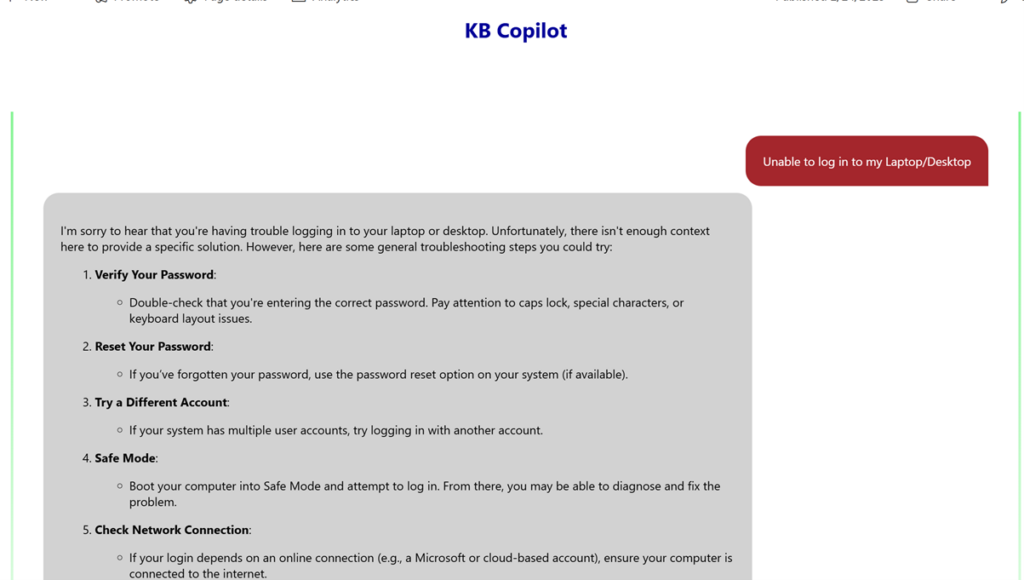
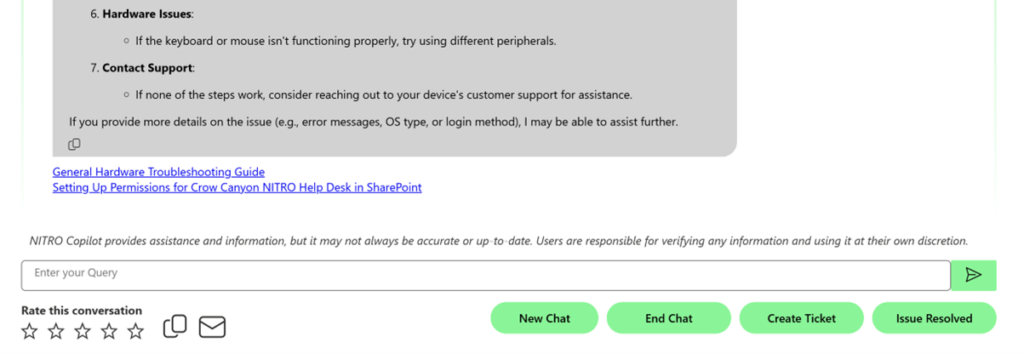
KB Copilot in NITRO Helpdesk
In this article, we have configured NITRO KB Copilot.
In NITRO Helpdesk applications, Knowledge Base is a repository of information to solve frequently occurring issues. It also has data from resolved Tickets so that users can refer to this information if they are facing a problem that has been solved before.
NITRO KB Copilot uses the repository of knowledge base articles data and provides intelligent, appropriate answers to users and reduces demand on the technicians.
In this sample use case, we have used a Knowledge Base list and below is the list of columns required for this configuration.
| Column Name | Column Type | Use in NITRO Copilot |
| Title | Single line of text | |
| Wiki Content | Enhanced rich text | Will be used as search column in NITRO Copilot |
| Embeddings | Multiple line of text-Plain | In this sample, use case we have used ‘SharePoint and Embedding Search’ and this column is used to store embedding values |
| Checksum | Single line of text | Will use this column to store checksum values |
Configurations for NITRO Copilot
Navigate to the NITRO Copilot page and configure the Copilot as shown below:
Data Source:
Prompts:
Actions:
‘Create Ticket’ and ‘Issue Resolved’ actions are explained above.
Theme:
Calculate Embeddings for Knowledge Base articles
KB Copilot uses the concept of embeddings to provide more relevant response for the user queries.
An embedding is a numerical representation of a text or data that captures the semantic meaning of the text. This is calculated using generative AI services. Embeddings are pre-calculated for the KB articles and stored in a column in the KB list. When user enters their query in the copilot, embedding value is calculated for the user query. The embedding for the user query is matched with that of KB articles and then articles that match more closely with user query are ranked higher.
Using NITRO Workflows, we calculate the embedding for the Knowledge Base article content and store it for use with the copilot.
Configure NITRO Workflows
- Calculate embedding when Knowledge Base articles created
- Configure a workflow on knowledge base article creation
- Calculate embedding when knowledge base article modified
- Configure a workflow on item updated event
Workflow: Calculate embedding when Knowledge Base article is created

Action: Calculate Embeddings
Drag and drop ‘Calculate embeddings’ action as shown below
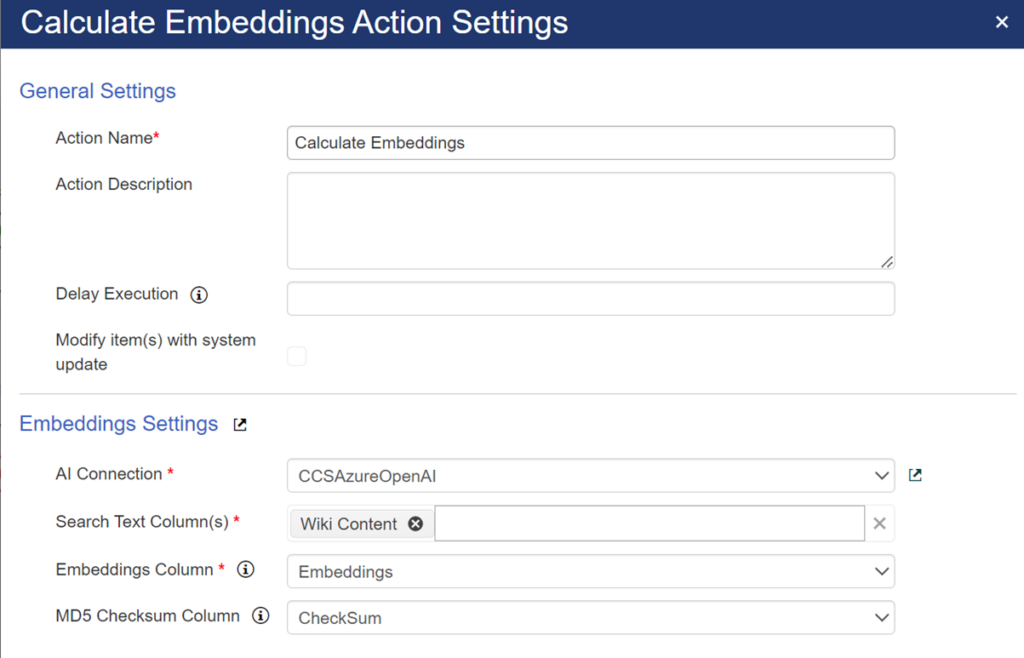
General Settings: provide action name, action description and delay execution.
Embeddings Settings:
- AI Connection: This dropdown will show all AI connections configured in NITRO site settings. select the AI Connection as required.
- Search Text Column(s): Select the column(s) for which embeddings has to be calculated. This will be the column where KB article text is stored.
- Embeddings Column: Select the multi-line text column to store the embedding value.
- MD5 Checksum Column: Select the single-line text column to store the checksum of the search text column(s). A checksum is used to detect changes in search content, and embedding is recalculated only if the content has changed.
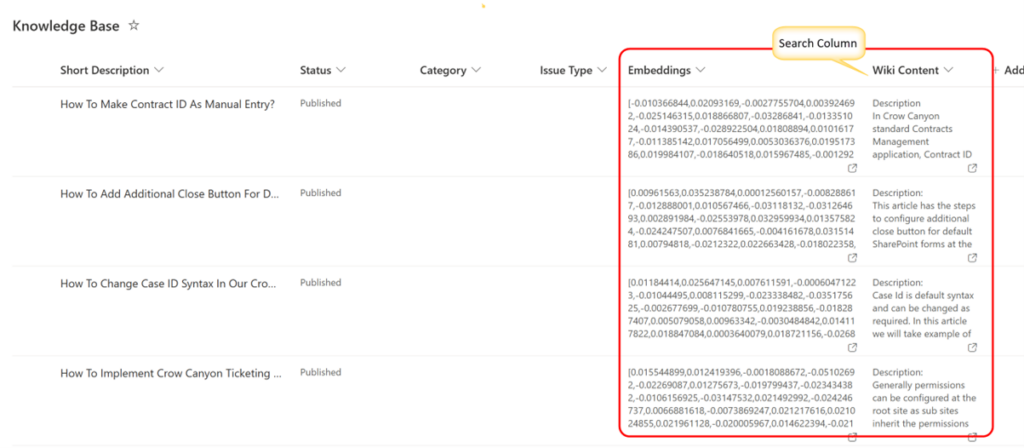
When a knowledge base article is added, embeddings are calculated as shown below:
Configure ‘Update Embeddings value’ workflow on Knowledge base list Item Updated event
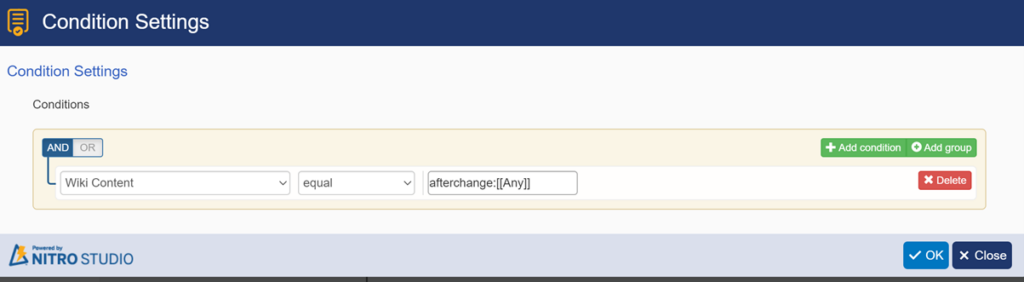
Workflow: Calculate embedding when Knowledge Base article is updated
Configure ‘calculate embedding’ action on item update event when ‘Wiki Content’ is modified. ‘Calculate Embedding’ action configuration is same as above.
Condition:
Add KB Copilot to Page
To add KB Copilot to a page, Go to Site Contents in Settings -> Site Pages -> select ‘Site Page’ in the New button dropdown.
In the page after adding the Crow Canyon Open AI Search web part as explained above, click edit properties button to select KB Copilot
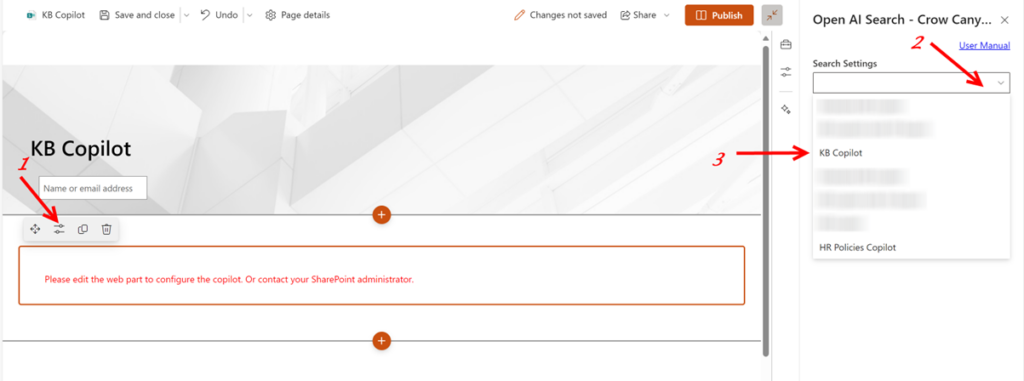
Publish the page by clicking the ‘Publish’ button.
Output: