Applies to:
Crow Canyon O365 helpdesk application (IT Helpdesk, Facilities, Request Management)
Description
This article describes the instructions to import the Tickets data from CSV file using Parse CSV action in NITRO Custom Actions.
Note: This article is same for IT, Facilities and Request Management applications and only difference is the name of the list (Tickets list). Below instructions are referring to Tickets list name, please use the corresponding list name and the import package based on the application that we have.
For IT Helpdesk application – ‘Tickets’
For Facilities application – ‘Work Orders’
For Request Management application – ‘Requests’
Summary of steps
- Prepare CSV file with Tickets data
- List Schema
- Configure NITRO Custom Actions
- Disable Product App and NITRO Workflows
- Import Tickets data
- Process Imported Tickets
- Enable Product App and NITRO Workflows
Detailed Steps
It is recommended to import only open Tickets into the live “Tickets” list. Historical Tickets can be imported to “Archived Tickets” list.
- All the Tickets imported into the live Tickets list will be assigned a new case id.
- If we would like to capture the case id from old system for reference, please create a text column and map it in the “Parse CSV” action settings.
- Steps #4, #6 and #7 are not required on historical Tickets imported into “Archived Tickets” list.
Pre-requisites:
- Make sure that all the required SharePoint groups are created in advance if we have data in “Assigned Team” column.
- Previous system could have different Ticket Ids but new case id will be assigned to all the imported Tickets in SharePoint. Do not map “Case Id” column for storing legacy case id from previous system. If required, please create new text column like “Legacy Case Id” in Tickets list and use it.
- Make sure that all choice columns have required options in SharePoint list before importing the data.
- For example, if we have “Priority” column with “Normal”, “Low”, “High” and “Critical” as possible values in CSV then we need to make sure that “Priority” column settings in Tickets/Archived Tickets list are matching with these options.
- Make sure that all category and issue types (lookup list items) are created prior to importing the data.
- Create a SharePoint group in site settings and add all possible users to this group. This is to ensure all person or group columns like Requester, Assigned Staff etc. are resolved in SharePoint before we do the actual import. If any user is not resolved prior to the import, it will be left with blank value.
- Lookup lists should have unique names
- For example, if we have two categories like “Hardware Request” and “Printer”. Both categories have “Other” issue type. Then we need to change the issue type to “Hardware Request – Other” and “Printer – Other” in SharePoint, update the data in CSV file accordingly.
- After the data import is completed, we can rename both the issue types to “Other” if required.
Prepare CSV file with Tickets data
- Please contact sharepointsupport@crowcanyon.com for package link.
- Right click on the downloaded file, go to properties, and unblock it if it is blocked.
- Extract the package. Package contains below files:
- Sample CSV file (Tickets.csv)
- It contains the standard columns from the out of the box Tickets list.
- We can add additional columns if required.
- NITRO Custom Actions settings (“Import Tickets data.xml” and “Process Imported Tickets.xml”).
- In case if we modify the CSV file, then we need to modify the custom action settings as well in step #3 (“Configure NITRO Custom Actions”).
- Sample CSV file (Tickets.csv)
- CSV file data syntaxes:
- Single line of text and Multiple lines of text: Specify direct text
- Ex: Printer is not working
- Lookup column: Specify lookup column value
- Ex: Printer
- Note: Multiple selections are not supported currently.
- Choice: Specify choice option
- Ex: High
- Date and Time: The value entered in the CSV file must be as per the SharePoint site regional settings. Enter the time in 24 hours format.
- Syntax: Month-Date-Year Hours:Minutes:Seconds
- Ex: 08-18-2022 5:30:00
- Person or Group: Specify display name of user or group
- Example for user: James Restivo
- Example for SharePoint group: Helpdesk Owners
- Note: Multiple selections are not supported currently.
- Number and Currency: Specify number values
- Ex: 500 or 550.50
- Yes/No: Specify Yes or No values
- Ex: Yes
List Schema
- Create a SharePoint list named “Import Tickets” in the site.
- Note: if this is one time import, then after the data import is completed, we can delete this list.
- Steps: Go to Site Contents à Create new custom/blank list à Enter name ‘Import Tickets’ and Create.
- Create an item in this list with the prepared CSV file as an attachment. This item will be used to run ‘Import Tickets data’ custom action in next steps.
- Create ‘OriginalCreated’ date and time column in Tickets list. This column will be used to save the ‘Created’ date column value from CSV file and then it will be used to update ‘Created’ date column on Ticket as part of “Process Imported Tickets” step.
Configure Custom Actions
- Downloaded package contains below custom action settings files.
- Import Tickets data.xml
- Process Imported Tickets.xml
- Import above custom actions in ‘Import Tickets’ and ‘Tickets’ list.
List: Import Tickets
Go to Site Contents -> Import Tickets -> List Settings -> Crow Canyon Custom Actions -> Click ‘New Custom Action’ -> Select ‘Designer’ experience and click ‘Ok’
- Click ‘Import’ button in the designer experience


After importing the custom action, click Publish button. Imported custom action will be as shown below.

Action settings explanation:
This custom action is enabled to run from list view, and it contains “Parse CSV” action.

Action 1 (Parse CSV): Import Tickets
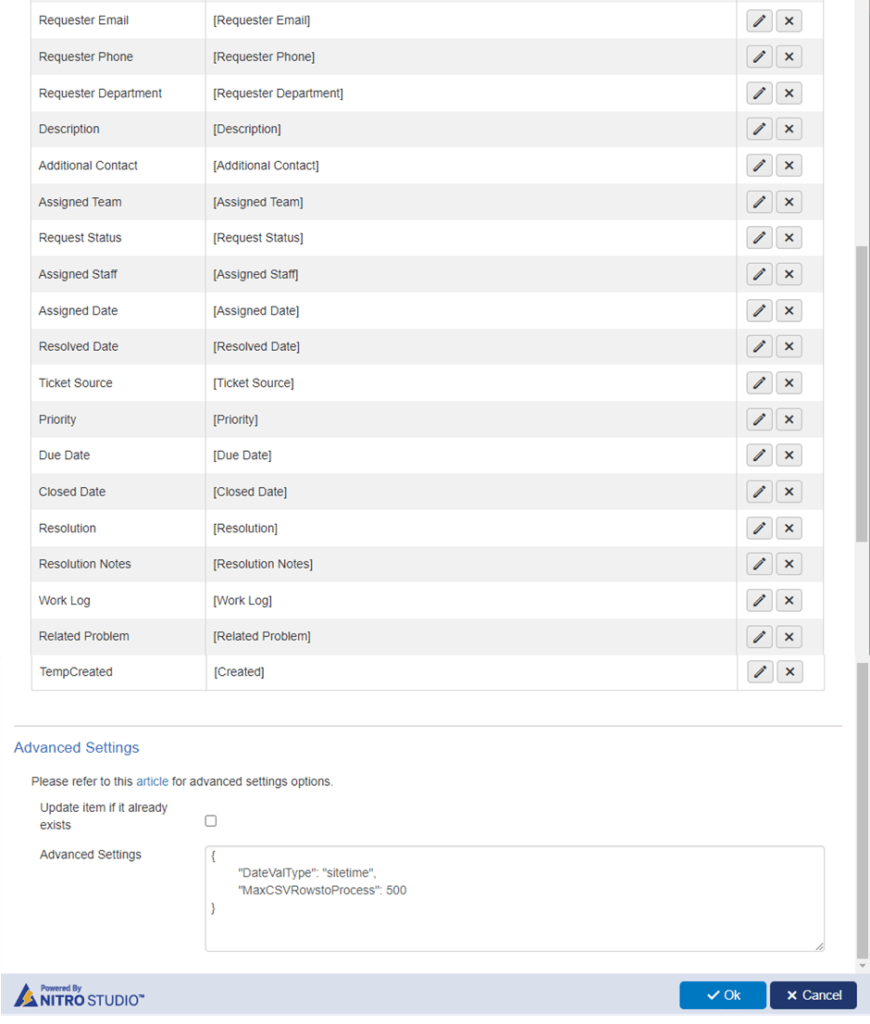
This action is used to read the CSV file data and create items in “Tickets” list. Refer below screenshot for settings.
Column mapping syntax: [CSV Column Name]
Example: [Category]


Advanced Settings:
{
“DateValType”: “sitetime”,
“MaxCSVRowstoProcess”: 500
}
DateValType : By default, date time values in CSV are assumed to be in UTC. Set “sitetime” property to import the date and time as per site regional settings.
MaxCSVRowstoProcess: Specify the max number of rows to process from the CSV data. Default maximum rows to be processed is 500. We can increase this limit if we want to import more than 500 items.
List: Tickets
This action is used to process the import Tickets and update case id, and other hidden columns to eliminate unwanted notifications and process on imported Tickets.
1. Import the custom action in ‘Tickes’ list
Go to Site Contents -> Tickets -> List Settings -> Crow Canyon Custom Actions -> Click ‘New Custom Action’ -> Select ‘Designer’ experience and click ‘Ok’
2. Click ‘Import’ button in the designer experience

After importing the custom action, click Publish button. Imported custom action will be as shown below.

Action Settings Explanation:

Define variables
Variables:
- VarID
- VarCurrentTicket
- VarRequester

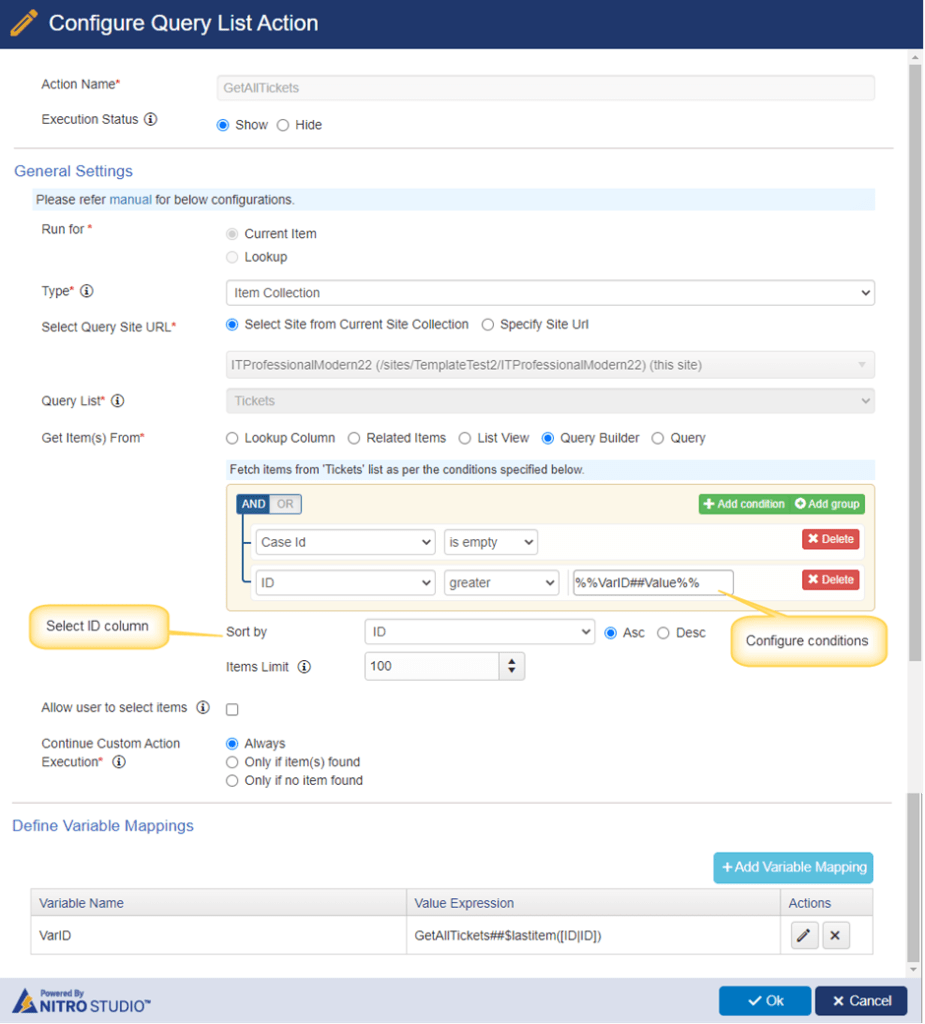
Action 1: GetAllTickets
This action is to get the unprocessed Tickets i.e., “Case ID” column is blank.

Placeholder used in the condition builder: %%VarID##Value%%
Set variable value in query list action settings

Variable value: GetAllTickets##$lastitem([ID|ID])
Action 2: Condition gateway
This condition gateway will verify the Tickets count found in above query list action. If Tickets found with empty Case Id then it will process the custom action otherwise it will terminate custom action.

Value used in the condition builder: GetAllTickets##$count([ID|ID]),,0
Action 3: LoopQLItems
This action will iterate through all items found in the query list action and process them as required.

Action 4: Update variables
This action will update the current loop item id and requester values in variables.

VarCurrentTicket = $GetIterationValue(LoopQLItems,[ID|ID])
VarRequester = $GetIterationValue(LoopQLItems,[Requester|Requester])
Action 5: Process and update hidden columns
This action will update all hidden columns in the imported Tickets for eliminating unwanted notifications.

Disable Product App and NITRO Workflows
Before starting the actual import process, we need to disable the Product App and the workflows on Tickets list.
1. Disable Product app
Go to Site Contents -> Open ‘Crow Canyon Product App’ and click ‘Deactivate’

2. Disable NITRO Workflows
Go to Application Administration -> Crow Canyon NITRO Apps -> NITRO Workflows and disable all workflows configured on Tickets list.

Import Tickets data
Run ‘Import Tickets data’ custom action in ‘Import Tickets’ list
Go to Site Contents -> Import Tickets list -> Select the item that has CSV data file and click ‘Import Tickets data’ custom action as shown below:

Process Imported Tickets
After importing all the Tickets, run ‘Process Imported Tickets’ custom action. This will update the ‘Case Id’ and other hidden columns.
go to Tickets list -> Select an item and click ‘Process Imported Tickets’ custom action as shown below:

Enable Product App and NITRO Workflows
After processing the imported ticket is completed, activate the Crow Canyon Product app feature and enable the workflows on Tickets list that were disabled earlier.

