Applies To
SharePoint On-Premises
Description
Crow Canyon NITRO Studio has several enhanced capabilities on top of what we have in our older version. There is a first-class forms designer tool, an enhanced Custom Actions tool, various performance improvements, custom list view, advanced printing, and many other improvements and new features.
Upgrading to a NITRO Studio based applications involves the following
- In place upgrade in the same SharePoint site. There is no data migration involved so your existing data remains as is, only the application components that work with that data get updated.
- The list schema (lists, columns, column settings) largely remain the same. Minor updates are required to some columns without modification of data.
- Upgrade application settings like Forms, Custom Actions, Print settings etc.
- Install NITRO Studio solutions as per details in this article.
- Upgrade “crowcanyon.cascadedlookup.wsp”, “CCSSRWorkflows.wsp” and “crowcanyon.timerjobs.wsp” solutions in the SharePoint server which is a required step before proceeding with the NITRO Upgrade.
- Downtime: During wsp solutions deployment, there will be a downtime of few minutes. For rest of the configurations, there is no downtime and application can be used with current settings.
Solutions to be Added/Removed/Retained as part of this upgrade and related changes in site
| Solution Name | Status | Description |
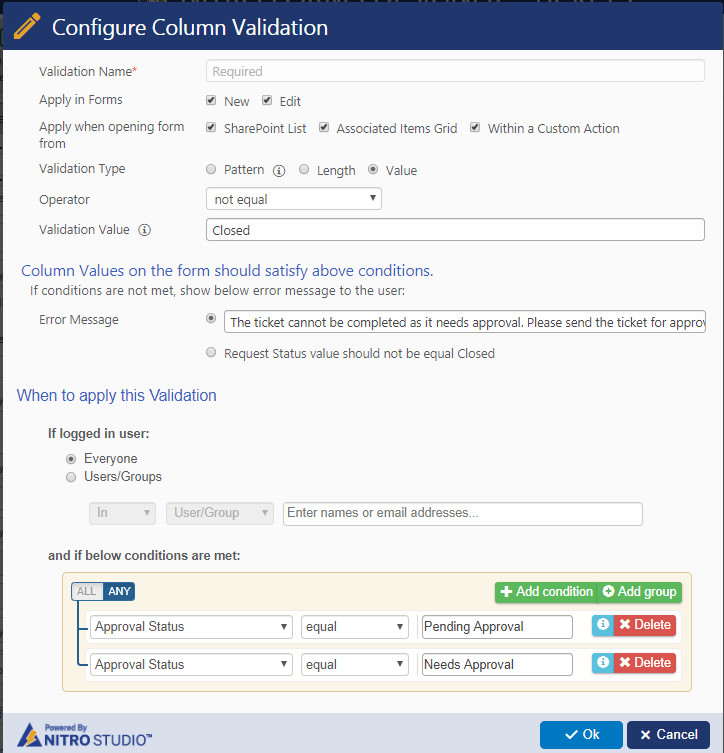
| CCSSREventReceiver.wsp | Remove | Replaced by NITRO Forms validations: Configure custom validations on “Tickets” and “Change Request” lists for restricting the close action if item is waiting for approval.
Note: This step is required only for upgrading Crow Canyon application sites such as IT Helpdesk, Facilities and Requests Management. |
| CCSSRWorkflows.wsp | Retain | Continues to provide standard service request business process functionality
Note: Applicable to Crow Canyon application sites such as IT Helpdesk, Facilities and Requests Management. |
| CrowCanyon.AdvancedAlerts.wsp | Remove | Replaced by NITRO Workflow Manager |
| CrowCanyon.AdvancedEmail.wsp | Remove | Replaced by NITRO Email Manager |
| CrowCanyon.AdvancedForms.wsp | Remove | Replaced by NITRO Forms |
| CrowCanyon.AdvancedPrint.wsp | Remove | Replaced by NITRO Print Manager |
| CrowCanyon.BatchTicketEditor.wsp | Remove | Replaced by NITRO Custom Actions |
| CrowCanyon.CalculatedTable.wsp | Remove | Replaced by NITRO Reports.
This can be removed once dashboard pages are updated to use new NITRO Reports |
| CrowCanyon.CascadedLookup.wsp | Remove | Replaced by Lookup Settings in NITRO Forms |
| CrowCanyon.ColorChoiceField.wsp | Remove | Replaced by NITRO Conditional Formatting |
| CrowCanyon.ColorKPI.wsp | Remove | Replaced by NITRO Conditional Formatting |
| CrowCanyon.CommonUtils.wsp | Retain | This solution has some common functionality used by other Crow Canyon solutions |
| CrowCanyon.CustomActions.wsp | Remove | Replaced by NITRO Custom Actions |
| CrowCanyon.Discussion.wsp | Remove | Will be replaced by standard SharePoint Multiple lines of text column with “Append Changes to existing text” option |
| CrowCanyon.FieldManager.wsp | Remove | Replaced by NITRO Forms. To hide columns on the form, do not add those columns to the forms or configure column permissions as needed |
| CrowCanyon.FormsManager.wsp | Remove | Replaced by NITRO Forms |
| CrowCanyon.LicenseManager.wsp | Remove | Provides licensing functionality for Crow Canyon solutions |
| CrowCanyon.ListSearch.wsp | Remove | Replaced by Crow Canyon List Search. This can be removed once dashboard pages are updated to use new NITRO list search component |
| CrowCanyon.MobileManager.wsp | Remove | Replaced by NITRO Forms and Power Portal that provide responsive forms functionality |
| CrowCanyon.PurchaseAssetLink.wsp | Retain (specific to purchasing application) | Used to create Assets from Purchase Order (Applicable only for Non-NITRO Studio based application) |
| CrowCanyon.PurchaseOrderApproverFlow.wsp | Remove | Replaced by NITRO Workflow Manager and Custom Actions |
| CrowCanyon.TaskManager.wsp | Remove | Replaced by NITRO Forms Associated Items settings and Linked Items functionality |
| CrowCanyon.TimerJobs.wsp | Retain | Used for Archival, Recurrence, and SLA features
Note: Appliable for only Crow Canyon IT Helpdesk/Facilities/Requests Management/Assets/Equipment/Customer Service application sites. |
| CrowCanyon.URLActions.wsp | Remove | It was used for creating Change Request or Problem from Ticket form, also invoking Ticket/Assignment Actions, replaced by NITRO Forms “Allow New Item” option and NITRO Custom Actions |
| CrowCanyon.WebParts.wsp | Remove | Used for Tiles and Dials on the home page, current user info filler web part. User info filler will be replaced with NITRO Forms. This can be removed once dashboard pages are updated to use new NITRO Tiles and Dials |
| CrowCanyon.WorkflowManager.wsp | Retain | This solution is updated with more capabilities and may be upgraded during the process |
| CrowCanyonBranding.wsp | Remove | Replaced by NITRO Branding |
| EasyTabParts.wsp | Remove | It is used in Application Administration for tabs interface.
NITRO has a new tabs component and this can be removed once new application administration page is created. |
| CrowCanyon.ConfigurablePortal.wsp | Remove | Replaced by NITRO Power Portal |
Package Information
| Component | Description |
| NITRO Upgrade Tool | Used in upgrading Forms, List Search, Reports, Home Tiles, Home Arcs, Advanced Email and Knowledge Base page |
| Crow Canyon Discussion Data Handler | Used to migrate Crow Canyon Discussion column data to multiple lines of rich text column |
| Field Data Copier | Used in copying data from one column to other |
| Color Choice converter | Used in converting Crow Canyon Color choice to SharePoint choice columns |
| Crow Canyon Solutions | CCSSRWorkflows.wsp, crowcanyon.cascadedlookup.wsp and crowcanyon.timerjobs.wsp |
Please contact sharepointsupport@crowcanyon.com for the package.
Summary of Steps
– Upgrade solutions
– Install NITRO Studio
– Activate NITRO Studio
– Run NITRO Upgrade tool
– Additional Processing for Custom Columns (Color choice and Discussion)
– Manual Configurations
– Remove old solutions
Detailed Steps
Upgrade Solutions
Upgrade crowcanyon.cascadedlookup.wsp and crowcanyon.timerjobs.wsp in the SharePoint server which is a required step before proceeding with the NITRO Upgrade.
For crowcanyon.cascadedlookup.wsp, please refer https://www.crowcanyon.help/article/381/
For crowcanyon.timerjobs.wsp, please refer https://www.crowcanyon.help/article/418/
Also for Crow Canyon Service Request applications like IT Helpdesk, Request Management, Facilities Management, Customer Service modules, please upgrade CCSSRWorkflows.wsp solution. Refer https://www.crowcanyon.help/article/312/.
Please note that during the CCSSRWorkflows.wsp solution update as defined in the above article, Service Request application will not process the Tickets/Requests/Work Orders/Emails.
Install NITRO Studio
Install NITRO Studio solutions referring below links:
- https://www.crowcanyon.help/article/448/#Step1
- https://www.crowcanyon.help/article/448/#Step2
- https://www.crowcanyon.help/article/448/#Step3
Activate NITRO Studio
After activating NITRO Studio feature for the site collection, go to Application site (Service Request Application site) –> site settings –> Manage Site Features –> deactivate below features
- Crow Canyon Advanced Forms
- Crow Canyon NITRO Forms Create Library
- Crow Canyon Custom Actions
- Crow Canyon Create Library
Go to Crow Canyon NITRO Studio –> click on “Activate” button in NITRO Studio for the application site.
Run NITRO Upgrade Tool
This tool helps automating in-place upgrade from Crow Canyon older version components to latest “NITRO Studio” version.
Components that are considered in automatic upgrade using the tool:
| S.No. | Non-NITRO Component | NITRO Component |
| 1 | Crow Canyon Forms Manager | Crow Canyon NITRO Forms |
| 2 | Crow Canyon Calculated Table Reports | Crow Canyon NITRO Reports |
| 3 | Home Tiles, Arcs | NITRO Tiles and Arcs |
| 4 | Crow Canyon List Search | NITRO List Search |
| 5 | Crow Canyon Advanced Email | Crow Canyon Email Manager |
| 6 | Knowledge Base Search page | New Knowledge Base search page |
1. Forms Manager to NITRO Forms
Steps:
- This step is required if the forms are using Forms Manager solution. If the forms are already using advanced forms, please ignore this step.
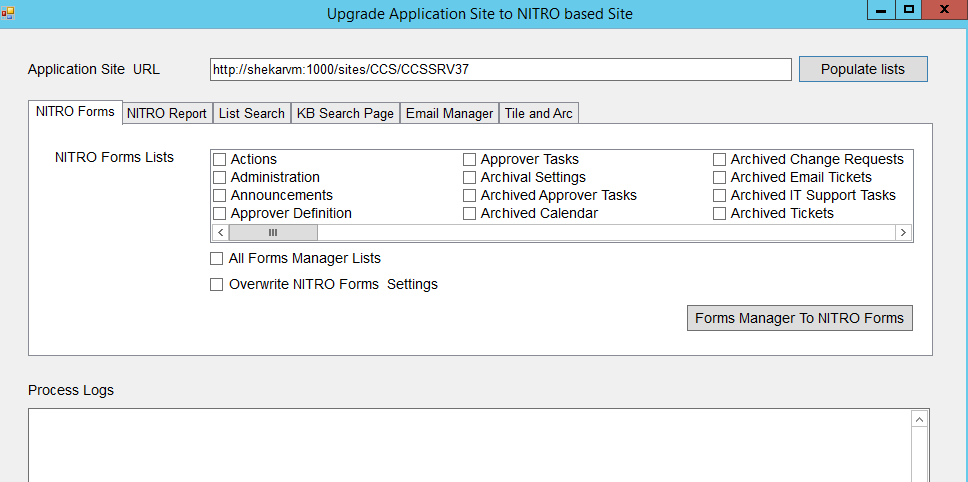
- Enter “Site URL” in “Application Site URL” text box and click on “Populate Lists” button.
- This will show all available lists in the site.
- Open “NITRO Forms” tab in tool, Check “All Forms Manager Lists” checkbox and click on “Forms Manager TO NITRO Forms” button.
- Tool will upgrade all the lists form settings to NITRO Forms, however, it will not publish any forms.
- “Process Logs” will show the information including required “Manual Steps” if any conflicts found.
- Go to every list that has Forms Manager configurations, open NITRO Forms, resolve conflicts based on “Process Log” if any and publish. Please note that we need publish every list even though there is no conflict as per Process Log.
Note: In case if NITRO Forms are not configured due to exceptions/errors we can rerun the tool.
We can run the tool for selective lists if required by selecting the required individual lists or we can also select “All Forms Manager Lists” and check “Overwrite NITRO Forms Settings” option.
2. Crow Canyon Calculated Table Reports to NITRO Reports
Calculated Table has two different web part components and both types of components will be upgraded automatically.
- Report Center
- Calculated Table (Reports configured in Workspaces, site Pages and Web part pages)
Steps:
- Enter “Site URL” in “Application Site URL” text box and click on “Populate Lists” button.
- This will show all available libraries in the site in “NITRO Report” tab.
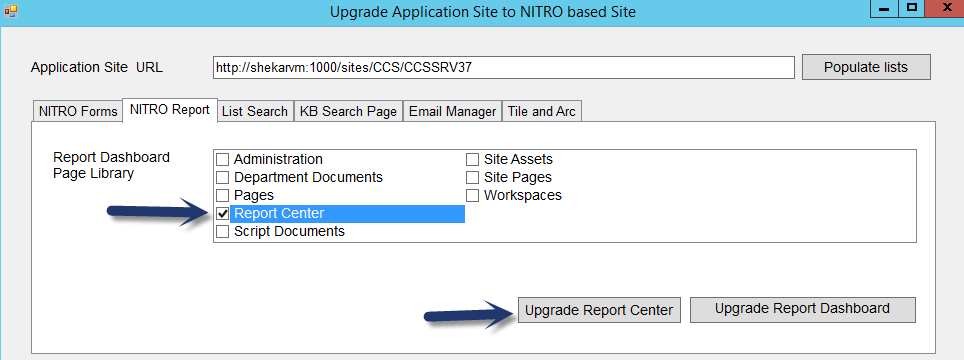
- Upgrade “Report Center” web part
- Select “Report Center” and hit “Upgrade Report Center” as shown in below screenshot 1
- This will create a new page in the Workspaces document library and will configure the “NITRO Report Center” web part and will replace “Report Center” top link bar with new Page.
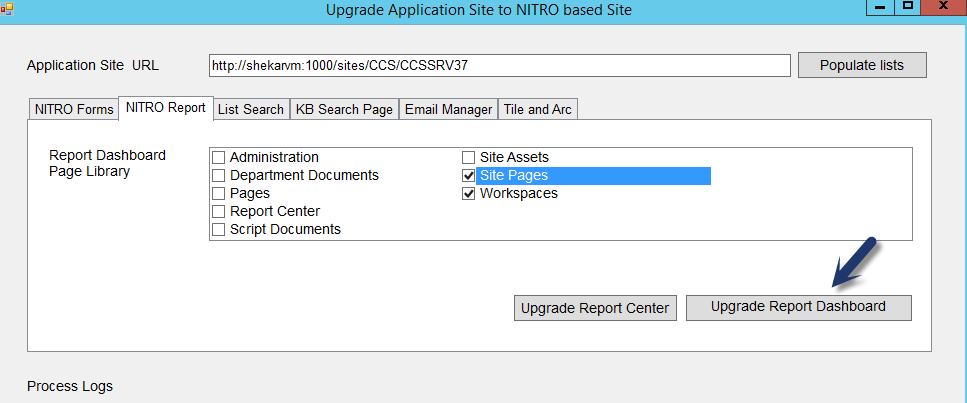
- Upgrade “Calculated Table” web part (Reports configured in Workspaces, site Pages and Web part pages)
- Select all the document libraries like Workspaces, Site Pages etc. where calculated reports are configured and then click on “Upgrade Report Dashboard” button as shown in screenshot 2.
- This step will update the Crow Canyon web parts to NITRO Reports.
Screenshot 1:
Screenshot 2:
3. Home Tiles, Arcs
This will update the Home Tiles, Dials available in the workspace pages to NITRO Tiles and Dials app.
Steps:
- Enter “Site URL” in “Application Site URL” text box and click on “Populate Lists” button.
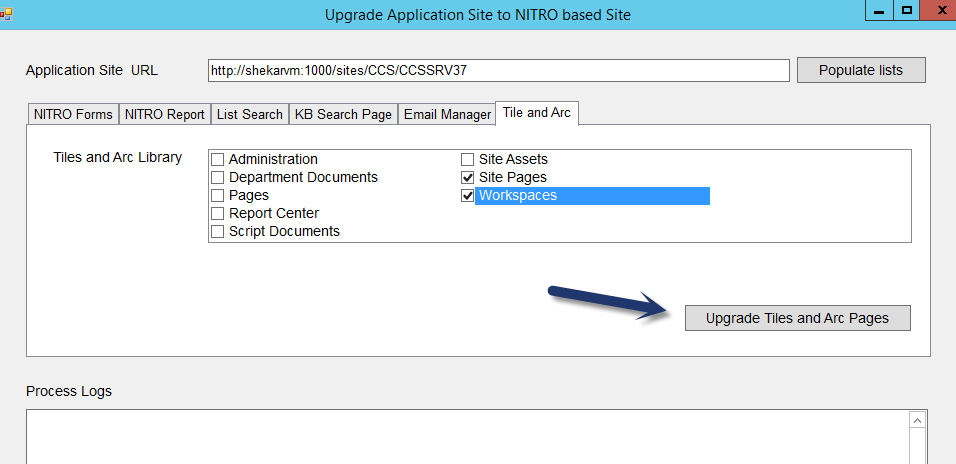
- This will show all available libraries in the site in “Tiles and Arc” tab in the tool.
- Select the document libraries like Workspaces, Site Pages etc. where Home Tiles, Home Arcs are configured and hit “Upgrade Tiles and Arc Pages” button as shown below
- This will upgrade the web parts to NITRO Tiles and Dials.
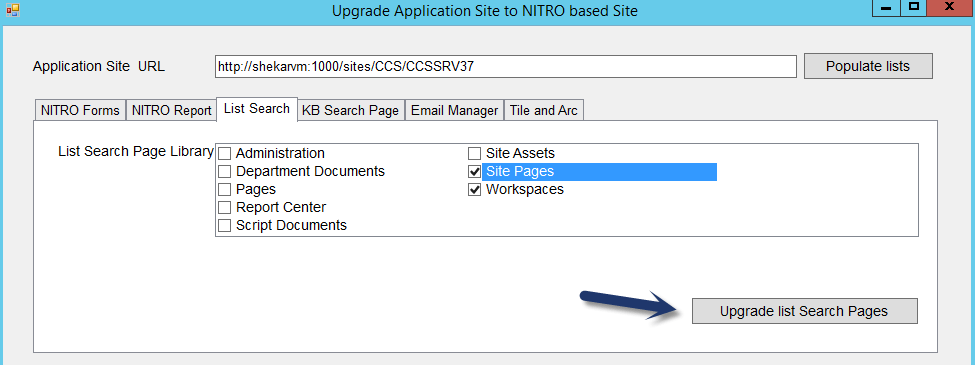
4. List Search
This will update the Crow Canyon List Search web parts present in the workspace pages to NITRO List Search app.
Steps:
- Enter “Site URL” in “Application Site URL” text box and click on “Populate Lists” button.
- This will show all available libraries in the site in “List Search” tab in the tool.
- Select the document libraries where Crow Canyon list search web part is present and click on “Upgrade list Search Pages” as shown below.
- This will convert all Crow Canyon list search web parts to NITRO List Search components.
5. Advanced Email
This will update the Crow Canyon Advanced Email settings present for the lists to NITRO Email Manager App.
Steps:
- Enter “Site URL” in “Application Site URL” text box and click on “Populate Lists” button.
- This will show all available libraries in the site in “Email Manager” tab in the tool.
- Select the lists where Crow Canyon Advanced Email settings exist and click on “Upgrade E-mail Manager” button as shown below.
- This will configure NITRO Email Manager Settings for the selected lists.
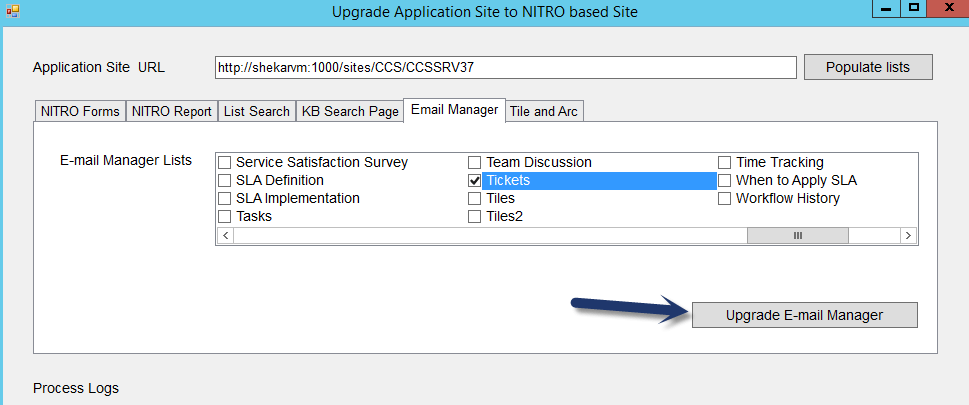
Note: There is no need to consider/select child list like Email Tickets.
6. Knowledge Base Search Page
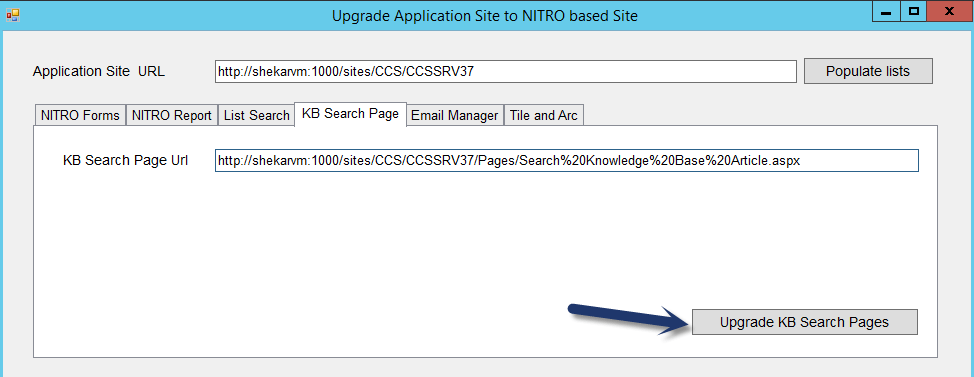
This will update the Crow Canyon KB Group web part present in the workspace pages to NITRO Knowledge base web parts.
Steps:
- Specify full URL of the existing Knowledge Base Page as shown below where Crow Canyon Knowledge base web part is used and click on “Upgrade KB Search Pages” as shown below
- This will convert all Crow Canyon KB Group web parts to NITRO Knowledge Base web part.
Additional Processing for Custom Columns (Color choice and Discussion)
Crow Canyon Color Choice:
Convert all columns of type “Crow Canyon Color Choice” field to regular choice using “CrowCanyon.ConvertToSPFiledTypes.exe” tool.
Before actually converting them, take a screenshot of the column settings which will be used in the configuration of conditional formatting in NITRO Studio.
Note: In our standard application sites we have “Priority” Color Choice field in Tickets, Archived Tickets, Change Requests, Problems (Root Cause Tickets) and Announcements lists.
Configure the color using NITRO Conditional formatting feature referring to the existing color coding in the screenshot.
Crow Canyon Discussion column:
Crow Canyon Discussion columns need to be converted to multiple lines of text column with version enabled. To perform this, first we will create a temporary rich text column in the list and copy the work log data to this column using CrowCanyon.DiscussionDataHandler.exe tool as shown below.
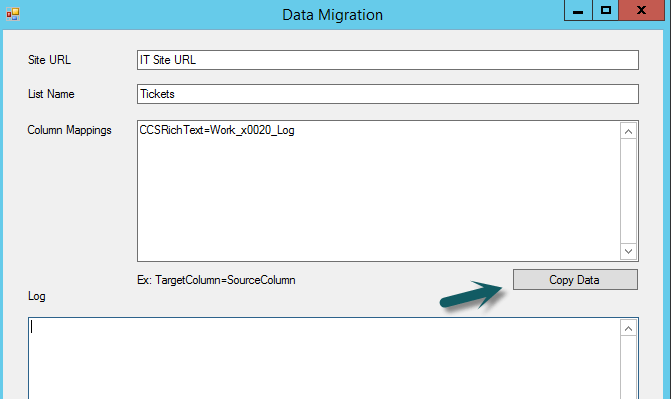
With the above step, discussion column data gets copied to temporary rich text column in the list items. Existing Work log (discussion column) need to be deleted and recreated with same internal name with multiple lines of text column in the list. Now use FieldDataCopier.exe to copy the data from temporary rich text column to Work log multiple lines of text column as shown below.
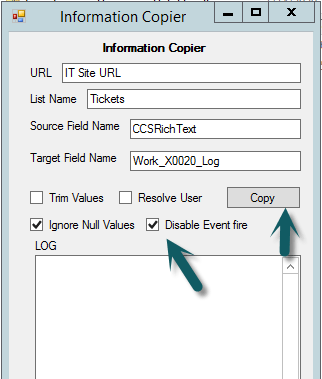
After the above step, validate the Work Log column data and then delete the temporary column created for this process.
Out of the box, we have discussion column in Tickets. Archived Tickets, Change Requests, Archived Change Requests, Problems and Recurring Ticket templates in service request application.
Manual Configurations
- Configure custom validations on Tickets and Change Request lists to restrict closing the item if it is awaiting approval. Remove CCS SR Event Receiver solution
Go to Tickets list –> NITRO Forms –> create a column validation on Request Status column as shown below
- Crow Canyon Advanced Alerts
Configure Workflow Manager Send mail actions for alerts configured using older Advanced Alerts solution. Remove old Advanced Alerts solution
- Publish NITRO Forms:
If the forms are configured using older Forms Manager solution, then this step can be ignored as it is already taken care above using NITRO Upgrade tool.
If the forms are configured using “Crow Canyon Advanced Forms” solution, then open the NITRO forms for all those lists and publish.
- Crow Canyon Associated item columns need to be recreated as multiple lines of rich text column with same internal name.
- Configure Print template on standard lists like “Purchase Request”, “Purchase Order” lists. We do not have out of the box print templates for Service Request Application.
- Configure standard Batch Ticket Editor Features on Tickets list using NITRO Custom Actions
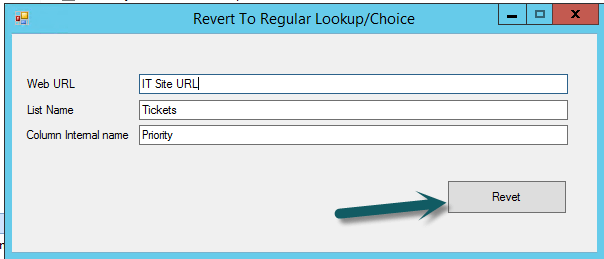
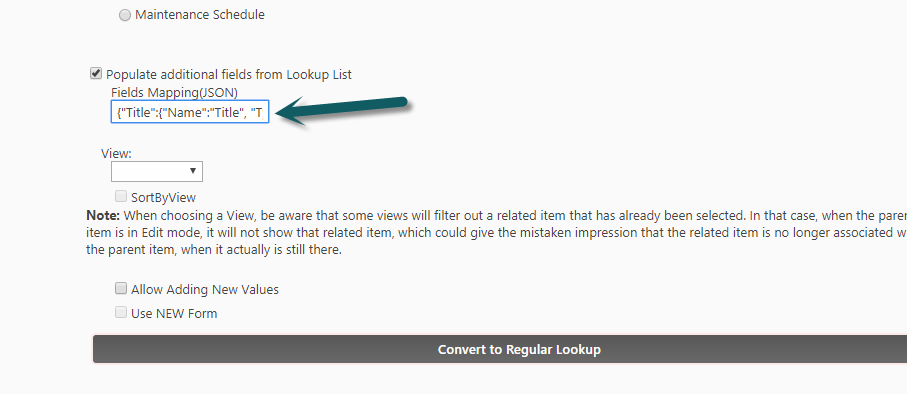
- Convert any Crow Canyon Cascaded Lookup type of column to regular lookup column
Edit the existing cascaded lookup column –> click on advanced settings –> click on Revert to SharePoint lookup and click on ok as shown below.
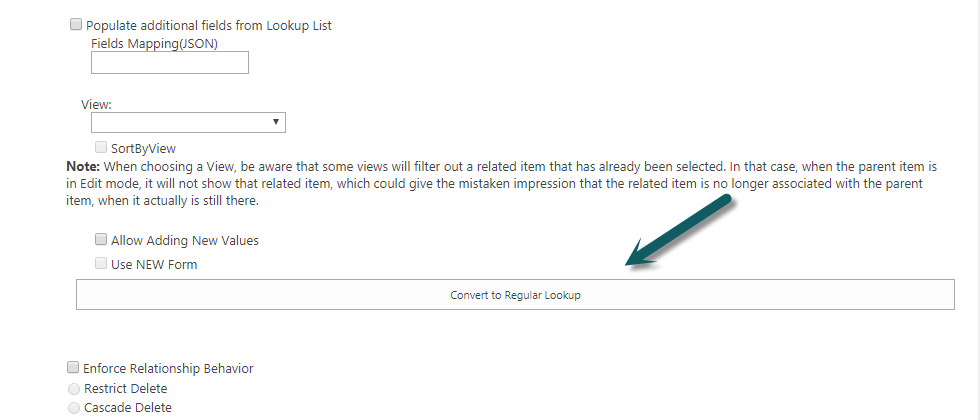
If the JSON settings are available in the cascaded lookup settings as shown below, reconfigure the auto fill settings using the lookup settings in NITRO Forms.
- If the Color KPI solution is in use, configure similar settings using NITRO Conditional Formatting and remove old solution
- If there are Ticket and Assignment actions in use (Site Contents –> Actions list), configure them using NITRO Custom Actions feature
- Configure the branding using the NITRO branding. Remove the application administration, remove the branding and re-apply using NITRO Branding app.
- Install/Upgrade Configurable Portal.
Go to Portal site –> Site settings –> Manage site features –> deactivate “Crow Canyon Configurable Portal” feature. Go to Crow Canyon Power Portal app –> click on Upgrade button in the Power portal that updates existing configurable Portal to Power Portal.
Important Note: All the above configurations will be done for lists that are part of Crow Canyon standard application. For any custom lists, either customer can do the required configurations or Crow Canyon can do it as part of professional services. This applies to any custom pages created by customer that are not part of standard application.
After the above process, below are the application site features to be deactivated
- CCS SR Event Receiver 3.6
- Crow Canyon Batch Ticket Editor
- Crow Canyon Branding Feature
- Crow Canyon Conditional Formatting
- Crow Canyon Mobile Manager
- CrowCanyon AdvancedEmail
- CrowCanyon Field Manager
Go to root site –> site settings –> site collection features –> deactivate below site collection features
- Crow Canyon Associated items
- Crow Canyon Forms Manager
- Crow Canyon List Search
- Crow Canyon URL Actions
- CrowCanyon Calculated Table
- CrowCanyon Systems WebParts
Go to root site –> Site Settings –> Web Designer Galleries –> Web Parts –> Delete all CrowCanyon web parts present in this page.
Remove old solutions
Note: Please validate the upgraded application and make sure everything is working as expected before following this section.
- Retract the solutions that are marked as Remove in the Table of this article.
- After all the deprecated Crow Canyon solutions are removed, we need to remove Forms manager Safe Control line in the web application. For details, please refer Note #2 from https://www.crowcanyon.help/article/310/
- Also, please ensure Ribbon.ascx file is present in C:\Program Files\Common Files\microsoft shared\Web Server Extensions\15\TEMPLATE\CONTROLTEMPLATES path. If not, please contact Crow Canyon to get this file and upload at the above location.


