Applies To
SharePoint Online
Description
Sentiment analysis evaluates input text to assign a sentiment score ranging from 0 (negative) to 1 (positive). This capability is useful in detecting sentiment and enables custom business process based on the sentiment. Crow Canyon uses Microsoft Azure Text Analytics API for this and you can find more information here.
This capability can be enabled in Crow Canyon Help Desk Application. When a Ticket is created, application will process the text in Ticket “Description” (or “Title” if there is no description) and determine the text sentiment score (0 to 1). Also, application assigns a configurable text value based on this score for easy identification and configurations. This data can then be used in application for various purposes like decide the priority of the Ticket, configure separate SLAs for Tickets having negative sentiment and send escalation notification if sentiment is excessively negative etc. It can also be used to configure reports to see sentiment for various types of Tickets, trend for assigned staff and time range etc.
Summary of Steps
Following steps are required to enable Sentiment Analysis in Crow Canyon Applications:
- Configurations list schema
- Tickets list schema
- SLA workflow based on business needs
Detailed Steps
-
Configurations List Schema
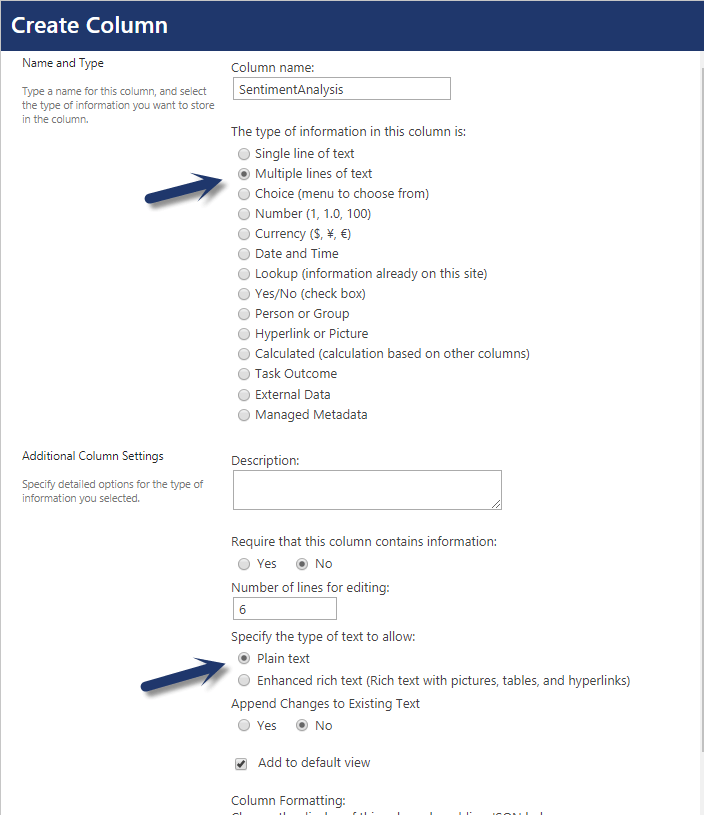
We need to create a multiple lines of text column (plain text) in configurations list with name “SentimentAnalysis”. Go to site contents –> Configurations list –> List settings –> Crow Canyon NITRO Forms –> click on “Create column” in the ribbon (see sample screenshot below)
Create a new tab in the form with name “Advanced” and add the newly created “SentimentAnalysis” column to this tab in the NITRO Form. We can rename this column to “Sentiment Analysis” as needed. Please make sure this column is also added to edit and display forms.
Note: Ensure that there is no space between Sentiment and Analysis during the column creation (SentimentAnalysis). After column is created, we can rename this column as needed.
“Sentiment Analysis” column value contains the configuration required for evaluating the sentiment, details are given below:
Sample configuration of the Sentiment Analysis is shown below:
Enabled=Yes
APIKey=xxxxxxxxxxxxxxxxxxxxxxx
URL=southcentralus
ScoreNumberColumn=SentimentScore
ScoreTextColumn=SentimentValue
ScoreTextValue=0.3-Angry,0.5-Negative,0.7-Neutral,1.0-Positive
(i) Enabled: This column is used to check whether Sentiment analysis is enabled/disabled in our application. The only two possible values are Yes and No. Yes to enable and No to disable this feature in our application
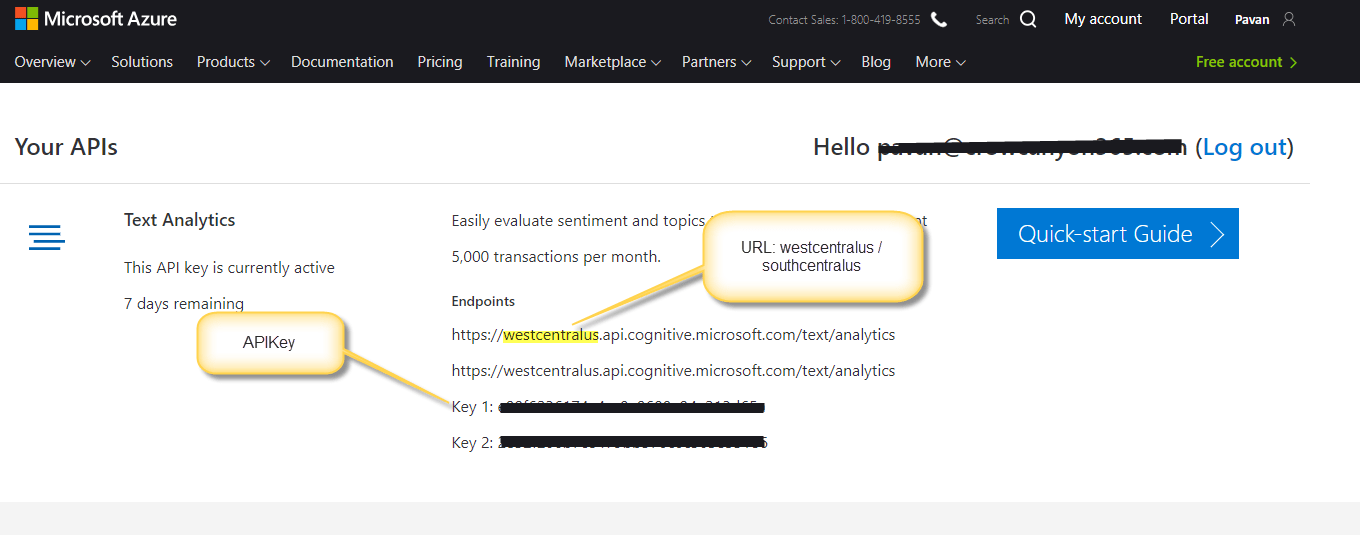
(ii) APIKey: This is a subscription key that needs to be used while calling Cognitive Service. For more details on this, please refer “How to create a Cognitive Services subscription” section at the end of this article.
(iii) URL: Region specific URL prefix of Text Analytics service e.g. “westcentralus” or “southcentralus”. Please refer “How to create a Cognitive Services subscription” section at the end of this article.
(iv) ScoreNumberColumn: This parameter is the internal name of the column that is used in the Tickets list. This column value range is between 0 – 1. API generates a decimal value between 0 and 1 based on the text sentiment and this result will be stored in this column on the ticket.
0 – Negative
1 – Positive
(v) ScoreTextColumn: This parameter is the internal name of the column that is used in the Tickets list. This is a single line of text or choice column and will be filled by the Product app on ticket creation. It is a mapping from the numeric sentiment score value to a text value for easy reference in configurations and reports.
The text can vary based on business needs. We can configure a value like “0.3- Angry,0.5-Negative,0.7-Neutral,1.0-Positive” and this would imply:
If Score is <= 0.3, set the ScoreTextValue as Angry
If Score is <= 0.5, set the ScoreTextValue as Negative
If Score is <= 0.7, set the ScoreTextValue as Neutral
If Score is <= 1.0, set the ScoreTextValue as Positive
-
Tickets list Schema
There are two columns to be created in the Tickets list:
– SentimentScore
– SentimentValue
(i) SentimentScore:
This column should be created with the same internal name that is used for “ScoreNumberColumn” for the Sentiment Analysis configuration list item. Go to site contents –> Tickets list –> list settings –> Crow Canyon NITRO Forms –> create a number column with two decimals like below
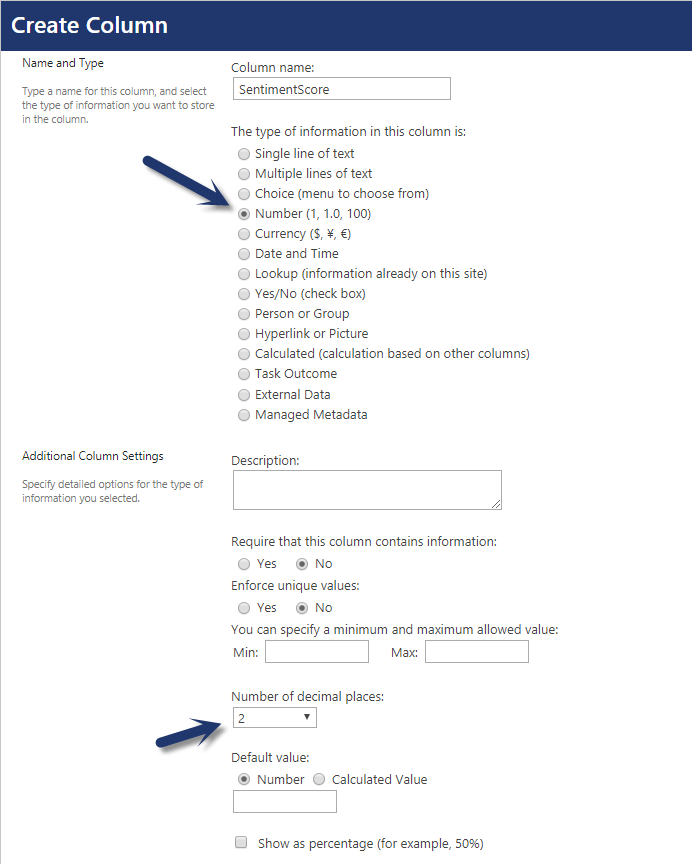
Add it to the required position in the Ticket forms as needed. Value in this column will be set to the score that is obtained by the sentiment analysis functionality in the application.
Note: We can rename this column once it is created with the required internal name
(ii) SentimentValue:
This column should be created with the same internal name specified for the “ScoreTextColumn” in the configuration list item. Create a new single line of text column and add this column to required tab in the NITRO forms as needed. See sample screenshot below
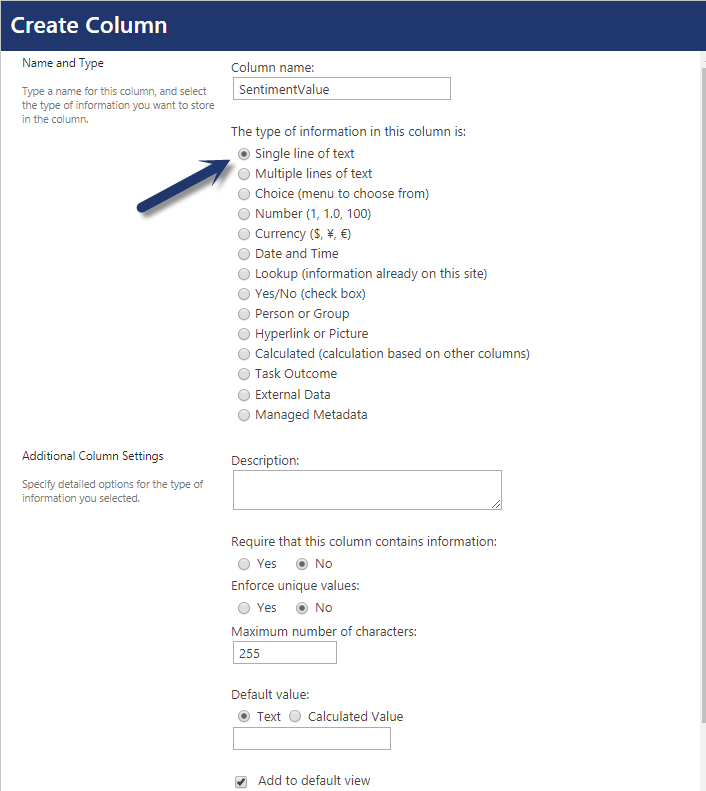
Note: We can rename this column once it is created with the required internal name
How to create a Cognitive Services subscription
If you have a Microsoft Azure subscription, you can create a new “Text Analytics” service.
Alternatively, you can use your O365 account to create this service. Please click here to create your own service for this. See sample screenshot below
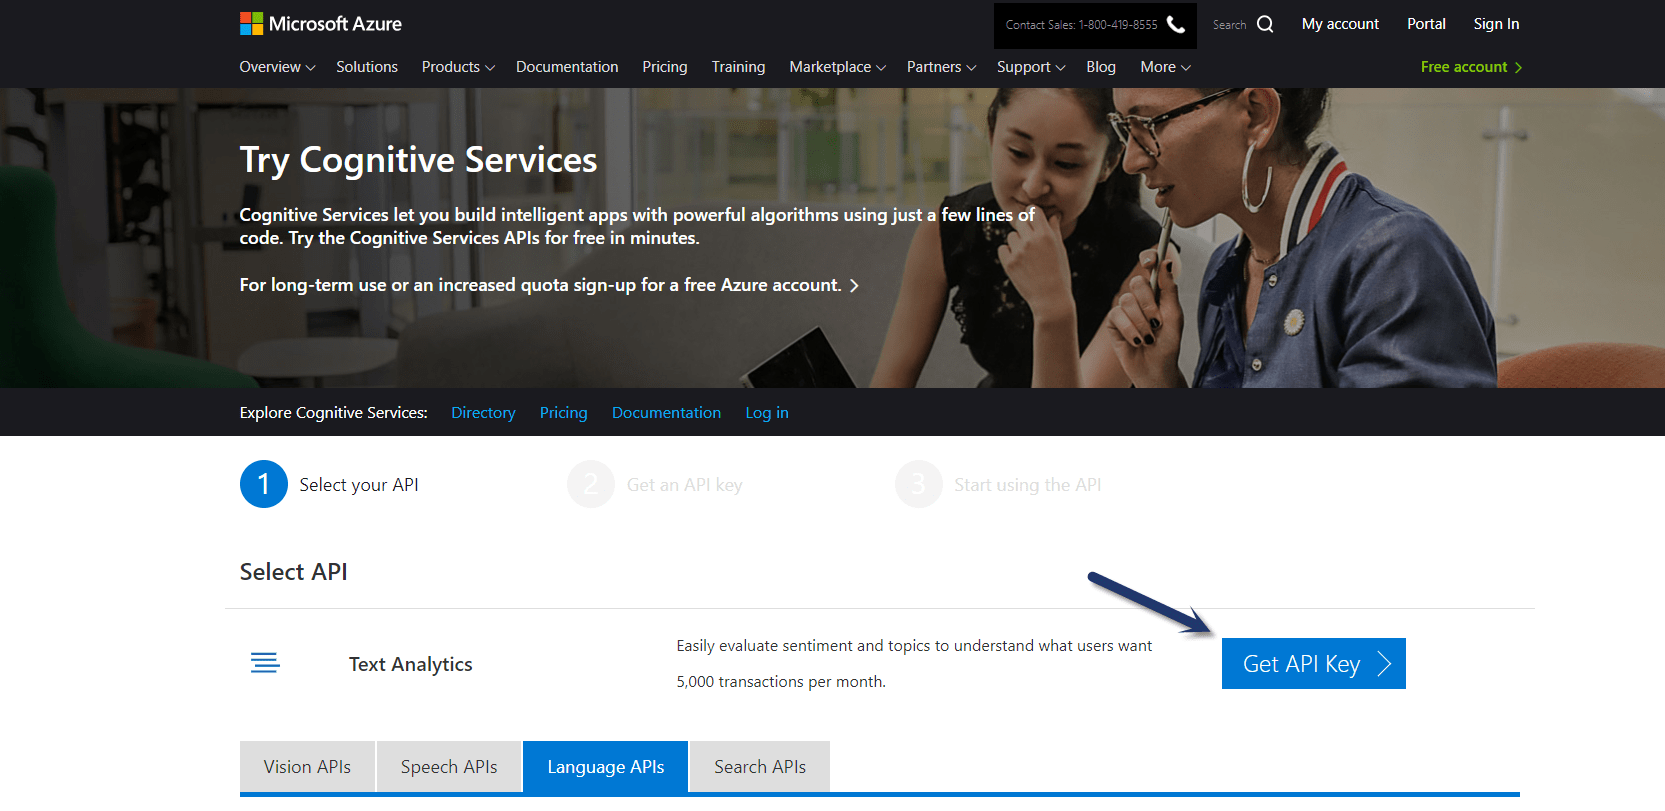
Upon clicking “Get API Key”, it prompts for the type of service that you would like to have. If you already have an Azure account, we can sign in and that would provide us the information for API. See sample screenshot below
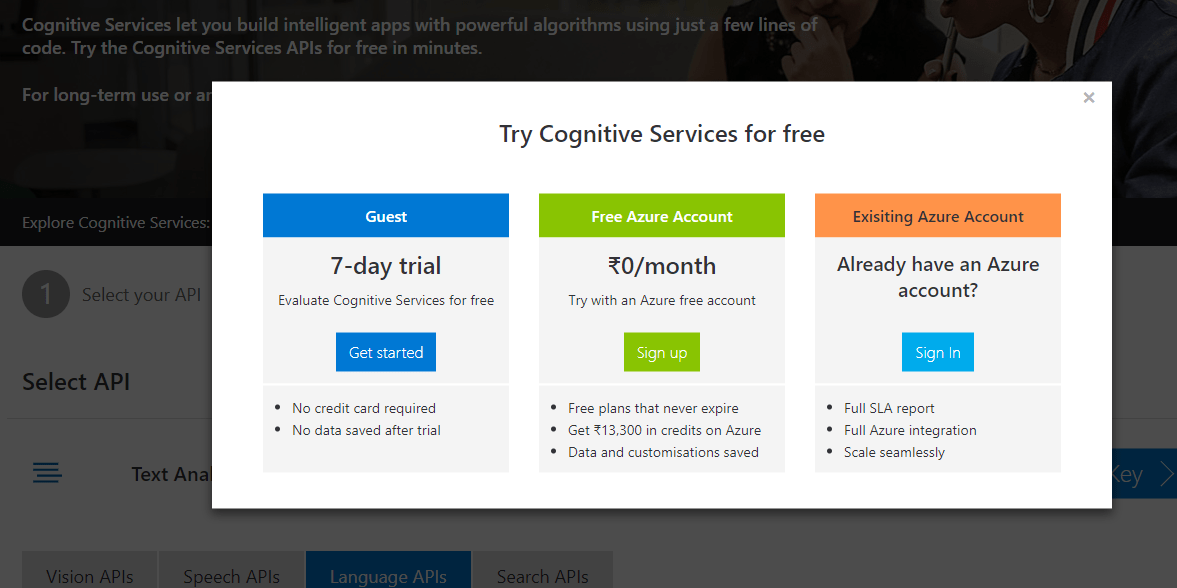
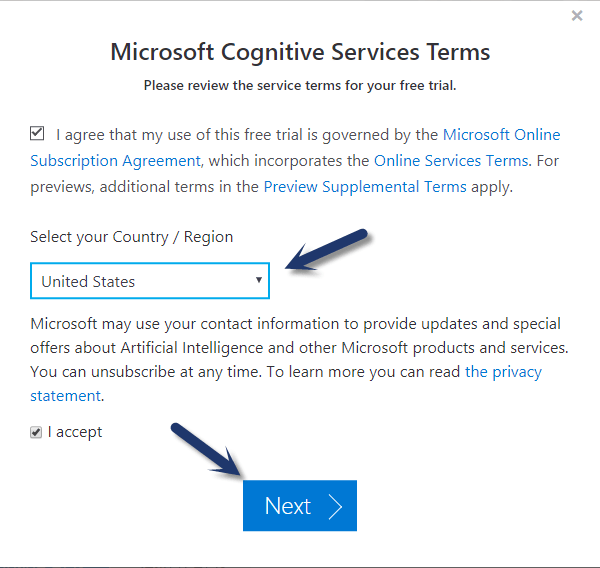
If you would like to try out a free trial, click on “Get Started” in Guest section that prompts for Country, provide the information and click on Next. See sample screenshot below
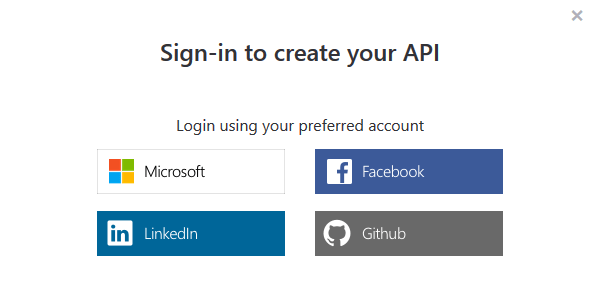
Now it prompts for us to select one of the login mode as shown below
We can sign in with the required option and that would generate us the information for API Key. See sample Text Analytics screenshot below
With the above configurations, sentiment analysis is integrated in our Crow Canyon application and it starts assigning sentiment score and value when new Tickets are created. Sample data below:

3. SLA workflow based on sentiment score
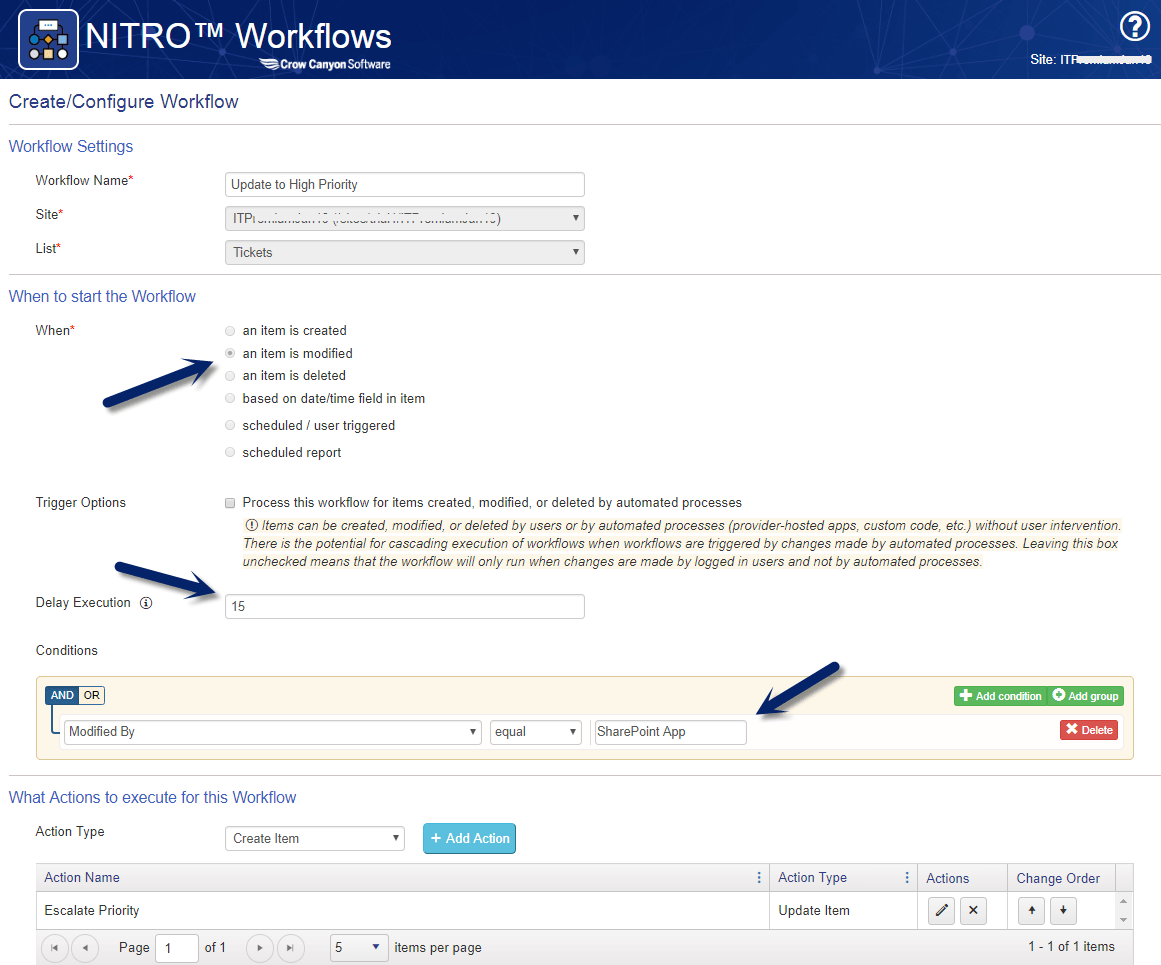
Since our Product app updates the sentiment score and text value on the ticket, these columns can be used in our NITRO Workflows app to automatically set the priority to the required value in the tickets.
See sample SLA Workflow from below
Configure Update item action like below
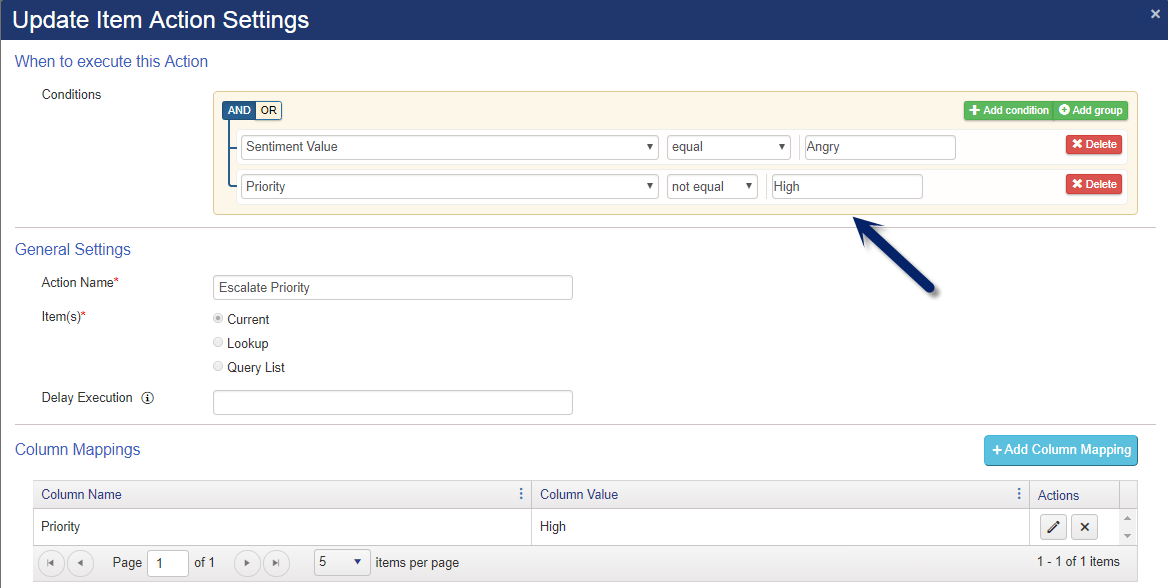
The above workflow will auto set priority to “High” if the sentiment value is “Angry” for the ticket. Similarly, we can configure other update item actions to automate the Priority setting based on Sentiment Value as needed.
Please refer SLA.docx (sharepoint.com) article for more detail on SLA feature.


