Applies To: SharePoint Online
Description:
Case Id is default syntax and can be changed as required. In this article we will take example of changing “Case Id” to “Work Order Id” in our Crow Canyon Application. This requires changes to the notification utilities, any mail templates configured in send mail actions of Workflow manager or Custom Actions, Advanced Email features.
Summary of Steps:
- List schema for Configurations list
- Case Id column name change in Tickets, Archived Tickets lists
- Notification Utilities
- Update the mail templates that are configured using the NITRO Workflows
- Update the mail templates that are configured using the NITRO Custom Actions
- Advanced Email for Tickets list
Steps 3 to 6 are required for subject key change in the notifications and steps 1,2 are required for changing the column name.
Detailed Steps:
-
List schema changes for the Configurations list
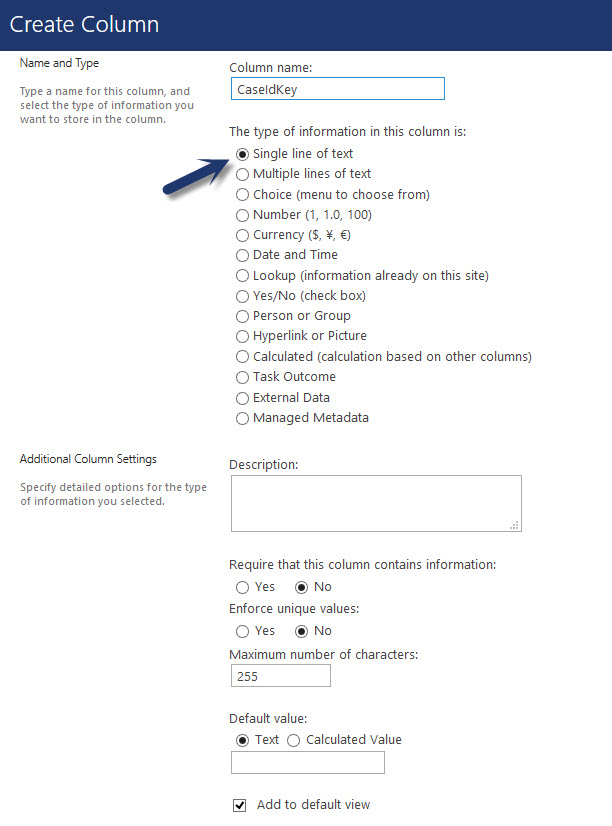
- Go to site contents –> Configurations list –> list settings –> NITRO Forms –> Create a single line of text column with internal name as “CaseIdKey” –> Add the column to General tab and publish the NITRO Forms. See sample screenshot below
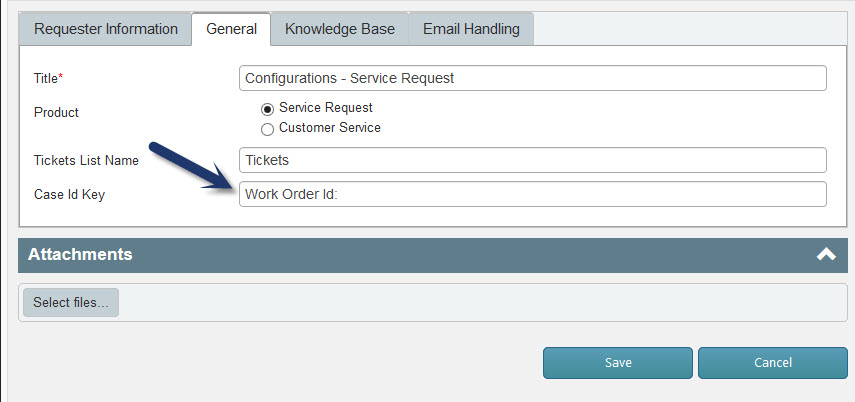
- Go to Application Administration –> General Configurations –> Enter “Work Order Id:” in the “CaseIdKey” column and save the list item.

- Go to site contents –> Configurations list –> list settings –> NITRO Forms –> Create a single line of text column with internal name as “CaseIdKey” –> Add the column to General tab and publish the NITRO Forms. See sample screenshot below
-
Case Id column rename in Tickets and Archived Tickets lists
- Go to Application Administration –> Configure Lists –> Configure Tickets –> edit “Case Id” column and rename the column to “Work Order Id”
- Go to Site Contents –> Archived Tickets list –> List settings –> edit “Case Id” column and rename the column to “Work Order Id”
-
Notification Utilities:
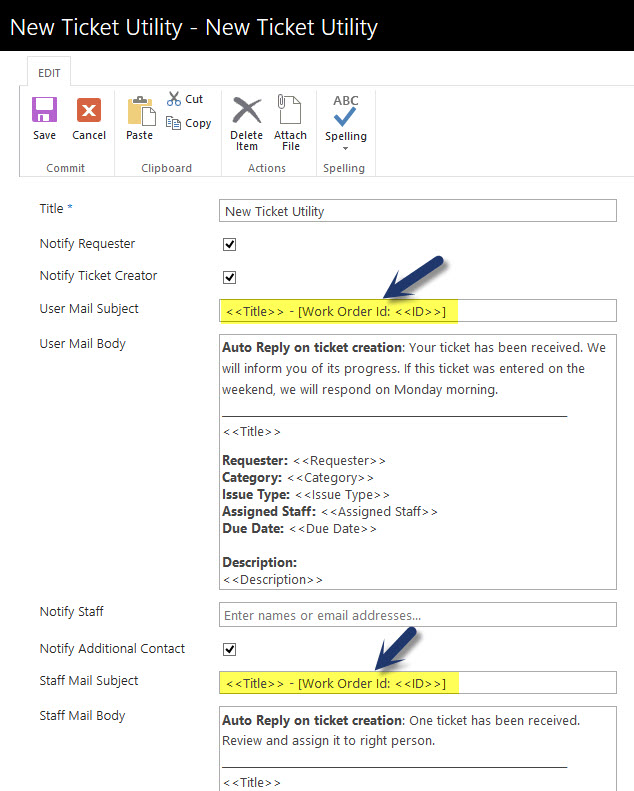
- Go to Application Administration –> Notifications –> edit each notification utility item and update the placeholders from <<Case Id>> to <<Work Order Id>> and click on Ok. See sample screenshot below.

- Go to Application Administration –> Notifications –> edit each notification utility item and update the placeholders from <<Case Id>> to <<Work Order Id>> and click on Ok. See sample screenshot below.
-
NITRO Workflows:
- Go to Application Administration –> Crow Canyon NITRO Apps –> NITRO Workflows –> edit the workflow that has the send mail actions for Tickets list items and update the mail template with the Work Order Id placeholders as needed and save the settings.
-
Custom Actions:
- Please go to site contents –> List settings –> Crow Canyon Custom Actions –> edit the custom action that has the “Send Mail” action –> update the mail template with the “Work Order Id:” instead of case id as needed. For more details in managing mail templates of custom actions, please refer app manual from https://www.crowcanyon.info/nitro/appmanual_v2/index.html?send-mail2.html
-
Advanced Email:
- Go to Application Administration –> Configure Lists –> Configure Tickets –> Crow Canyon Email Manager settings –> update the mail template case id to Work Order Id. For more details in accessing and updating mail templates for advanced email, please refer the app manual from https://www.crowcanyon.info/nitro/appmanual_v2/index.html?configuring-mail-templates.html


