Applies To: SharePoint Online
Description:
- In general Crow Canyon approver feature creates a task for approver and notifies with the link to edit form of the task so that Approver can set the decision and complete the approver task.
- If the approval feature is configured using Crow Canyon Advanced Approval App, then this article does not work. Please refer https://www.crowcanyon.help/article/299/ for sample configurations and reconfigure the approval feature using NITRO Workflow Manager before proceeding with the configurations described in this article.
- This article describe the process to configure NITRO workflows such that approver can make the decision directly from the mail instead of going to task edit form (no login required).
- Idea is, we include the hyperlinks (one for each possible decision like Approve/Deny/etc.) in the approver mail body that opens a new email with pre-filled subject and recipient so approver can click on the desired decision link and click send to confirm the decision.
- Predefined subject contains a syntax that helps understanding the approver task list, approver task item id and decision
- Recipient is a mailbox account that needs to be configured in “Crow Canyon Email Sync” settings in our “Crow Canyon Email Sync” app
Summary of Steps:
- Pre-requisites: This article assumes that the approver feature is already configured as described in the Description above.
- Configure List Schema
- Approver Tasks
- Approver Emails
- Any main list like Tickets/Purchase Requests/etc.
- Email Sync Settings
- Workflow Manager Settings
Configure workflows on “Approver Emails” list on “item created” event and “Approver Tasks” list on “item created” event with required actions as described below using the Crow Canyon NITRO Workflow Manager App- Workflow1: Create a workflow on Approver Tasks list “on item created” event
- Action1: Notify assignee on the approver task creation with the desired links in the mail body to approve/deny
- Workflow2: Create a workflow on Approver Emails list “on Item created” event
- Action1: Get the ID of the Approver task from the email subject
- Action2: Notify the approver if the invalid option sent through mail subject
- Action3: Check and ensure the task is not already completed and update only if the task is not already completed. Decision cannot be overridden
- Action4: Approve the task based on decision key in mail subject
- Action5: Deny the task based on decision key in mail subject
- Workflow1: Create a workflow on Approver Tasks list “on item created” event
Detailed Steps:
To support approve via email feature, we need to create certain lists and fields as described in this section.
Approver Emails list (Announcements type list):
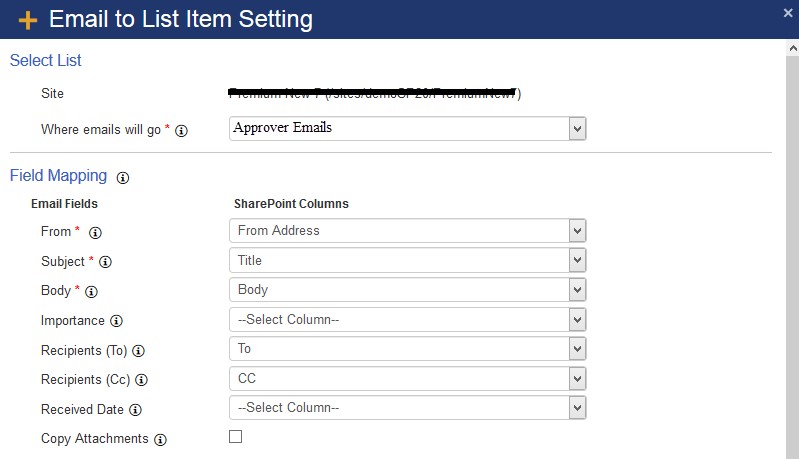
This list will be used in Crow Canyon Email Sync settings and will be used in approver mail template, so when approver click on the decision link and send mail, email reaches to this list and it will be processed further by Crow Canyon NITRO Workflows app.
Required Fields:
- To (Single line of text)
- Sender (Single line of text)
- Title (Single line of text)
- Body (Multiple lines of text field – Enhanced Rich text)
Approver Tasks list:
This article assumes that “Approver Tasks” list already present in the system. List of columns that are used in this article:’
- Decision (Choice column with two possible options “Approve” and “Deny”)
- Comments (Multiple lines of text column)
- Task Status (Choice column with “Completed” as one of the possible options)
- Configure Email Sync settings using Crow Canyon Email Sync app on “Approver Emails” list as shown below. Pre-requisite is to have a valid mailbox that can be accessed using on-premises or online exchange web services.
Please refer “https://www.crowcanyon.info/nitro/appmanual_v2/index.html?configuring-email-sync.html” for Email Sync App complete manual.
Workflow Manager Configurations:
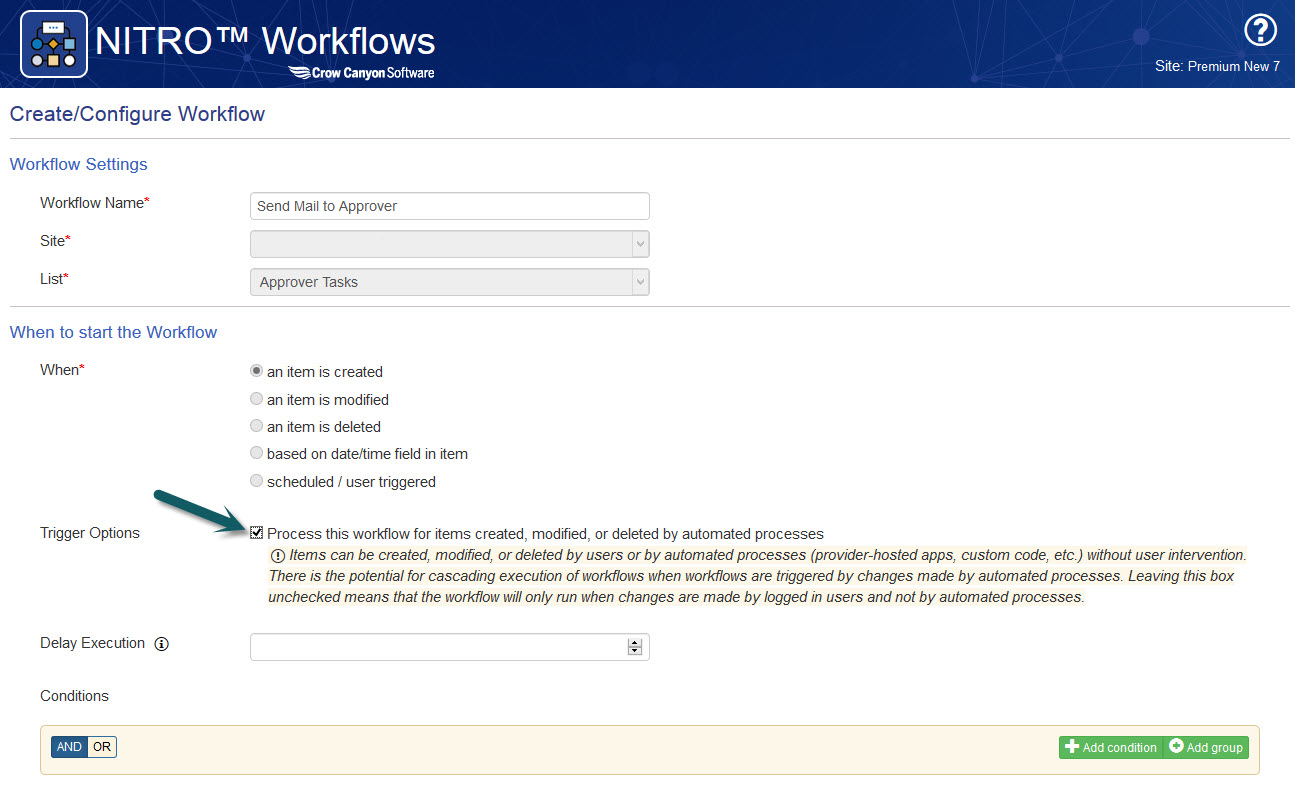
Workflow1: Create a workflow on Approver Tasks list “on item created” event as showed in below screenshot.
Note: If there is already an existing workflow with “Send Mail” action on “Approver Tasks” list item creation event, modify the existing send mail action and reconfigure the mail template as described below, otherwise create new workflow.
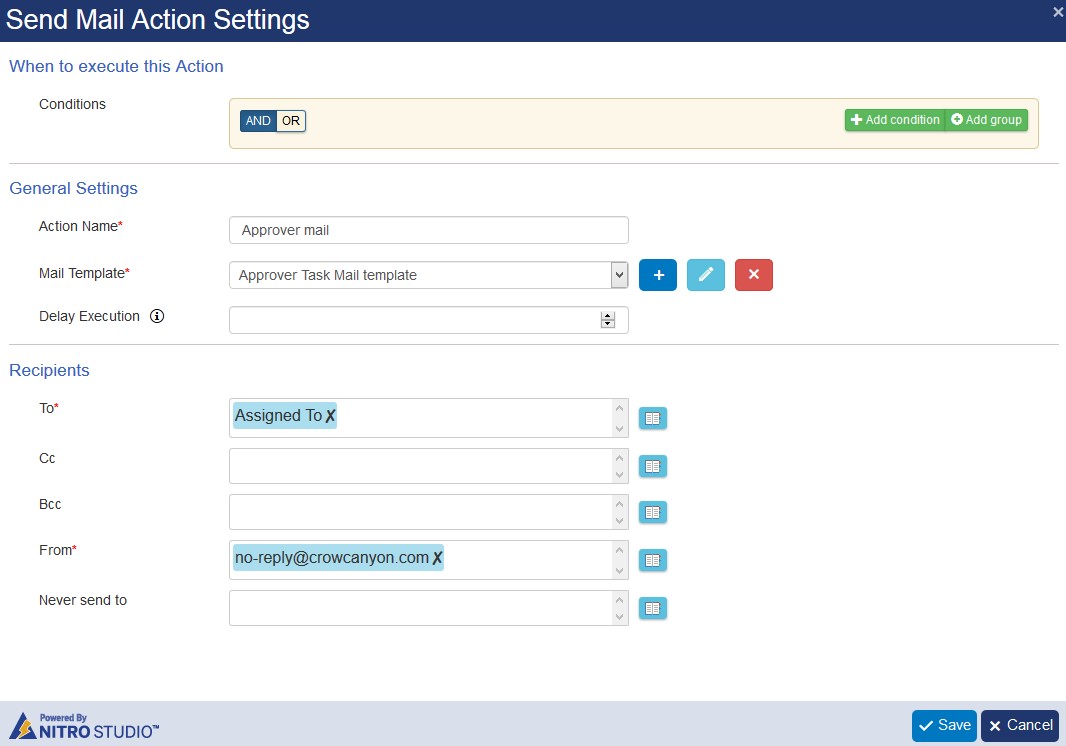
Action1: Create a “Send Mail” action as shown below
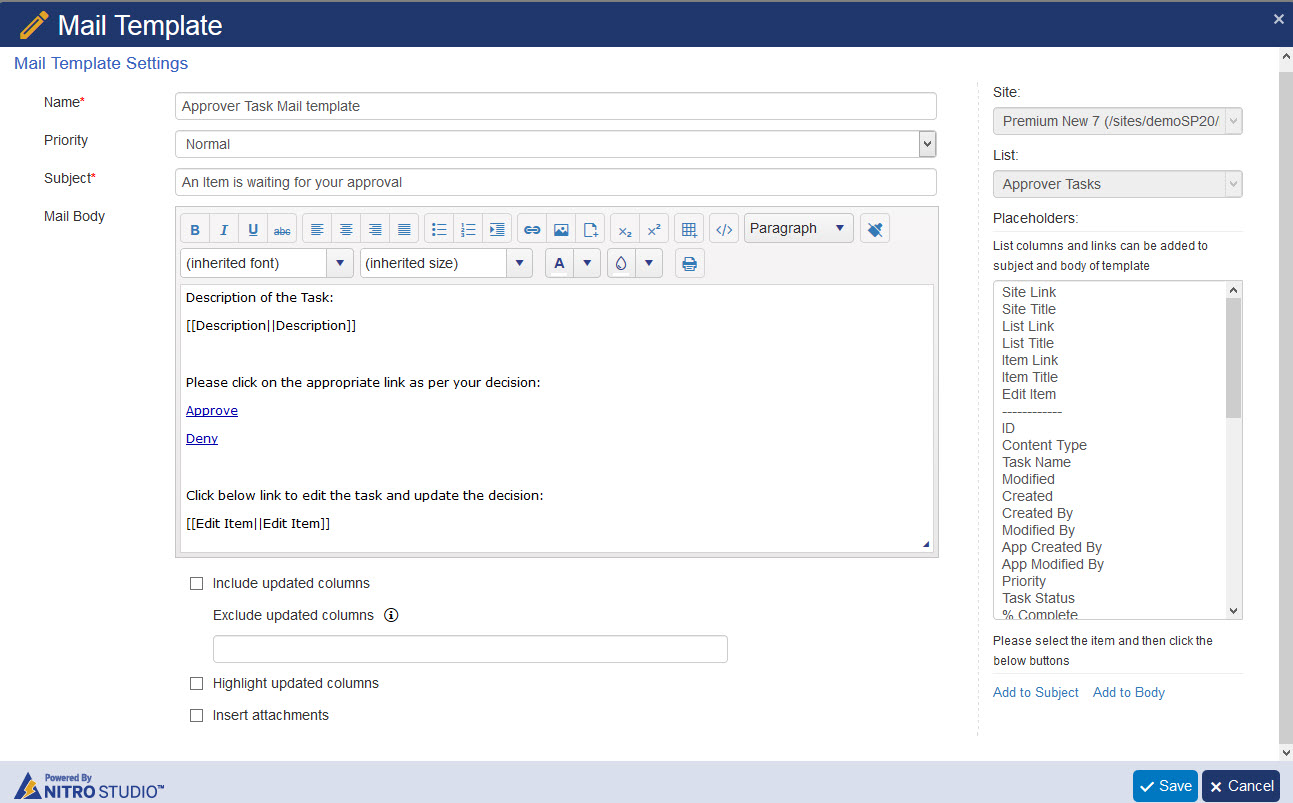
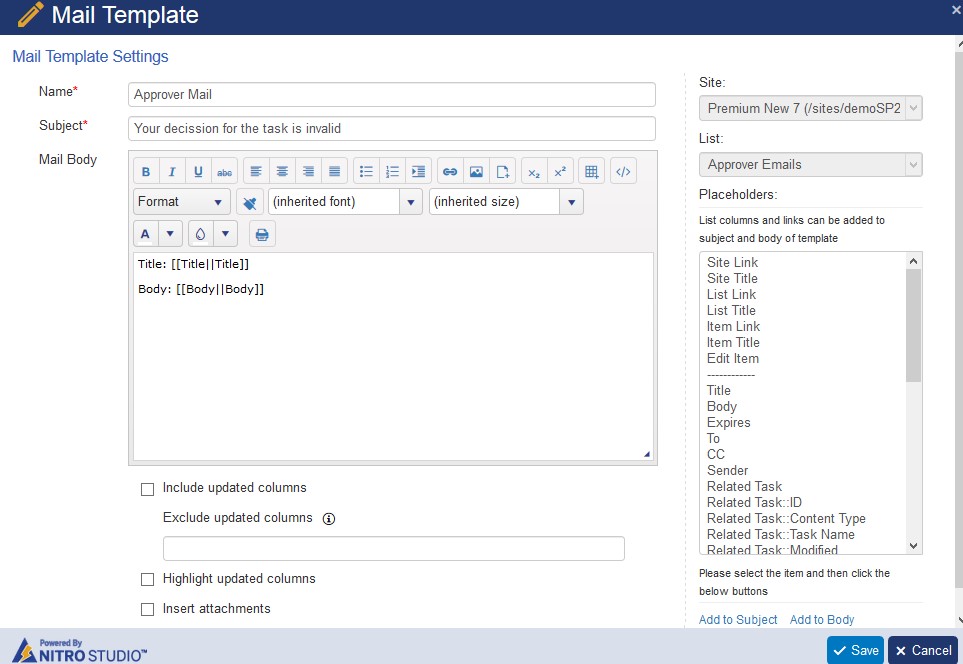
Configure the Mail Template as shown below
The body of the above mail template has three hyperlinks, one for each possible decision. To configure these links, please insert the hyperlinks in the body as shown below
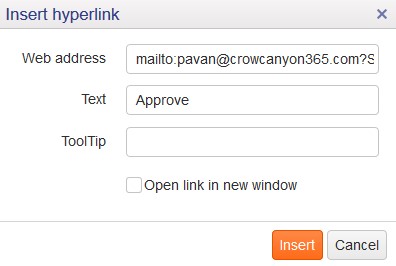
The links can be configured as shown below. As per the configurations described in this article, it should follow the same syntax (List Name Key – ID – Decision Key).
- Approve
mailto:email@domain.com?Subject=Approver Tasks - [[ID||ID]] – Approved
- Deny
mailto:email@domain.com?Subject=Approver Tasks - [[ID||ID]] – Denied
- The email Address in the above syntax (email@domain.com) is the email account that is used in Email Sync settings in Crow Canyon Email Sync app in above steps.
- List Key (Approver Tasks) is the “Approver Tasks” list name configured as per the list schema above
- ID and Decision Key (Approved/Denied) options are used in workflow configurations to identify approver decision and update corresponding approver task
Workflow2: Create a workflow on “Approver Emails” list on “an item is created” event as shown below
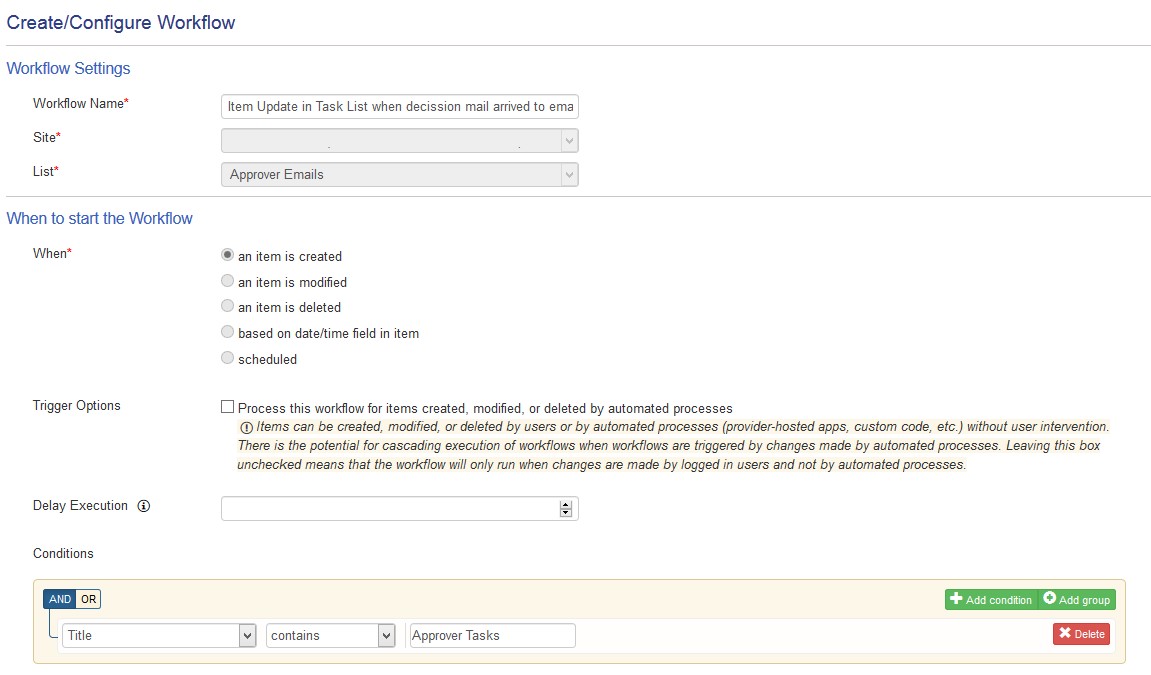
Action1: Configure a “WF Variable” action to find the approver task ID from the mail subject.

Value: $regextract([Title|Title],@.*- (\d+) -.*)
Action2: Create a “Send Mail” action with conditions as shown below
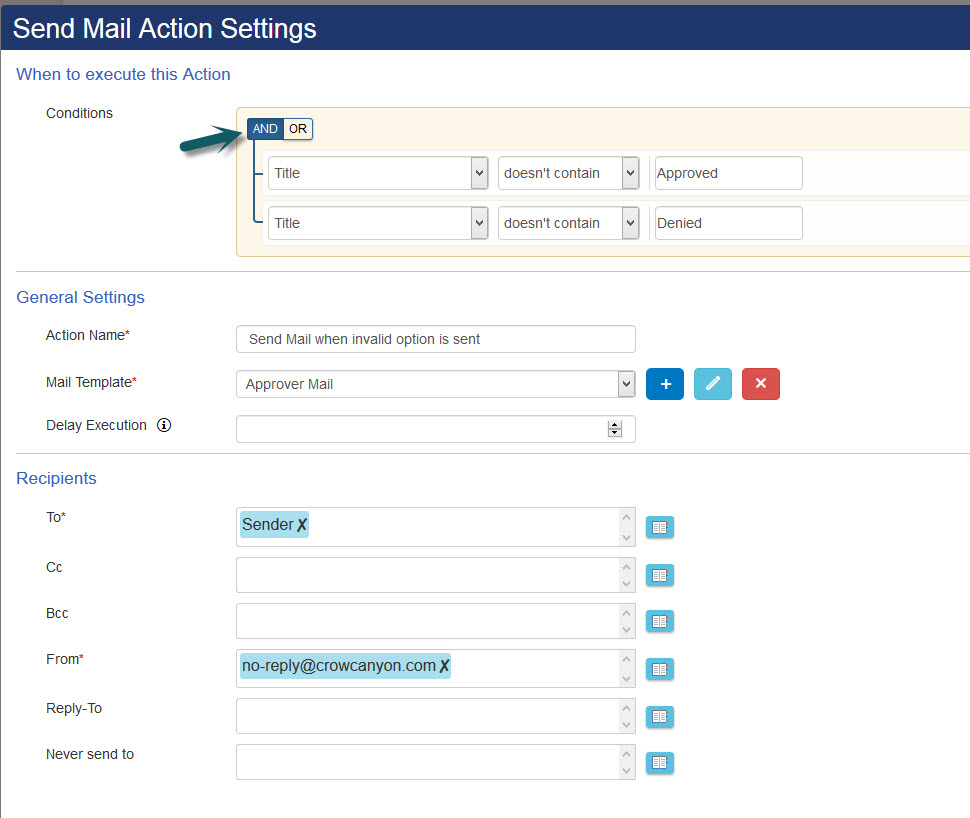
Configure the mail template using the placeholders as shown below (note: these are sample configurations, one can configure as per the need)
Action3: Configure a “Query List” action to get the corresponding approver task from the “Approver Tasks” list and see whether the task is already completed or not. Further actions will be executed only if the approver task is not already completed. See screenshot below.
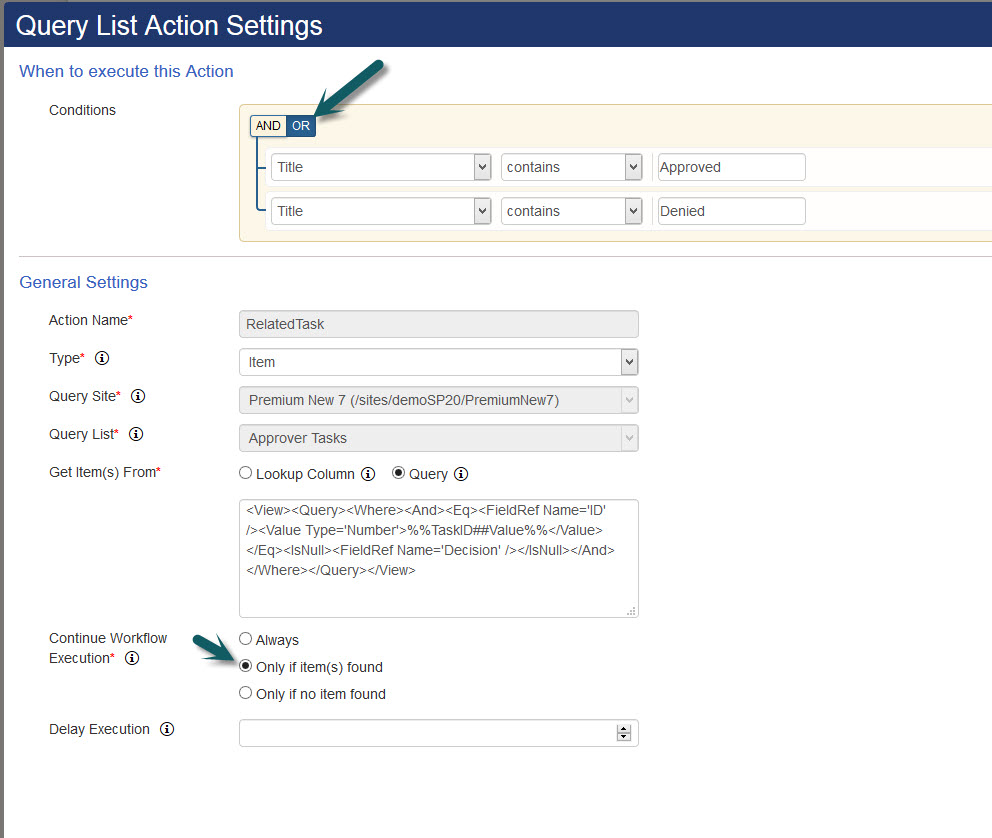
Query: <View><Query><Where><And><Eq><FieldRef Name='ID' /><Value Type='Number'>%%TaskID##Value%%</Value></Eq><IsNull><FieldRef Name='Decision' /></IsNull></And></Where></Query></View>
Action4: Configure an “Update Item” action to set the approver decision as “Approve” as shown below.
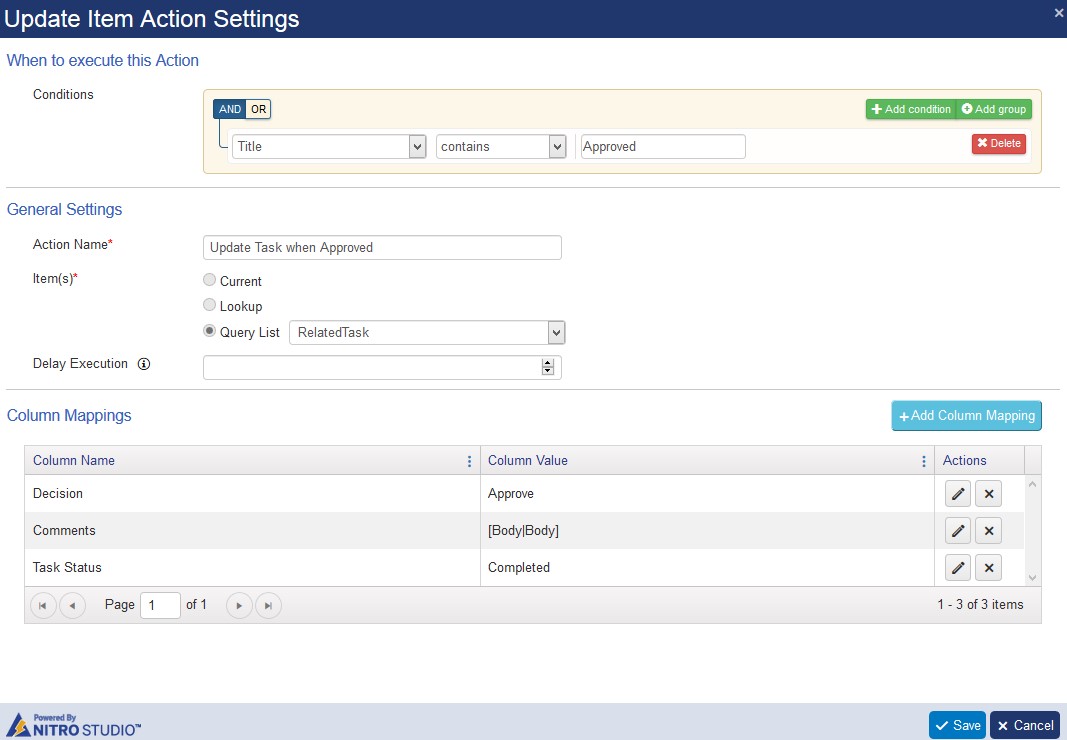
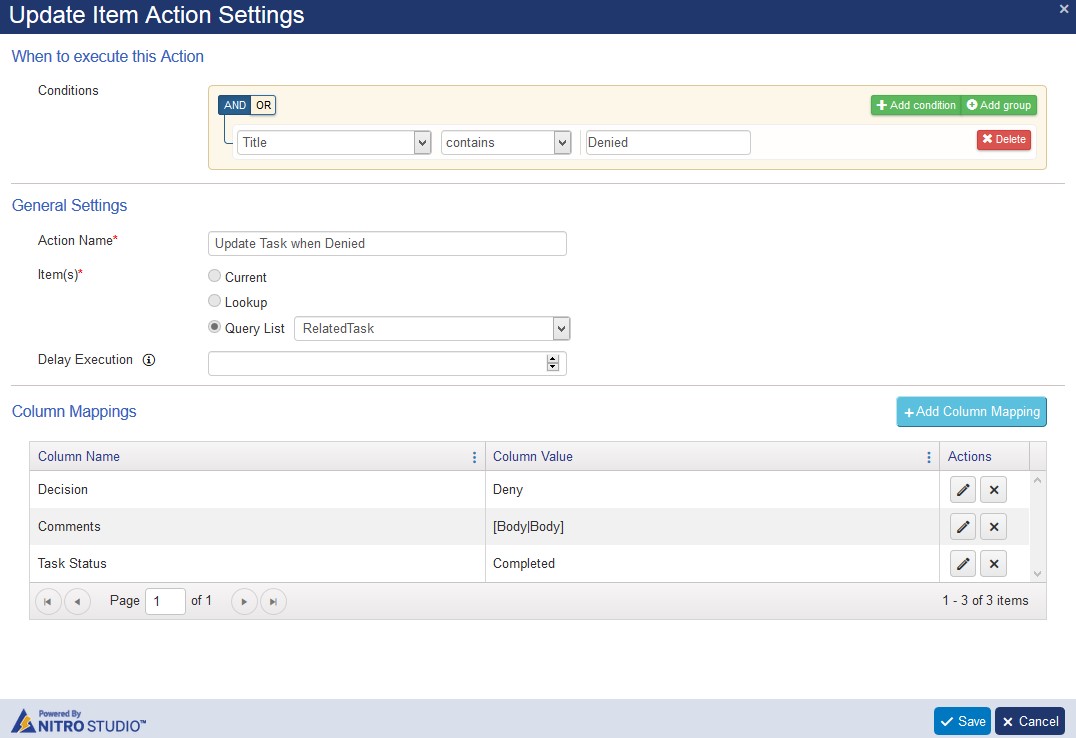
Action5: Configure an “Update Item” action to set the approver decision in “Deny” as shown below
Note: In complex cases where there are multiple approver tasks lists exist, we can use the same email address in Crow Canyon Email Sync settings, however, create new workflow on Approver Emails list with different conditions as needed and configure workflows on the other approver tasks list as well with appropriate mail templates.


