Applies To:
SharePoint Online
Description:
In Crow Canyon IT/Facilities/Requests applications, there is a column “Work Log” which is version enabled so all the comments are stored in its own version along with user and time stamp. Out of the box Crow Canyon application’s product app could include only the latest comment entered into this “Work Log” during the ticket close event. This article describes possible work around to include all Work Log versions along with the known limitations.
We are capturing two different types of information in “Work Log” column:
- User entered comments i.e. someone add comments in “Work Log” column either from portal or back end ticket form
- System updates the “Work Log” if someone sends an email to SharePoint if ticket’s case id syntax present in the mail subject
We can configure such that all comments entered by user (#1 above) are included in the notifications by following the steps described in this article but we cannot include system updates (#2 above) with configurations.
Summary of Steps:
- Create new column “hiddenWorkLog” of type “Multiple lines of text (Enhanced Rich)” in Tickets list.
- Configure back end Tickets list New and Edit forms with submit action
- Configure Portal Ticket Edit form with submit action
- Configure mail templates Notification on Ticket Completion utility
Detailed Steps:
1. Create new column “hiddenWorkLog” of type “Multiple lines of text (Enhanced Rich)” in Tickets list
Go to Tickets list settings, create new column with the name and type mentioned above. This column will be used to copy the Work Log entries every time when someone add comments to “Work Log” column. This column won’t be shown on the form but it will be used in the mail templates.
2. Configure back end Tickets list New and Edit forms with submit action
Go to Tickets list, list settings, Crow Canyon NITRO Forms, configure the following
- Check “Hide Save Button” checkbox under “Layouts and Theme” section.
- Set the “Bottom Action Panel Button Align” value to “Right” under “Layouts and Theme” section.
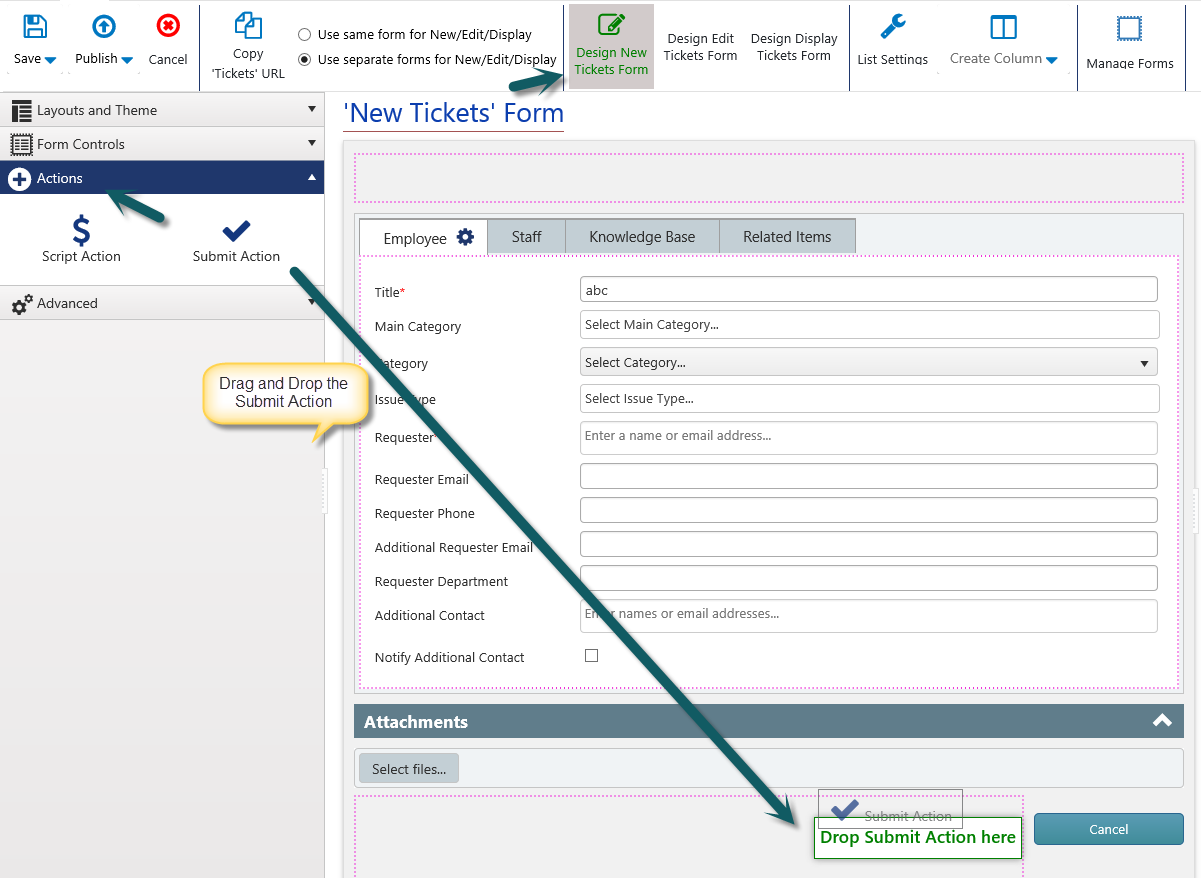
- Add “Submit Action”. Drag and drop Submit action from “Actions” section into the form beside the “Cancel” button. (See Screenshot 1 below)
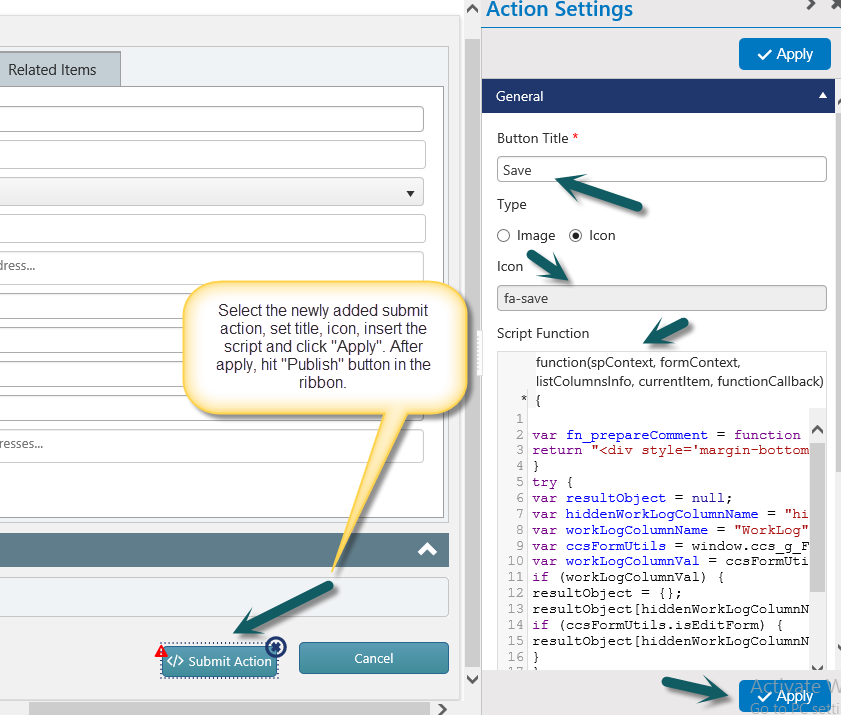
- Select the newly created “Submit Action”, Set “Button Title” to “Save”, set the desired icon and paste the below whole script into the “Script Function” text box in “Action Settings” section on the right side of the designer surface and click “Apply”. Publish the form. (See Screenshot 2 below)
- Repeat above four steps in “Edit Tickets Form” as well.
Script:
var fn_prepareComment = function (currUserName, comment) {

return "<div style='margin-bottom: 20px;'><div><strong>" + currUserName + "</strong> (" + (new Date()).toLocaleString() + ")</div><div>" + comment + "</div></div>";

}

try {

var resultObject = null;

var hiddenWorkLogColumnName = "hiddenWorkLog";

var workLogColumnName = "WorkLog";

var ccsFormUtils = window.ccs_g_FormUI;

var workLogColumnVal = ccsFormUtils.fetchColumnValueUI(workLogColumnName);

if (workLogColumnVal) {

resultObject = {};

resultObject[hiddenWorkLogColumnName] = fn_prepareComment(ccsFormUtils.getCurrentUserName(), workLogColumnVal);

if (ccsFormUtils.isEditForm) {

resultObject[hiddenWorkLogColumnName] += ccsFormUtils.listItem.get_item(hiddenWorkLogColumnName) || "";

}

}

functionCallback(false, resultObject);

}

catch (ex) {

functionCallback(false, null);

}
Screenshot 1 (How to add Submit action?):
Screenshot 2 (How to insert the script in Submit Action button?):

3. Configure Portal Ticket Edit form with submit action
Go to Portal site, Portal Settings, Edit the Tickets list form under “Portal Forms” section, and repeat the steps described in the #2 above. Since Portal tickets list form does not contain the “Work Log” column in the new form, these configurations are required only in edit form.
4. Configure mail templates Notification on Ticket Completion utility
Go to Application Administration, Notifications, click on “Notification on Ticket Completion” tile, replace “<<Work Log>>” column place holder with “<<hiddenWorkLog>>” in “User Mail Body” and “Staff Mail Body” columns and save the item.


