Applies to:
Crow Canyon helpdesk applications (SharePoint Online)
Description
Auto-assignment refers to assigning new Tickets (or Requests) automatically to specified staff based on the configured rules. This can be done in following ways:
- Based on the Category and Issue Type. Specific staff users can be set for each category and issue type.
- Based on users in the staff list. This list has all the staff users and assignment is done based on staff load or in round-robin fashion.
Steps to configure auto assignment
Auto assignment feature can be enabled in the configuration item in all Crow Canyon helpdesk applications.
- Go to application administration page -> Auto Assignment tab -> Click ‘Ticket Assignment’ tile and select ‘Auto-assign Staff Selection’ as per the requirement.
Auto assign staff selection can happen in below ways:
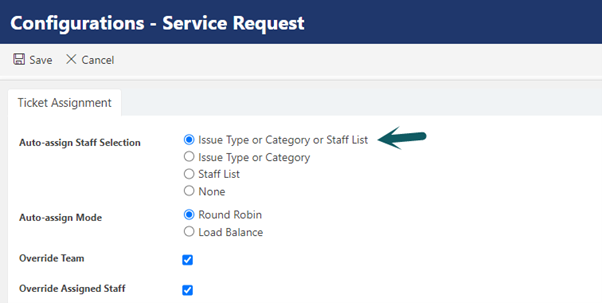
- Issue Type or Category or Staff List:
Select this option to auto assign Ticket with below priority order:
- If Ticket is created with an Issue Type and selected Issue Type has staff and team, then Ticket will be assigned to that staff and team. This will take the highest precedence.
- Else if selected Category has staff and team, then Ticket will be assigned based on the staff and team in the selected Category. This will take the second highest precedence.
- Else if selected category doesn’t have designated staff and team, then Ticket will be assigned based on the users in the “Staff” list.
2. Issue Type or Category:
Select this option if “Staff” list is not to be used and only assign based on the selected Issue Type and Category.
3. Staff List:
- Select this option to auto assign Ticket only based on the users in the “Staff” list.
4. None:
- Select this option to disable the auto assignment feature.
Auto-assign Mode:
Selection of staff user for auto-assignment can be done in below ways:
Round Robin:
- By default, this option is selected. Staff will be assigned in round robin fashion. Multiple users can be specified in the Category and Issue Type items.
- For example,
- ‘VPN Access’ category has “John Smith“ and “Joe Bloggs” in the Assigned Staff column.
- First Ticket created with this category will be auto assigned to “John Smith”.
- Second Ticket created with this category will be auto assigned to “Joe Bloggs” and the cycle will repeat.
Load Balance:
- Select this option to auto assign the Tickets to the staff user with lowest number of assigned active Tickets. This count is maintained by the application in the ‘Staff’ list.
- Maintain users in “Staff” list.
- Staff list has “Tickets Count” and this count will be updated whenever Ticket gets assigned to a staff.
- For example,
- “John Smith” has 5 Tickets and “Joe Bloggs” has 3 Tickets.
- If Ticket is created, then it will be assigned to “Joe Bloggs”.
Configure staff in Category, Issue Type or Staff list:
Category
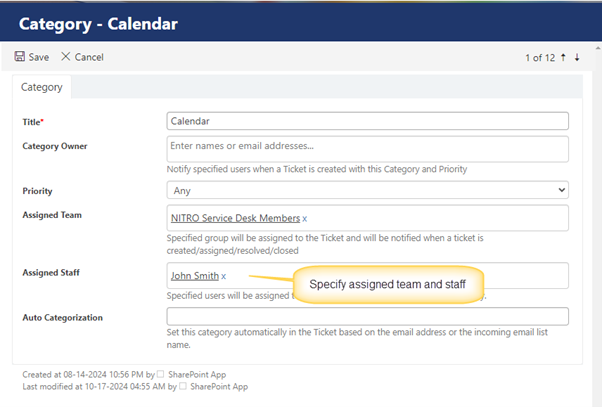
To specify the staff and team in Category, go to Application Administration -> Categorization tab -> Edit the Category -> Specify the “Assigned Team” and “Assigned Staff”.
Issue Type
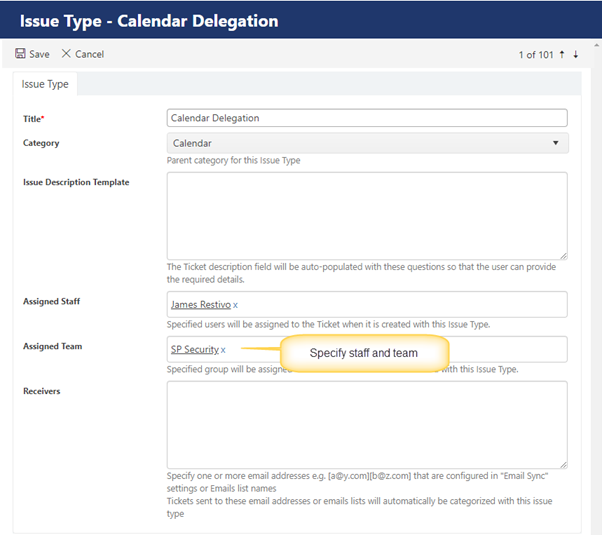
To specify the staff and team in Issue Type, go to Application Administration -> Categorization tab -> Edit the Issue Type -> Specify the “Assigned Team” and “Assigned Staff”.
Staff List
To create the users in staff list, go to Application Administration -> Auto Assignment tab -> Create users in “Staff” list.

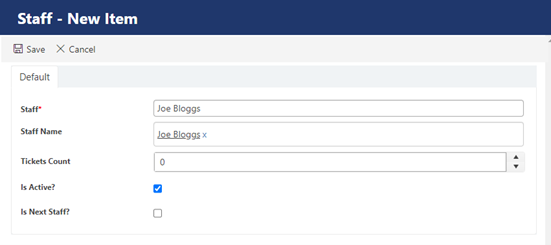
Staff: Specify title for staff user.
Staff Name: Ticket will be assigned to the user specified in this column.
Tickets Count: This value is zero in the beginning. It will be increased by 1 whenever a Ticket is assigned to that user.
User with lowest Tickets count will be assigned the next Ticket (if load balance option is selected).
Is Active?: Staff can be marked as inactive if they are on leave or cannot work on Tickets for any other reason. Inactive staff will not be considered for auto-assignment.
Is Next Staff?: This is used for round-robin assignment and is used by the application to select the next staff for assignment. Please do not modify the value of this column.
Override team and staff on Category and Issue Type change
Ticket is auto assigned and modified the category/Issue Type on Ticket update, enable override feature to reassign the Staff and Team as per the selected category/Issue Type.
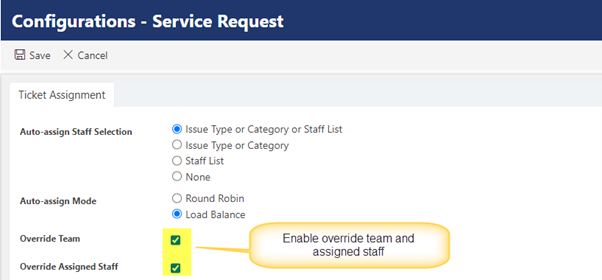
To override the staff and team on Category and Issue Type change, go to application administration page -> Auto Assignment tab -> click ‘Ticket Assignment’ tile -> Enable “Override Team” and “Override Assigned Staff”.
Auto-assignment behavior
- If Ticket is already resolved or closed, then auto-assignment is not done. For example, if Ticket does not have a staff set, and it is categorized while being resolved, application will not auto-assign at this stage.
- If Ticket is auto assigned by application, and Ticket status is not equal to ‘Unassigned’, then status is not changed by the application. Ticket status is changed to ‘Assigned’ only if status before the auto-assignment is ‘Unassigned’.
- If user creating/updating the Ticket manually specifies the staff/team in the Ticket:
- If Override is not enabled, then auto-assignment will not be done, and user specified values will not be changed
- If Override is enabled, then user specified values will not be changed if auto-assignment is not already done, otherwise application will reassign the staff/team.
- If Category/Issue Type is changed in the Ticket:
- If Override is not enabled, then reassignment will not be done.
- If Override is enabled, then application will reassign the Ticket to staff in the new Category/Issue Type
5. If Ticket is edited and staff is cleared, then application will set the staff based on selected Category/Issue Type again if override is enabled. If override is not enabled, then staff will not be set in this case.

